

Maine winters are not a suggestion. By the time November rolls around in Bangor, Portland, or Augusta, you are already dealing with sub-freezing overnight temps, accumulated ice on flat rooftops, and the kind of wet, heavy snow that makes every outdoor task twice as hard. If you are running tear-offs, gut renovations, or junk-removal jobs through the cold season — and plenty of Maine contractors do — your debris chute is working in conditions it was not necessarily designed around.
The good news: a well-maintained fabric debris chute holds up through a New England winter just fine. The bad news: most crews skip the five-minute pre-job inspection, store their chutes wrong in the off-season, and then wonder why sections are cracking, connectors are sticking, or fabric is pilling by February. This guide covers every maintenance step worth knowing, written specifically for the conditions Maine contractors face from late October through early April.
Why Winter Conditions Hit Debris Chutes Harder Than Contractors Expect
Fabric debris chutes are built tough — woven, coated poly fabric resists abrasion and puncture better than most people assume. But cold temperature introduces a physics problem. Polymer-based coatings become stiffer and more brittle at low temperatures. The overlap connections that zip together cleanly at 60 degrees Fahrenheit can become stubborn and unforgiving at 20 degrees.
Add moisture — rain, sleet, or snowmelt — and you have a situation where wet fabric can freeze mid-job if you have to pause for more than a few hours. Ice inside a folded chute section turns what should be a one-person carry into a wrestling match. And debris coming down a frozen chute interior creates unpredictable friction patterns that can cause hang-ups or sudden surges, neither of which is ideal when you are working on a rooftop in Caribou in January.
The Three Forces Maine Winters Apply to Your Chute
- Thermal contraction: Fabric and hardware shrink slightly in the cold. Loops and carabiner points bear more stress when the material is less flexible.
- Ice loading: Snow or ice accumulating inside or on the exterior of a hanging chute adds weight the system was not necessarily tensioned for.
- Freeze-thaw cycling: Repeated freezing and thawing — common in coastal Maine — degrades seams and coatings faster than consistent cold does.
Pre-Season Inspection: What to Check Before the First Cold Job
Before you hang a chute on a job site in October or November, pull every section out and do a systematic inspection. This takes under fifteen minutes and will tell you whether a section needs repair, replacement, or is good to go for winter work.
Fabric and Coating Inspection
- Lay each section flat or hang it vertically. Look along seams under good light — a headlamp works fine on overcast days.
- Feel for areas where the poly coating is flaking, peeling, or has gone brittle. Run your thumb across the surface; it should feel smooth and slightly waxy, not chalky or papery.
- Look for any punctures, tears, or abrasion patches larger than a quarter. Small scuffs are cosmetic. Anything that penetrates the weave needs a patch or replacement.
- Check the overlap zones — the areas where sections connect with a 1.5 ft overlap. These get the most handling stress and are often the first place coatings degrade.
Hardware and Loop Inspection
- Inspect all four woven loops on each section. Look for fraying, cuts, or discoloration that suggests UV degradation from last summer's rooftop work.
- Test each loop by pulling firmly with both hands. It should not stretch significantly or show stress whitening in the weave.
- Check your carabiners and quick-connects. Cold steel carabiners can be slow to gate-open in winter; make sure the gate springs are functioning and there is no rust forming at pivot points.
- If you use locking carabiners, cycle the lock collar a dozen times to confirm it moves freely. Cold lubricant thickens; a seized locking carabiner at elevation is a safety problem.
Section Labeling
Winter jobs move fast. If you are running a 50 ft chute made up of multiple sections, label each section with a paint marker or weatherproof tape before the season starts. This saves time during teardown in the dark and cold, and helps you track which sections have accumulated the most wear cycles.
Proper Off-Season and Between-Job Storage in Cold Climates
How you store your chute sections between jobs — and during the off-season — directly determines how long they last and how easy they are to deploy when it is 25 degrees and you need to move fast. Maine contractors who leave sections folded in an unheated trailer all winter are creating problems they will not notice until mid-season.
Temperature and Moisture Are the Two Enemies
- Avoid storing sections wet. If a chute got rained on or snow-covered during a job, let it dry completely before folding and boxing it. Wet fabric folded into a small box in a cold truck bed can develop mildew along seams, and in a freeze, the fabric layers can bond slightly, making deployment stiff and awkward.
- Avoid unheated metal enclosures in extreme cold. Metal tool boxes conduct cold directly into whatever is inside them. A storage bin inside a heated shop, mud room, or garage maintains the poly coating's flexibility far better than a steel job box left outside.
- Fold loosely, not tightly compressed. EasyChute sections fold into compact boxes, but do not crush them flat under heavy materials. Sustained compression at low temperatures can crease the fabric coating in ways that cause cracking over time.
The Ideal Between-Job Storage Routine
- Shake out any debris — gravel, shingle granules, plaster chunks — before folding.
- Allow the section to air out for at least thirty minutes if it was wet during the job.
- Fold loosely along the natural fold lines and place in the original box or a comparable container.
- Store in a location that stays above freezing — the cab of a truck, an equipment room, or a heated storage unit.
- Coil your carabiners and quick-connects in a separate small bag and store them with the section so you are not hunting for hardware on the next job.
Cold-Weather Deployment: Setup Tips for Frozen Job Sites
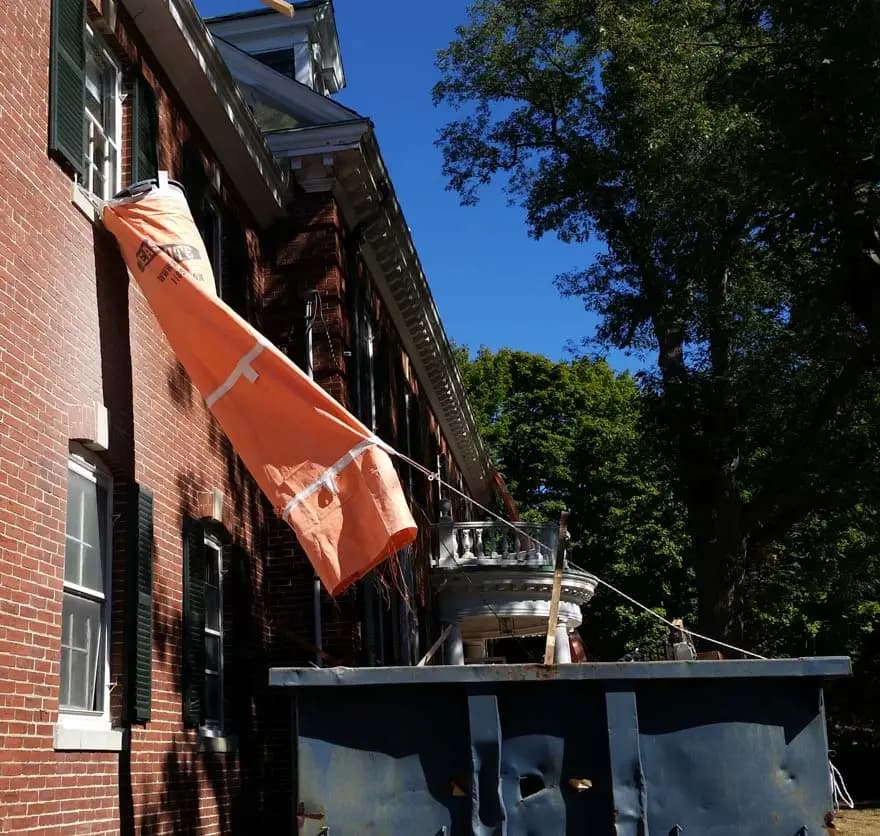
Hanging a debris chute in January in central Maine is a different experience than hanging one in July. The fabric is stiffer, your gloves make fine-motor tasks harder, and the anchor points you are working with — window frames, roof edges, scaffold rails — may have frost or ice on them. Here is how to set up efficiently and safely in winter conditions.
Warm the Sections Before You Hang Them
If your chute sections have been stored in a cold truck or trailer overnight, bring them inside or put them in the cab with the heat running for thirty minutes before setup. Warm fabric is dramatically more cooperative than cold fabric — it unfolds easily, the overlap connections seat properly, and the loops remain flexible enough to thread carabiners quickly. This is a small step that eliminates a lot of fumbling in the cold.
Check Your Anchor Points for Ice
- Wipe or chip ice from window frame lips, scaffold rails, or roof edge anchors before looping carabiners. Ice under a load-bearing connection point reduces friction and can allow the loop to shift.
- Use a dry rag or gloved hand to clear anchor points — do not rely on the debris weight to seat the connection properly if there is ice present.
- If you are anchoring to a scaffold rail in freezing rain conditions, consider a secondary safety anchor at the top section to back up the primary connection points.
Managing Overlap Connections in Cold Weather
The 1.5 ft overlap that connects EasyChute sections is reliable, but cold temperatures make the fabric stiffer and the overlap seating less intuitive. Work the overlap zone with your hands to flex the fabric before connecting. If you are wearing heavy work gloves, take them off for the thirty seconds it takes to properly seat the overlap — the connection matters more than keeping your gloves on during that moment.
For more detail on the installation process, see our step-by-step EasyChute installation guide.
Managing Ice and Snow Accumulation While the Chute Is in Use
An actively running chute on a roofing tear-off or demo job will generally stay clear because debris is moving through it continuously. The problems come during pauses — lunch breaks, material delays, or when a job gets shut down mid-day due to weather. Standing water or snow that enters a stationary chute can freeze inside, creating a partial blockage or stiffening the fabric at a connection point.
During Extended Pauses
- Tie off or cap the top opening if you anticipate a pause of more than an hour in precipitation or below-freezing conditions. A simple tarp draped over the top opening and secured prevents snow accumulation inside.
- If the temperature drops sharply mid-job, do a visual check of the full chute length before resuming debris flow. Run a small test load — a few loose shingles or demo plaster — and watch the trajectory down each section before sending anything heavy.
- Never leave a chute hanging overnight in a storm without securing the bottom end. If the bottom funnel or terminus gets buried in snow around the dumpster, the obstruction can cause debris hang-ups or force material off-course when the job resumes.
Ice Inside Sections: What to Do
If a section has partially frozen internally, do not force debris through it. Lower it to ground level, bring it somewhere above freezing, and let it thaw before rehanging. Forcing heavy debris through a section with ice buildup puts abnormal stress on the fabric and seams, and can create a hang-up that suddenly releases — a hazard for anyone below. OSHA construction safety standards are clear that struck-by hazards from falling debris are among the most preventable on job sites; a blocked chute that suddenly releases is exactly this type of risk.
Post-Job Cleaning and Winter-Specific Wash Protocols
Cleaning a debris chute after a winter job is slightly different from warm-season cleanup. Cold water rinses work, but they will not evaporate quickly — which means you need to actively dry sections before storage rather than relying on ambient air to do it for you.
Post-Job Winter Cleaning Steps
- Shake and invert each section to remove loose debris — gravel, shingle grit, and plaster chunks that did not make it all the way to the dumpster.
- Rinse with water if necessary to remove asphalt or adhesive residue. Use a hose or pressure washer on low if available.
- Wipe down the exterior of each section with a dry cloth or shop rag before folding. Pay particular attention to the overlap zones and loop attachment points.
- Allow full drying in a heated space — a garage, shop, or heated storage unit — before boxing the sections. Even thirty minutes of hang time in a 55-degree room will remove residual moisture from folds and seams.
- Inspect seams after cleaning while the fabric is still unfolded. Post-job is the best time to notice new damage so you can address it before the next job, not on the morning of setup.
Keeping your chute clean also matters from a materials perspective. The EPA estimates that construction and demolition debris accounts for more than 600 million tons of waste annually in the United States — the cleaner and better-sorted your debris stream, the more of that material can be diverted from landfills. A clean chute that deposits debris cleanly into a dumpster supports that goal better than a clogged or damaged one.
Repairing Minor Damage Before It Becomes Major Damage
Fabric chutes are repairable. Small punctures, minor seam separation, and scuffed coating patches are all addressable with the right approach. The key is catching them early — which is exactly why the pre-season inspection matters.
Fabric Patch Repairs
- Use a heavy-duty poly fabric repair tape or a PVC patch kit rated for outdoor use. Standard duct tape is not adequate — it will fail in cold temperatures and peel off under debris friction.
- Clean and dry the patch area thoroughly before applying. Cold surfaces do not bond well; if you are doing a repair in the field, use a heat gun or warm rag to bring the surface up to at least 50 degrees before applying adhesive patches.
- Apply patch material at least 2 inches beyond the edge of the damage in every direction. Patches that just cover the hole will peel from the edges under repeated loading.
When to Replace Instead of Repair
- Seam separation longer than 6 inches that cannot be reliably patched without specialized sewing equipment.
- Loops that show significant fraying, cuts, or weave separation. A loop failure at height is a falling-object hazard — do not patch a compromised loop, replace the section.
- Coating delamination across more than 30 percent of a section's surface. At that point the fabric has lost significant abrasion resistance and debris handling will degrade the section rapidly.
EasyChute sections are priced and sized so that replacing a single worn 10 ft section is far more economical than replacing an entire chute system. See the full debris chute guide for section sizing and configuration options.
Safety Considerations That Are Especially Relevant in Winter
Debris chute safety matters year-round, but winter conditions introduce hazards that are worth calling out specifically. Slippery surfaces, cold hands, reduced visibility in storms, and the tendency to rush jobs before weather worsens all increase risk.
OSHA Ergonomics and Lifting in Cold Conditions
Cold muscles fatigue faster and are more prone to strain. OSHA's ergonomics guidelines recommend limiting manual lifting loads and using mechanical assists wherever possible — which is precisely the argument for a debris chute rather than bucket-and-carry debris removal. A 10 ft EasyChute section weighs under 3 lbs. One person can carry, hang, and strike an entire chute setup in minutes, without the repeated overhead loading that causes shoulder and back injuries during cold-weather manual carry jobs.
Struck-By Hazard Prevention in Icy Conditions
- Establish a ground exclusion zone below the chute. Mark it with cones or barrier tape. In winter, bystanders are less likely to be paying close attention to a job site and more likely to be focused on navigating icy sidewalks.
- Brief your ground crew every morning before starting debris flow. In cold weather, crew communication tends to be shorter and faster — make sure the essential safety information does not get cut.
- If wind is gusting above 25 mph, evaluate whether chute operation is appropriate. High winds can redirect lighter debris or cause the chute to swing, particularly if ice loading has added weight to the fabric.
For a more detailed look at setup best practices, our debris chute setup mistakes guide covers common errors that apply equally in Maine's winter conditions.
Choosing the Right Section Length for Winter Maine Projects
Section selection matters more in winter than in warmer months because longer setups mean more connection points to manage in the cold, and more fabric exposed to wind and ice loading. Here is how to think about it for common Maine project types.
Roofing Tear-Offs
Maine roofers working through early winter — particularly on the coast where the shoulder season stretches later — are typically dealing with one- and two-story residential work. A single 25 ft section or two 10 ft sections connected is usually sufficient for most residential steep-slope work. For commercial flat roofs or three-story buildings, a 50 ft section gives you a single continuous run with no mid-span connections to manage. See the complete roofing trash chute guide for tear-off specific setup advice.
Interior Demo and Gut Renovations
Winter interior work in Maine is common — heated spaces where crews demo kitchens, bathrooms, and older building systems. Interior gut work typically involves chuting material out of a window opening, so section length is determined by floor height plus the drop to the dumpster. The demolition chutes guide covers interior gut work configurations in detail.
Multi-Story Commercial Work
For commercial buildings over three stories in winter conditions, connecting multiple sections with careful attention to overlap seating in the cold is essential. Work top-down when connecting sections, and have one crew member dedicated to confirming each overlap connection before debris flow starts. The commercial vs. residential debris chute comparison outlines the key differences in multi-story setups.
The Economics of Year-Round Chute Use vs. Seasonal Storage
Some Maine contractors mothball their debris chutes after October and absorb the inefficiency of bucket-and-carry or manual relay systems through the winter. This is understandable — winter jobs can be sporadic, and it feels like one less thing to manage. But the economics usually favor keeping your chute operational year-round.
Consider: a roofer doing a one-day shingle tear-off on a two-story home without a chute will have two or three crew members making repeated trips to carry or throw shingles to ground level. Those labor hours add up fast. Even in winter, the fifteen-minute setup and teardown time for a chute pays back in reduced labor within the first hour of a job. For junk removal crews working apartment cleanouts in multi-story buildings through the winter, a chute running out a window opening eliminates stair runs entirely.
EasyChute sells at fixed prices with free shipping, so there is no premium for getting sections delivered to a Maine job address. See the real cost breakdown for trash chute rental vs. ownership to run the numbers for your specific situation.
Frequently Asked Questions
Can a fabric debris chute be used in temperatures below zero?
Yes, with appropriate preparation. The main concern at extreme cold temperatures is fabric stiffness — woven poly coatings become less flexible below zero Fahrenheit, which makes overlap connections harder to seat properly and loops harder to work with gloved hands. Warming sections in a heated cab or shop before deployment largely eliminates this issue. During the job, active debris flow keeps the chute interior from freezing. The primary risk is ice accumulation during extended pauses, which should be managed by capping the top opening and doing a test run before resuming full debris flow.
How do I keep my chute sections from freezing together when stored?
The key is drying sections completely before folding and storage. Wet fabric that is folded and stored in a cold environment can freeze with the layers bonded together, making deployment difficult. After every winter job, allow sections to air-dry in a heated space for at least thirty minutes before folding into their storage boxes. Store boxes above freezing — in a truck cab, heated shop, or equipment room — rather than in an unheated trailer or outdoor storage container. Loosely folded sections also freeze together less readily than tightly compressed ones.
Do I need to do anything special to the loops and carabiners for winter use?
Inspect loops for fraying or weave stress before the season. For carabiners, the main winter concern is gate function — cold temperatures slow the gate spring and can cause locking collars to seize. Cycle every carabiner gate multiple times before hanging a section in cold conditions to confirm full function. If you use locking carabiners, check that the collar moves freely and is not corroded. A light application of dry lubricant on the gate pivot and collar thread at the start of the cold season will keep hardware functioning properly through Maine's winter months.
How often should I inspect sections during a multi-day winter job?
Do a visual inspection at the start of every workday and after any significant precipitation event — heavy snow, freezing rain, or a wind event overnight. The inspection takes under five minutes: walk the full length of the hanging chute, check each connection point for seating, verify the top anchor loops are secure, and confirm the bottom end is clear of snow accumulation around the dumpster. After any storm shutdown and restart, run a small test load before resuming full debris flow to confirm the chute interior is clear and the sections are tracking properly.
What is the safest way to strike and pack down a chute in cold weather?
Work top-down, same as warm weather, but allow extra time — cold fabric and stiff hardware make each step slightly slower. Remove carabiners one anchor point at a time and hand sections down rather than dropping them, since frozen fabric can crack at sharp fold lines if dropped from height. Shake each section out thoroughly before folding; cold debris — especially ice chunks and frozen shingle granules — can be heavier than expected and should not be carried inside a folded section. Pack sections loosely and get them into a heated space before the end of the day if possible.
Are there Maine-specific regulations about debris chutes on job sites?
Maine follows federal OSHA construction standards, which require that debris removal systems prevent material from falling freely where it could strike workers or bystanders. A properly rigged debris chute satisfies this requirement by containing and directing material into a dumpster or designated drop zone. Always establish a marked exclusion zone below the chute during operation. For specific site permit requirements — particularly in historic districts or on urban streets — check with your local municipality, as some Maine cities and towns have additional requirements around dumpster placement and sidewalk protection that affect how you configure your chute terminus.
Can I use EasyChute sections for both roofing and interior demo jobs in winter?
Yes. EasyChute sections are not application-specific — the same 10 ft or 25 ft section that runs shingles off a rooftop can be repositioned to chute plaster, drywall, or demo debris out of a window opening on an interior gut job. The only configuration difference is anchor point selection and section length. Interior work typically requires fewer sections because floor-to-dumpster drops are measured inside the building footprint, while rooftop chutes need enough length to clear eaves and reach the dumpster below. See the fabric trash chute overview for configuration guidance across both applications.
Ready to Keep Your Debris Chute Running All Winter Long?
Maine contractors who maintain their debris chute properly going into the cold season show up to winter jobs with a tool that is ready to work — not one they are fighting with in the driveway at 7:00 AM when it is 18 degrees and the crew is waiting.
The steps are not complicated: inspect before the season, store dry and above freezing, warm sections before deployment, manage ice accumulation during jobs, and clean thoroughly after each use. A lightweight EasyChute section weighing under 3 lbs does not care whether it is August or January as long as you are treating it right.
If you have questions about which section lengths are right for your winter job types, or you want to get eyes on the product before ordering, visit our EasyChute video library to see the chute in action on real job sites. You can also read answers to common setup questions in our EasyChute FAQ, or reach out directly — we are based in Massachusetts and know exactly what cold-season construction work looks like on this side of the country.
Demo it. Bag it. Chute it. Even in January.