
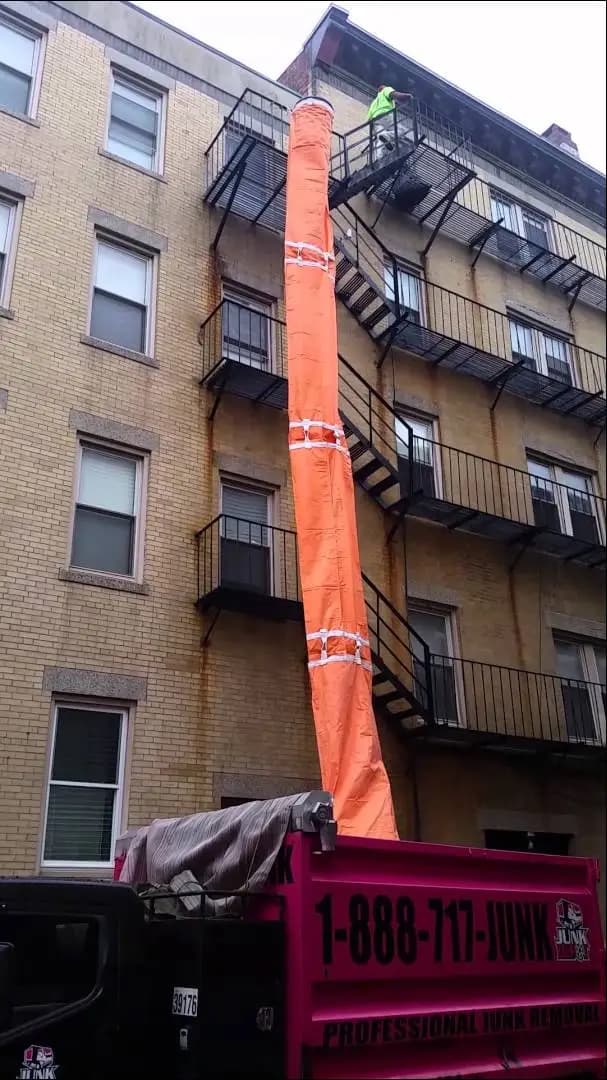
New York job sites are unforgiving. You are working above sidewalks with pedestrian traffic below, tight brownstone setbacks, narrow alleyways, and building supers who want your debris gone before the next tenant walks through. When a debris chute setup goes wrong in that environment, it does not just slow you down — it creates liability, violates site conditions, and sometimes lands you a stop-work order before lunch.
This guide breaks down the most common debris chute setup mistakes New York contractors make, why they happen, and exactly what to do instead. Whether you are running a gut renovation in Bushwick, a shingle tear-off in Bay Ridge, or a multi-floor demo in Midtown, the principles are the same: hang it right, secure it right, and protect everyone below.
Why Debris Chute Setup Errors Are Especially Costly in New York
Most markets give you room for error. New York does not. The density of foot traffic, the vertical nature of the work, and the scrutiny from city inspectors and building management all compound every mistake. A debris chute that shifts, tears, or drops material in a suburban cul-de-sac is a nuisance. The same failure on a Manhattan block can injure a pedestrian and end a project.
The good news is that most setup failures are entirely preventable. They follow predictable patterns, and once you recognize them, you can build a setup routine that eliminates them systematically. Let's go through each one in detail.
Mistake 1: Choosing the Wrong Chute Length for the Job Height
This is the single most common error, and it costs contractors real money. A crew estimates they need 30 feet of chute, orders a single 25 ft section, and arrives on-site to discover the debris exit point is actually 34 feet above the dumpster lip. Now they are either shortchanging the drop or scrambling to improvise — neither option is good.
How to Measure Correctly Before You Order
- Measure from the window sill or roof edge where you plan to hang the chute down to the interior of the dumpster, not the top of the dumpster wall.
- Add 3-4 feet of buffer for the overlap connection and the hang loop clearance above your anchor point.
- If you are connecting sections together, remember that each 1.5 ft overlap slightly reduces your effective drop length — account for it.
- When in doubt, order the next section up. A 50 ft section on a 40-foot drop is not waste — it coils at the bottom and still functions. A 25 ft section on a 30-foot drop is a problem.
EasyChute sells sections in 10 ft, 25 ft, and 50 ft lengths, so there is a configuration for virtually any New York building height. See all options on the debris chute product page before you place your order.
Mistake 2: Using an Inadequate or Improvised Anchor Point
A fabric debris chute in active use is not static — material hitting the interior wall creates lateral force, and the cumulative weight of a full stream of shingles or plaster chunks generates real downward pull. If you have anchored the top loops to something that cannot handle that dynamic load, the chute will shift, tip, or drop.
What Qualifies as a Proper Anchor Point
- A structural window frame member or masonry window buck — not the sash, not the casing trim.
- A scaffold horizontal rail rated for the anticipated load.
- A roof edge joist or rafter tail exposed during tear-off, confirmed as structurally sound.
- A temporary wood blocking assembly lag-screwed into the structural wall — common in tight brownstone windows where there is no convenient horizontal member.
Carabiner and Quick-Connect Best Practices
- Use locking carabiners, not snap hooks. On a New York job site with vibration from street traffic and equipment, a snap hook can work open during the day without anyone noticing until the chute drops.
- EasyChute's woven hang loops are rated to handle the load — but the hardware connecting them to the structure needs to match. Use gate-lock carabiners or proper quick-connects rated for construction use.
- Check all four connection points at the start of every shift, not just at setup. Heat, humidity, and accumulated debris can all shift the rig overnight.
For a detailed walkthrough of the full hanging process, review the step-by-step EasyChute installation guide before your first setup.
Mistake 3: Skipping the Ground-Level Debris Zone Setup
Contractors obsess over the top of the chute and forget about the bottom. In New York, the bottom of the chute is where the public lives. A debris chute exit point that is not controlled becomes a flying-debris hazard the moment a large piece of shingle or drywall chunk hits the dumpster at speed and bounces.
Proper Ground-Level Controls
- Position the dumpster so the chute exit drops into the center of the container, not across the top lip.
- Use plywood or debris netting around the dumpster perimeter to catch any bounce-out material.
- Establish a 10-foot clear zone around the dumpster and mark it with orange cones and caution tape — even if your permit covers the entire sidewalk shed, the active debris zone needs its own delineation.
- Station a ground-level spotter during active debris runs if the site has pedestrian exposure. This is not optional in Manhattan, the Bronx, or Brooklyn neighborhoods with consistent foot traffic.
OSHA's Construction Industry safety standards specifically address overhead work and falling-object hazards. Ground-level zone control is not just best practice — it is a compliance requirement on most New York job sites.
Mistake 4: Overloading the Chute with Incompatible Material
A fabric debris chute is designed for broken-down construction waste: shingles, drywall chunks, plaster, lumber cut-offs, roofing nails, broken tile, loose insulation. It is not a conveyor belt for whole windows, uncut 2x10 joists, or concrete blocks. When contractors try to push oversized material through, they tear the fabric, blow the overlap seams, or create a blockage mid-chute that requires shutting the whole operation down.
Material That Should Never Go Down a Fabric Chute
- Intact glass panels or large mirror sections — these shatter on impact and create a falling-glass hazard
- Full sheets of plywood or OSB — they catch on the chute walls and jam
- Uncut pipe sections longer than 4 feet — they angle across the interior diameter and create a plug
- Wet concrete or wet mortar — weight per cubic foot far exceeds what the chute fabric is designed to handle in continuous flow
How to Prep Debris for Safe Chute Use
- Break drywall into sections no larger than 2 feet by 2 feet before feeding into the chute intake.
- Cut lumber to 3-foot lengths maximum for clean passage.
- Strip shingles from the deck before feeding — loose shingles slide cleanly; a double-layer stack with ice-and-water still attached will drag and snag.
The demolition chute guide covers material prep in detail for interior gut work, which involves different debris profiles than roofing tear-offs.
Mistake 5: Ignoring Permit and Sidewalk Shed Requirements
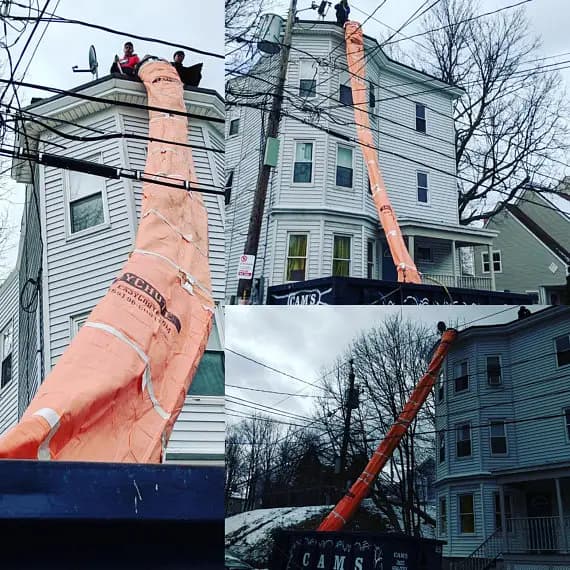
New York City has some of the most detailed construction permit requirements in the country. Using a debris chute without the correct permits — or setting one up outside the boundaries of a valid sidewalk shed permit — exposes you to stop-work orders, fines, and personal liability if anything goes wrong below.
What New York Generally Requires for Chute Use
- A valid NYC Department of Buildings permit for the work being performed
- A sidewalk shed (pedestrian protection canopy) installed when work is happening above pedestrian level — this is not optional for most exterior work in the five boroughs
- A street-work permit or lane-closure authorization if the dumpster placement affects the roadway or curb lane
- Coordination with the building's property manager or co-op board on hours of operation for debris removal — many residential buildings in Manhattan and Brooklyn have rules about when noise-generating work can occur
Requirements vary by borough and building type. Always verify with the NYC DOB before setup, and keep copies of all permits on-site. Inspectors do show up — especially in the Bronx and Manhattan, where DOB enforcement activity has increased significantly in 2026.
Mistake 6: Setting Up the Chute Without a Two-Person Crew
EasyChute sections are remarkably light — a 10 ft section weighs under 3 lbs, and even a 50 ft section is manageable for one person to carry. But setup is a different story. Hanging a chute from an upper-floor window or roof edge while simultaneously threading the loops onto carabiners and ensuring the chute is hanging plumb is a two-person job. One-person setup attempts lead to misaligned hangs, improperly seated carabiners, and chutes that are slightly twisted from the start — which affects how material flows and can accelerate fabric wear.
Recommended Two-Person Setup Protocol
- Person A positions at the anchor point with the folded chute, hardware, and a rope for lowering.
- Person B positions at ground level with clear sight lines to the dumpster and the chute exit zone.
- Person A attaches the top loop carabiners to the anchor, then slowly deploys the chute downward, allowing the fabric to unroll naturally.
- Person B confirms the chute is hanging plumb, the exit is centered over the dumpster, and there is no twist in the fabric.
- Both persons confirm all four hang points are secure before the first debris load goes in.
This protocol takes about 10-12 minutes for an experienced crew. It is the fastest way to get the chute operational without a callback to fix a problem mid-job.
Mistake 7: Leaving the Chute Unattended in Public-Facing New York Environments
A fabric debris chute left hanging overnight in certain New York neighborhoods is an invitation for misuse. Someone will put garbage bags in it. Curious kids will pull at the lower sections. In extreme cases, the chute hardware can be targeted for theft. Beyond the security issue, an unattended chute left in wind without proper restraint at the bottom can swing, bang against the building facade, and potentially dislodge if the overnight wind load is significant.
End-of-Day Chute Procedures
- Tie off the lower section to the dumpster edge or a fixed point to prevent wind-driven swinging.
- Block or rope off the chute intake at the top-floor entry point so it cannot be accessed from inside the building by unauthorized persons.
- If the job is in a high-theft area, consider striking the chute entirely at end of day and re-hanging in the morning. EasyChute sections fold small and stow quickly — the time cost of a full strike is 10-15 minutes, which is worth it on a multi-week job where chute replacement would cost more.
Mistake 8: Connecting Sections Without Checking Overlap Alignment
When you connect multiple EasyChute sections to reach a tall building — common on New York's 4- and 5-story brownstones and commercial buildings — the 1.5 ft overlap between sections is critical. If the overlap is wrong, material can escape at the joint or create a snagging point that slows debris flow and puts stress on the fabric.
How to Connect Sections Properly
- The upper section slides inside the lower section — the upper section's bottom end goes into the top of the lower section, with at least 1.5 ft of overlap.
- The overlap should be even all the way around the circumference — no bunching on one side, which would create an interior lip that catches debris.
- At each connection point, use a bungee cord or zip tie around the outside of the overlap to hold the alignment during active use. Without this, vibration from debris impact can gradually work the sections apart.
Multi-section configurations are especially common on the taller buildings in Brooklyn and Upper Manhattan, where EasyChute's modular design makes it practical to cover any height by combining sections.
Mistake 9: Failing to Account for Wind Conditions
New York buildings create wind tunnel effects that do not exist on most suburban job sites. A debris chute hanging from a high floor between two buildings can experience lateral wind loading that simply does not appear in the specifications for most chute systems designed for open-lot suburban use. When the wind is strong enough to push the lower chute sections away from the building, the exit point moves — sometimes completely off the dumpster target.
Wind Management for Tall Building Setups
- On setups above 4 stories, add a secondary restraint at the mid-point of the chute run — a rope from the building facade or scaffold keeps the lower section from kiting outward.
- Monitor wind forecasts for high-wind days (sustained 20+ mph) and consider suspending chute operations during peak gusts. Debris ejected laterally from an open chute in wind is a falling-object hazard that no permit covers.
- Lightweight material like loose insulation should not be chuted in windy conditions regardless of setup quality — the physics simply do not favor containment.
OSHA's ergonomics guidelines also reinforce the importance of planning debris handling around environmental conditions — review OSHA's ergonomics standards for context on how load, posture, and environmental factors combine on construction sites.
Mistake 10: Underestimating How Much Debris Volume the Job Will Generate
New York renovation jobs often reveal more debris than the initial scope suggests. A gut renovation that looked like two dumpster loads turns into four when you open the walls and find original plaster lath, horsehair insulation, and an unexpected double-layer floor system. If you have only brought enough chute sections for one configuration and the dumpster needs to move mid-job, you may find yourself re-rigging in the middle of an active work day.
Planning Chute Capacity for Large Jobs
- Order one additional 10 ft section beyond what you calculate you need. At under 3 lbs and free shipping, it is cheap insurance for a job that runs deeper than expected.
- Know your dumpster position options before the job starts. If the dumpster must move (street permit expires, building access changes), confirm the new position still allows the existing chute configuration to reach it without a full re-hang.
- For multi-week jobs, establish a daily debris run schedule so the chute is not being used continuously for 8 hours — this prevents heat buildup in the fabric from friction and extends the chute's service life across jobs.
The commercial versus residential debris chute guide covers how volume planning differs between project types — worth reading before you bid a large New York commercial job.
Mistake 11: Not Factoring In the Building Super and Tenant Impact
In occupied New York buildings — which is most of them — the building superintendent is a de facto authority over how and when certain work happens. A debris chute hanging from a window on a floor that still has active tenants will generate complaints if the setup is loud, if debris dust drifts into windows below, or if the dumpster below blocks a tenant's parking spot or building entrance.
Coordinating with Building Management Before Setup
- Give the super at least 48 hours notice before the chute goes up. Walk them through where the chute will hang and where the dumpster will sit.
- Schedule the noisiest debris runs (heavy shingles, concrete chunks) during hours that fit the building's operational norms — typically 8:00 AM to 4:00 PM on weekdays.
- Confirm that the dumpster placement does not block the building's main entry, fire exit, or any tenant parking that is not covered by your street permit.
Mistake 12: Treating a Fabric Chute Like It Needs No Maintenance Across Jobs
EasyChute sections are reusable job after job — that is a primary advantage over disposable rigid chute systems. But reusable does not mean indestructible. A chute that is shoved into a bag with roofing nails still embedded in the fabric, or stored wet, will develop small tears and mildew that compromise the next setup.
Between-Job Chute Maintenance Checklist
- Shake out the section completely after every job — loose nails and gravel in the fold seams will cut the fabric from the inside during storage.
- Inspect the hang loops and loop stitching for fraying after every 5-6 deployments. Loop failure is rare but serious — catch it in the shop, not on the job site.
- Allow sections to air dry before folding if the job involved wet debris or the chute was out during rain. Folding wet fabric promotes mildew and accelerates breakdown of the coated poly weave.
- Store folded sections in a dry location, ideally in the original box or a breathable fabric bag. Avoid storing under heavy tools or equipment that could crease the fabric along the same lines repeatedly.
Proper maintenance is what makes the EasyChute system genuinely economical — a well-maintained section can serve dozens of jobs. See the fabric trash chute overview for more on the material construction and what to look for during inspection.
How New York Contractors Can Build a Foolproof Setup Routine
The contractors who avoid these mistakes consistently are not smarter or more careful than average — they have a written setup routine that every crew member follows. That is it. No guesswork, no improvisation on the first day of a new job.
A Practical Pre-Setup Checklist for New York Job Sites
- Confirm all permits are in hand and posted before the first crew member starts rigging.
- Measure the drop height from anchor to dumpster interior and verify your section configuration covers it with buffer.
- Identify and confirm the anchor point quality — structural member, properly rated for dynamic load.
- Brief the ground-level crew on the debris zone, cone placement, and spotter responsibilities.
- Confirm dumpster position puts the chute exit over the center of the container.
- Conduct two-person hang with section-overlap check at every connection point.
- Do a test run with a small amount of light debris before full operation begins.
- Brief the building super or property manager on hours and exit point location.
This checklist takes under 20 minutes on a typical setup. It prevents the kind of mid-job failures that cost hours to fix and can create liability that lasts much longer. The full EasyChute installation guide provides additional detail on each step of the physical setup process.
The EPA's construction and demolition debris data underscores just how much material moves through job sites across the country every year — proper chute setup is not a minor operational detail, it is central to safe and compliant debris management on any multi-story project.
Frequently Asked Questions
Do I need a permit specifically for a debris chute in New York City?
New York City does not typically require a separate permit just for the debris chute itself, but the work generating the debris almost always requires a valid DOB permit. Additionally, if you are using a sidewalk shed — which is required for most exterior work at height in NYC — that shed must be permitted. The dumpster placement on a street or sidewalk requires a separate street-use permit from the relevant borough office. Always confirm current requirements with the NYC Department of Buildings before setup, as enforcement has tightened in 2026.
Can one person set up an EasyChute section alone on a New York job site?
Technically one person can carry and unfold a section — EasyChute's 10 ft sections weigh under 3 lbs. But a solo hang, particularly from an upper-floor window or roof edge in a New York environment, creates real safety risk and almost always results in a suboptimal setup. The chute may hang off-plumb, loop attachments may not be fully seated, and there is no one at ground level to confirm the exit point is centered over the dumpster. Use a two-person crew for every setup. The 10-minute time cost prevents far more expensive problems.
What is the maximum height I can set up a debris chute in New York?
There is no absolute regulatory height limit on debris chute use — height limits are governed by the building permit, the sidewalk shed design, and the structural capacity of your anchor point. EasyChute sections connect with 1.5 ft overlaps to reach any building height by combining multiple sections. Practical considerations — wind management, debris zone control, and anchor point quality — become more demanding as height increases. For setups above 6 stories, adding mid-run restraints and conducting a wind assessment before each active work session is strongly advisable.
How do I keep the debris chute from swinging in New York's wind?
Wind management is a critical operational concern on tall New York buildings. Use a secondary restraint rope at the mid-point of any chute run exceeding 3 stories — tie the rope from the building facade or scaffold to the chute exterior to limit lateral swing. On high-wind days with sustained speeds above 20 mph, suspend active debris runs during peak gusts. For tall buildings between other structures, anticipate channeled wind speeds that may be significantly higher than street-level readings, and adjust your restraint strategy accordingly.
How do EasyChute sections connect for multi-story buildings?
EasyChute sections connect with a 1.5 ft overlap — the bottom end of the upper section slides inside the top of the lower section. The overlap should be even around the full circumference to avoid creating an interior lip that catches debris. Secure each overlap with a bungee cord or zip tie around the exterior to maintain alignment during active use. EasyChute offers 10 ft, 25 ft, and 50 ft sections, so you can build any configuration needed for the specific building height you are working on.
What materials should I never put through a fabric debris chute?
Avoid intact glass panels, full sheets of plywood or OSB, uncut pipe sections longer than 4 feet, and wet concrete or wet mortar. These materials are either too large to pass cleanly, too heavy for safe fabric chute use, or create falling-object hazards if they bounce on impact. Break drywall into sections no larger than 2 feet by 2 feet, cut lumber to 3-foot maximum lengths, and strip shingles from deck layers before feeding them into the chute intake. When in doubt about a specific material, run a small test load before committing to full flow.
Is an EasyChute reusable across multiple New York jobs?
Yes — EasyChute sections are designed for repeated reuse across many jobs. The woven, coated poly fabric is durable and the hang loops are stitched for load-bearing use. Longevity depends on proper between-job maintenance: shake out all debris including loose nails, inspect loop stitching every 5-6 deployments, air-dry before folding, and store in a dry location away from heavy tools. A well-maintained EasyChute section can serve dozens of jobs, making it significantly more economical than rental or disposable chute systems over a full season of work.
Ready to Set Up Your Next New York Job Site Without the Headaches?
Every mistake covered in this guide is avoidable with the right equipment, the right setup routine, and a chute system designed for the demands of real commercial work. EasyChute was built by contractors for contractors — lightweight, modular, and tough enough to handle everything from a Brooklyn brownstone gut job to a Midtown shingle tear-off.
Browse the full EasyChute lineup, check section lengths and configurations, and place your order with free shipping to your job site at the debris chute product page. Have questions before you order? Visit the EasyChute FAQ or reach out directly — the team behind EasyChute has run these job sites and can point you to the right configuration for your specific building height and project type.
Demo it. Bag it. Chute it.