

Index
- What Is a Trash Chute and Why Do First-Time Contractors Need One?
- Before You Start: Site Assessment and Planning
- Choosing the Right Trash Chute System for Your Project
- Safety Requirements and Compliance Checklist
- Installation Preparation and Tools You’ll Need
- Step-by-Step Setup Process
- Operational Best Practices and Daily Management
- Maintenance Protocol and Cleaning Schedule
- Common Problems and Quick Fixes
- Cost Budgeting and ROI for First-Timers
- Local Regulations and Permit Considerations
- Frequently Asked Questions
- Ready to Get Started?
What Is a Trash Chute and Why Do First-Time Contractors Need One?
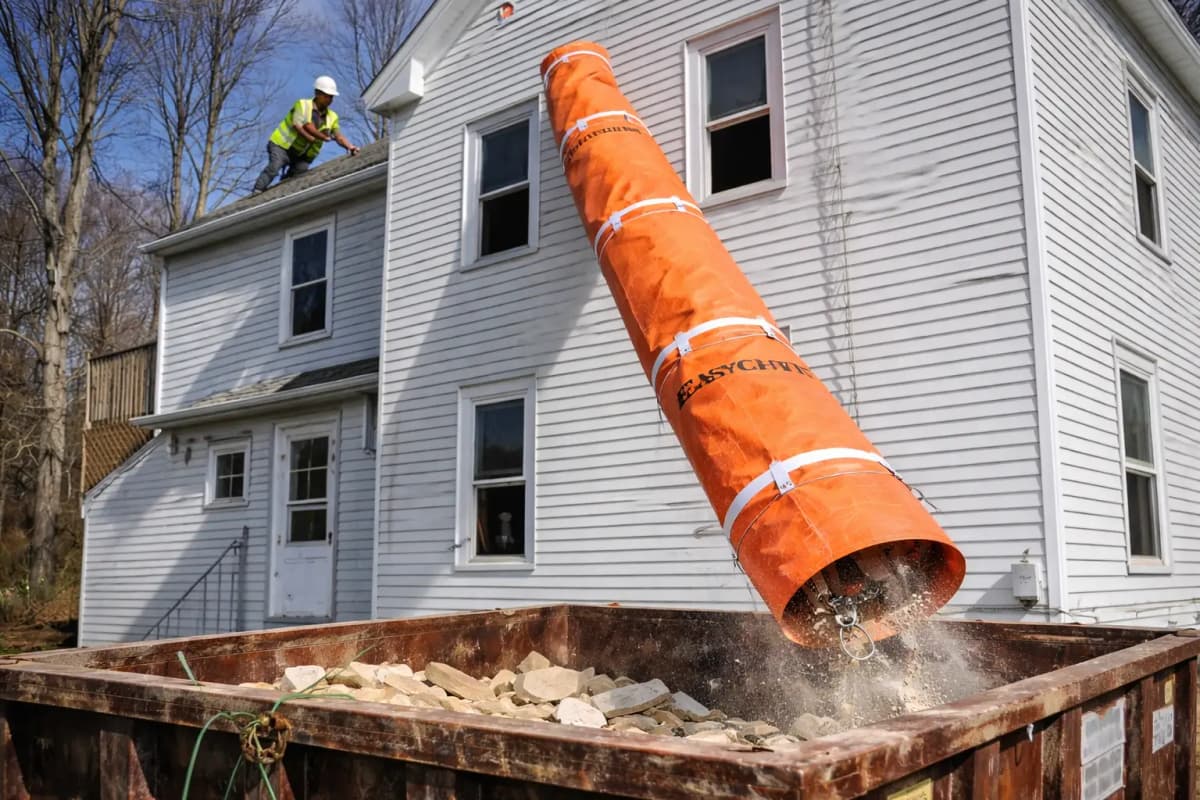
A trash chute is a modular, tubular debris containment system that runs vertically down the exterior (or occasionally interior) of a building, allowing workers to safely dispose of construction debris from upper floors into a dumpster or roll-off container at ground level. Instead of hauling materials down stairs or hoisting them with equipment, contractors drop debris through the chute—saving time, reducing injury risk, and keeping job sites cleaner.
For first-time contractors, a trash chute is often the difference between a chaotic, dangerous site and an organized, efficient one. Modern systems are lightweight, modular, and reusable across multiple projects, making them both practical and cost-effective.
The Core Benefits
- Safety: Fewer workers carrying heavy loads down stairs or ladders means fewer slip-and-fall injuries.
- Speed: Debris disposal takes seconds per load, not minutes.
- Site cleanliness: Controlled debris flow keeps the interior cleaner, reducing dust and mess.
- Neighborly relations: Contained systems mean less flying debris and cleaner streets around your job site.
- Reusability: Modular sections can be used on dozens of projects, spreading cost over time.
Whether you’re tackling a full home renovation, a roofing tear-off, or commercial demolition, understanding how to select, set up, and operate a trash chute is essential knowledge in 2026.
Before You Start: Site Assessment and Planning
Before you order or set up a trash chute, you need to evaluate your specific job site. A 10-minute assessment now prevents costly mistakes later.
Questions to Ask Yourself
- How many stories tall is the building? This determines chute length and the number of modular sections you’ll need.
- Where will the dumpster sit? Can you place it directly below the chute discharge point, or will debris need to travel laterally?
- Are there overhead obstacles (power lines, HVAC units)? Chutes must not contact electrical lines or block airflow.
- What type of debris will you be disposing of? Roofing shingles, lumber, drywall, and concrete have different weight and flow characteristics.
- How long will the project last? Short jobs may suit rental; longer projects favor purchase or long-term rental.
- Are there HOA, historic, or other aesthetic restrictions? Some properties require lower-visibility or specific-color chute systems.
Take photos, measure the vertical distance from the topmost floor to the ground, and note any access restrictions. This information will guide your system selection.
Measuring for Accurate Chute Length
Measure the distance from the floor or window opening where debris will enter to the ground level where the dumpster will sit. Add 2 feet of buffer (the chute must discharge fully into the container). If your building is 35 feet tall, you likely need sections totaling at least 37–40 feet to account for the discharge angle.
Choosing the Right Trash Chute System for Your Project
Trash chutes come in different styles, materials, and duty ratings. Your choice depends on debris type, project duration, and budget.
System Types in 2026
- Lightweight (Poly/Polyethylene): Bright orange modular tubes, typically 10–50 feet. Ideal for residential and light commercial work. Easy to assemble and transport; great for first-timers. Examples include poly debris chute systems.
- Heavy-Duty (Steel or Reinforced): Built for high-volume demolition and commercial sites with abrasive or sharp debris. More expensive upfront, but rated for heavier loads and longer project lifecycles. Learn about heavy-duty trash chute models.
- Window-Drop Chutes: Smaller systems designed to fit through existing windows, ideal when exterior wall mounting is not possible.
- Lite-Duty: Entry-level option for small residential remodels with modest debris volumes.
25ft sections for larger projects can be combined to reach any height, and modular design means you can reconfigure for different sites.
Key Specifications to Compare
- Debris weight capacity per linear foot (typically 50–150 lbs/ft depending on model)
- Material (polyethylene, steel, composite)
- Modular section lengths (10, 15, 25, 50 feet)
- Discharge angle and speed (affects debris breakage and dumpster loading)
- Installation footprint (how far the base extends from the building)
For first-time contractors, a lightweight poly system with good reviews and clear assembly instructions is the safest starting point. Consult a trash chute capacity calculator to ensure you’re not undersizing.
Safety Requirements and Compliance Checklist
Trash chutes are regulated by federal, state, and local building codes. Failing to meet these requirements can result in fines, work stoppages, or injuries.
Federal and Occupational Safety Standards
Follow OSHA Construction Industry safety standards and adhere to OSHA ergonomics guidelines when loading and operating chutes. Key mandates include:
- Workers must never stand directly under a chute opening or discharge point. Debris can jam and suddenly release.
- Chutes must be secured and braced to prevent swaying. High winds can destabilize unsecured systems.
- Discharge must be fully contained within the dumpster. Spillage creates hazards and liability.
- Proper fall protection is required for workers installing chutes above ground level. Harnesses and anchor points are mandatory.
- No workers should be in the debris path. Establish a no-access zone around the discharge area.
Local Building Code Checklist
- Do you need a building permit for the chute installation?
- Are there height or setback restrictions for exterior-mounted systems?
- Does the chute need to be concealed or screened from adjacent properties?
- Are there noise ordinances affecting debris disposal hours?
- Must the chute be inspected by the city or county before use?
Contact your local building department before starting. A 15-minute call can save you weeks of delays.
Environmental and Waste Disposal Compliance
Review EPA construction and demolition debris management guidelines to understand which materials can be mixed in a single dumpster and which require separate disposal (hazardous waste, asbestos, lead paint, etc.).
Installation Preparation and Tools You’ll Need
Proper preparation ensures a smooth, safe installation and reduces the risk of on-site improvisation.
Essential Tools and Equipment
- Measuring tape (25–50 feet) — to verify vertical and horizontal dimensions
- Level (4–6 feet) — to ensure sections are plumb (perfectly vertical)
- Socket set and adjustable wrench — for bolting connection hardware
- Drill with bits — for anchoring brackets into walls or structures
- Safety harness and lanyard — for workers working at height
- Hard hat, safety glasses, gloves — personal protective equipment for all workers
- Work boots with good ankle support — for standing on scaffolding or ladders
- Ladder or scissor lift — to access upper mounting points safely
Site Preparation
Before installation day:
- Clear the installation path of obstacles and debris.
- Confirm dumpster placement and ensure adequate space for safe discharge.
- Verify that all electrical lines, pipes, and HVAC systems are mapped and marked.
- Brief all workers on the installation plan and safety protocols.
- Confirm receipt of all modular sections and hardware; missing parts delay the job.
Step-by-Step Setup Process
Most modular trash chutes follow a similar assembly logic. This is the standard workflow for lightweight poly systems used on residential and light commercial projects.
Step 1: Position the Base and Discharge Chute
Place the lowest chute section (with the discharge angle) directly above the dumpster, angling the discharge opening into the container. Secure the base with heavy-duty straps or brackets anchored to the ground or structure. The base must not shift when debris flows into the chute.
Step 2: Stack Modular Sections Vertically
Working from bottom to top, bolt or clip each successive section to the one below. Ensure each connection is tight and level. Most systems use quick-connect hardware that requires only a wrench; no welding is needed. Refer to the debris chute installation guide for manufacturer-specific details.
Step 3: Secure the Chute to the Building or Structure
Every 10–15 feet of height, bolt the chute to the building wall, scaffold, or temporary bracing. Use lag bolts or expansion anchors appropriate to the wall material (wood, concrete, masonry). Brackets should resist lateral (side-to-side) movement caused by wind or debris impact.
Step 4: Install Any Intermediate Loading Platforms
If workers will be loading debris from multiple floors, install secure platforms or chute-loading gates at each floor level. These allow workers to feed debris safely into the chute without climbing inside.
Step 5: Test the System
Before full operation, run a test load of representative debris through the chute. Watch for jamming, unusual vibration, or discharge issues. Adjust angle or flow if necessary. Confirm that discharge falls entirely into the dumpster with no spillage.
Step 6: Install Safety Guards and Signage
Install high-visibility barriers or guardrails around the discharge area to prevent workers or passersby from standing underneath. Post warning signs at each floor-level loading point. Include phone numbers for emergency contact in case of jams or injuries.
Operational Best Practices and Daily Management
Once the chute is installed, how your crew uses it determines its safety, lifespan, and effectiveness.
Loading Protocol
- Never overfill the chute opening. Debris should flow freely; jamming creates backups and safety hazards.
- Break down large items (full sheets of drywall, long lumber) before loading. Oversized pieces jam and cause costly slowdowns.
- Do not throw tools, nails, or metal fasteners down the chute. They cause jamming and can damage the interior surface.
- Load heavy items first (concrete, brick), then lighter debris. This prevents lighter materials from packing underneath heavier debris.
- Keep hands and tools clear of the chute opening. Never reach into a backed-up chute without stopping operations and locking out the system.
Daily Monitoring
- Check all anchor bolts and brackets for looseness. Vibration can gradually work bolts loose over days or weeks.
- Inspect the chute exterior for cracks, dents, or signs of excessive wear. Minor damage can worsen rapidly under continued use.
- Monitor discharge velocity and angle. If debris is bouncing out of the dumpster or flowing sluggishly, adjust the chute angle slightly or check for interior blockages.
- Empty the dumpster before it overflows. A full dumpster prevents proper discharge and forces workers to overstuff the chute.
Wind and Weather Considerations
High winds can destabilize chutes and scatter lightweight debris. On windy days, increase bracing frequency, reduce loading height drops, and monitor the chute more closely. Heavy rain can make debris flow erratically; adjust discharge angle as needed.
Maintenance Protocol and Cleaning Schedule
Regular maintenance extends chute life, prevents failures, and keeps your site safe. A neglected chute becomes a liability.
Weekly Maintenance Tasks
- Empty and hose out any accumulated debris or moisture inside the chute.
- Check all bolt connections and tighten any that have loosened.
- Inspect exterior for damage, corrosion, or loose brackets.
- Ensure the dumpster area is clear of spillage and hazards.
Post-Project Cleanup and Decommissioning
When the project is complete, trash chute cleaning and maintenance is critical before storage or reuse:
- Flush the interior thoroughly with water to remove dust, debris, and residual material.
- Inspect all sections for cracks, delamination, or structural damage.
- Allow the system to dry completely before disassembly.
- Unbolt and disconnect sections in reverse order (top to bottom).
- Store sections in a dry, sheltered location where they won’t be crushed or exposed to UV.
Proper storage is an investment in reusability. Many contractors get 50+ uses out of a single chute system by maintaining it correctly.
Common Problems and Quick Fixes
First-time contractors often encounter predictable issues. Here’s how to diagnose and resolve them.
Chute Jams
Symptom: Debris is not flowing; blockage is visible or suspected.
Cause: Oversized item, wet debris that sticks, or internal buildup of fine material.
Fix: Stop loading immediately. Never allow workers to stand under the jam. From a safe platform above, use a long stick or rod to dislodge the item. If that fails, disassemble the top section or two to access and clear the blockage. Once clear, reassemble and test with a small load before resuming normal operation.
Excessive Spillage at Discharge
Symptom: Debris is bouncing out of the dumpster or scattering sideways.
Cause: Discharge angle too steep, dumpster not positioned directly below, or debris velocity too high.
Fix: Reposition the dumpster directly below the discharge. Reduce the angle slightly (adjust brackets). Check for interior obstructions slowing flow. If debris velocity is very high, lower the loading height or break items into smaller pieces.
Chute Flexing or Swaying
Symptom: The chute visibly moves side-to-side when loaded.
Cause: Insufficient bracing, loose bolts, or inadequate anchoring to the building.
Fix: Stop operations immediately. Add additional brackets or guy-wires every 10 feet. Tighten all bolts. If the chute is not properly anchored to a solid structure, add temporary steel bracing or scaffolding. Test stability before resuming use.
Corrosion or Discoloration
Symptom: White or green patina on plastic, or rust on metal components.
Cause: Moisture exposure, salt air (coastal projects), or prolonged sun exposure.
Fix: For plastic, wash with a mild soap solution and allow to dry. For metal bolts or brackets, apply a thin coat of rust preventative or WD-40. After project completion, store in a dry location. Replace severely corroded bolts to prevent failure.
Cost Budgeting and ROI for First-Timers
Understanding costs helps you decide whether to buy, rent, or lease a trash chute system.
Rental vs. Purchase Economics
Check rental options and pricing in your area. For a typical residential renovation (4–8 weeks):
- Rental: $150–400/week, totaling $600–$3,200 for the project. No purchase or transport cost.
- Purchase: $1,500–$5,000 upfront for a lightweight system. Payback occurs after 4–8 projects. Reusable indefinitely with proper maintenance.
If you forecast 5+ projects per year, purchase is typically more cost-effective. For occasional use, rental makes sense.
Hidden Costs to Budget For
- Transport/delivery: $200–$500 depending on distance and weight.
- Installation labor: 4–8 hours for a typical residential setup; add $400–$1,000 if hiring a specialist.
- Permits and inspections: $50–$300 depending on jurisdiction.
- Dumpster surcharge: Some haulers charge extra for chute-discharged debris (faster loading = more frequent pickups).
- Cleanup and decommissioning labor: 2–4 hours post-project.
Factor these into your project bid to avoid margin erosion. Many contractors find that reduced labor time (no hand-carrying debris down stairs) offsets equipment costs within a single project.
Local Regulations and Permit Considerations
Building codes and permits vary by city and state. Knowing your jurisdiction’s rules prevents costly delays.
Common Permit Requirements
- Exterior Work Permit: Many jurisdictions require a permit to mount any structure to the building exterior.
- Temporary Structure Permit: Chutes are often classified as temporary structures; permitting can be fast (1–2 days) or slow (2–3 weeks) depending on local backlog.
- Electrical Clearance: If your chute is within 10 feet of overhead power lines, the utility may require inspection or special bracing.
- Noise or Hours-of-Operation Restrictions: Some municipalities limit debris disposal hours (e.g., no chute use before 8 a.m. or after 6 p.m.).
- Inspections: Some codes require an inspection before operation and another after project completion.
Obtaining Permits
- Contact the building or planning department and ask for the specific form or application.
- Provide a site plan showing the chute position, building dimensions, and dumpster location.
- Submit a copy of the chute manufacturer’s specifications (bracing recommendations, weight capacity, material certifications).
- Follow up within 3–5 business days if you haven’t heard back.
- Schedule inspection before startup if required.
Permit costs vary ($50–$500), but the cost of stopping work mid-project due to a code violation is far higher. Invest the time upfront.
Frequently Asked Questions
What is the maximum height a trash chute can safely span?
Most residential and light commercial chutes safely span 10–50 feet. Very tall buildings (60+ feet) require engineered bracing and specialized heavy-duty systems. Consult the manufacturer’s specifications and a local structural engineer if your building exceeds 50 feet. Proper anchoring every 10–15 feet is critical at any height.
Can I use a trash chute for wet debris or snow removal?
Generally, no. Wet debris can jam the interior, freeze in winter conditions, and increase weight beyond rated capacity. Snow and ice are too adhesive and will cause blockages. Use chutes only for dry construction debris. If working in winter, keep the chute covered or move operations indoors.
How often do trash chute sections need to be replaced?
With proper maintenance, lightweight poly sections last 10–20 years and can be used for 50–100+ projects before significant wear occurs. Heavy-duty steel systems last even longer. Inspect for cracks, UV damage, and corrosion annually. Replace sections only if structural integrity is compromised or flow is significantly obstructed.
What should I do if a worker is injured near or at the chute?
Stop all operations immediately. Call emergency services (911) if the injury is serious. Document the incident, photograph the scene, and preserve evidence for insurance and regulatory purposes. Notify your workers’ compensation insurer and OSHA (if required by severity). Review procedures to prevent recurrence. Most chute injuries are preventable through proper training and barriers.
Do I need to hire a licensed contractor to install a trash chute?
Not always, but it depends on your jurisdiction and building type. Residential installations are often DIY-friendly with basic tools and manufacturer instructions. Commercial or height-restricted sites may require a licensed contractor or engineer certification. When in doubt, hire a specialist; the cost ($500–$1,500) is minimal compared to permit issues or safety liability.
What’s the difference between a trash chute and a debris chute?
In common usage, the terms are interchangeable. “Debris chute” often refers to heavier-duty systems for demolition and construction; “trash chute” can describe lighter-duty or rental systems for general debris. Both serve the same function: containing and directing debris from upper levels to ground. Review product specifications rather than terminology when selecting a system.
Can I use a chute system on a commercial high-rise, or is it limited to residential work?
Chutes are equally suitable for commercial buildings. In fact, many multi-story commercial projects (hotels, office buildings, shopping centers) rely on trash chute systems for commercial buildings and multi-story work. Ensure your system is rated for the building height and the volume and type of debris. Commercial installations often require additional engineering and inspection.
Ready to Get Started?
Trash chutes are a practical, safe, and cost-effective addition to any contractor’s toolkit. Start with a clear site assessment, choose the right system for your project scope, follow safety and permitting requirements, and maintain the system throughout its use. First-time contractors who invest in learning the fundamentals—and who treat safety as non-negotiable—see immediate returns in crew productivity, site cleanliness, and job site morale.
If you’re ready to integrate a trash chute into your next project, begin by measuring your building, understanding your local codes, and consulting the full trash chute installation guide specific to your system. For complex or high-rise projects, consult construction debris chute systems that offer heavy-duty capacity and engineered support.
Questions about capacity, durability, or rental vs. purchase? Review the weight capacity specifications and explore rental options and pricing in your area. Our team is here to help you make the right choice for your next job.