

Table of Contents
- What Is a Poly Debris Chute?
- Why Contractors Choose Poly Over Aluminum or Canvas
- Durability and Longevity in High-Use Environments
- Weight Capacity and Load Testing
- Installation Workflow for Commercial Sites
- Safety Compliance and OSHA Requirements
- Maintenance Protocols to Extend Service Life
- Cost Analysis: Poly Chutes vs. Rentals and Alternatives
- Site-Specific Configurations and Accessories
- Environmental Impact and Recycling
- Common Issues and Troubleshooting
- Frequently Asked Questions
- Ready to Upgrade Your Debris Management?
What Is a Poly Debris Chute?
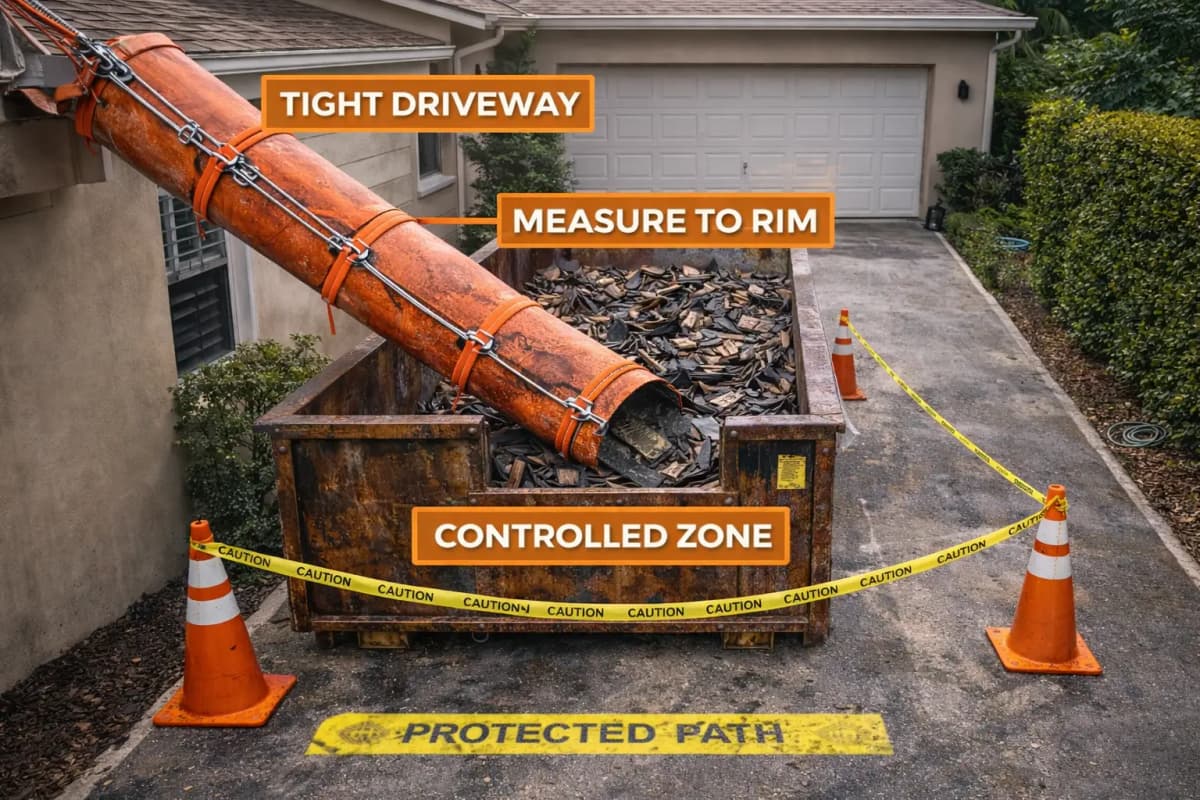
A poly debris chute is a segmented, modular tube system made from high-density polyethylene (HDPE) or similar thermoplastic material. Unlike canvas or single-material alternatives, poly chutes provide a rigid yet lightweight pathway for construction waste, demolition debris, roof shingles, and renovation materials to flow safely from upper stories to a dumpster or collection container below.
Poly chutes are engineered for commercial construction and renovation work. They’re assembled section-by-section, lashed or clamped to scaffolding, building edges, or window frames, and can be reconfigured for projects ranging from residential tear-offs to multi-unit demolition. The orange or bright color is not only a safety standard—it’s highly visible and meets job-site regulations in most jurisdictions.
Why Contractors Choose Poly Over Aluminum or Canvas
Poly has carved out a dominant position in the contractor tool kit for three core reasons: cost, durability, and versatility.
- Lightweight and easy to move. A single poly section weighs 8–12 lbs, versus 15–20 lbs for aluminum. This cuts setup time and reduces worker fatigue.
- UV and weather resistant. Poly doesn’t corrode in rain, salt spray, or sunlight the way aluminum oxidizes or canvas deteriorates. A well-maintained poly chute survives 5–10 years of active use.
- Noise reduction. Debris tumbling down poly is quieter than metal, a significant advantage on residential jobs or in noise-sensitive neighborhoods.
- Lower initial investment. Poly chutes cost 15–30% less than equivalent aluminum systems, making them accessible for smaller crews and one-off projects.
- Modular scaling. You buy only the sections you need—10 ft, 25 ft, or 50 ft—and swap or reuse them across multiple jobs.
Canvas alternatives lack rigidity and are prone to sagging and bunching, especially under heavy asphalt or wet plaster. Aluminum is premium but overkill for most residential and light commercial work.
Durability and Longevity in High-Use Environments
A quality poly chute, properly maintained, will outlast two or three canvas systems and match aluminum in lifespan at a fraction of the cost. The material itself resists cracking, splitting, and UV degradation when manufactured to commercial standards.
Real-world performance markers:
- Years 1–3: Zero maintenance. Debris flows cleanly; no visible wear.
- Years 4–6: Occasional cosmetic scuffs; internal flow surfaces remain smooth. May require hose-down or light scrubbing.
- Years 7–10: Possible section replacement if heavily used on abrasive projects (demolition with heavy concrete chunks). The modular design means you swap one or two sections rather than replacing the whole system.
Contractors who store poly chutes indoors during off-season, rinse them after wet projects, and inspect for cracks before each deployment see systems last well into a second decade.
Weight Capacity and Load Testing
Standard poly chutes are rated for 400–600 lbs per linear foot, depending on diameter and wall thickness. This means a 25-ft chute can safely handle a continuous stream of material without kinking, buckling, or rupturing.
For a detailed breakdown of capacity planning, see our weight capacity guide. Key takeaways:
- Roofing tearoffs and shingles: 300–400 lbs/ft (lower density, high volume)
- Drywall, lumber, mixed demolition: 400–500 lbs/ft (moderate density)
- Concrete chunks, brick, heavy masonry: Requires reinforced poly or aluminum; standard poly may not be rated
Load testing is not optional on commercial jobs. Before day one, confirm with your chute supplier that the system is rated for your specific debris mix and volume. A clogged or overstressed poly chute can split mid-project, costing hours in downtime.
Installation Workflow for Commercial Sites
Proper installation is the difference between a smooth debris flow and a jammed, leaking mess. Follow these steps:
- Site survey and measurement. Measure the vertical drop, note building edge geometry, and identify anchor points (scaffolding, window frames, corners). Confirm dumpster position and ground clearance.
- Assemble base sections on the ground. Connect the first 10–15 ft of chute sections using provided clamps or bolts. Test the joints for tightness and smooth interior surfaces.
- Hoist and secure the assembly. Use a crane, bucket truck, or rope rigging to position the chute base at the upper anchor point. Secure with lashing or structural fasteners rated for sustained load.
- Stack and connect upper sections. Add sections one at a time, ensuring each joint is fully seated and clamped. Stagger clamps on opposite sides for even pressure.
- Align the discharge. Position the chute outlet directly over the dumpster, accounting for any wind drift. Use tie-off straps or ratchet straps to fine-tune alignment.
- Inspect and test. Drop a test load of light debris (cardboard, clean wood) to confirm flow and check for spillage. Adjust anchor points or outlet positioning as needed.
- Post safety signage. Mark the chute and dumpster zone with “Debris Chute in Use” and “Hard Hat Area” signs. Brief crew on no-contact protocol.
For a full step-by-step installation guide, refer to our contractor playbook. Total setup time for a standard 25-ft chute is 2–3 hours with a two-person crew.
Safety Compliance and OSHA Requirements
Debris chutes fall under OSHA Construction Industry standards, which mandate:
- Chutes angled 45–50 degrees from vertical to ensure controlled descent and prevent material ejection.
- Fully enclosed tubes (no open sides) to prevent spillage and worker contact with moving debris.
- Secure anchor points capable of supporting 5× the maximum anticipated load.
- Clear warning signage at the top and base of the chute.
- A landing net or catch-box at the discharge to slow debris and minimize dust and splatter.
- Proper ergonomics for loading—no workers should lift more than 50 lbs per load or use unsafe twisting motions.
Poly chutes meet these requirements by design. However, job-site conditions—wind, improper lashing, overloading—can compromise safety. Conduct a pre-work safety briefing and weekly inspections during the project.
Maintenance Protocols to Extend Service Life
Preventative maintenance pays for itself in avoided replacements and downtime.
Weekly during active use:
- Inspect joints and clamps for looseness. Tighten any that have shifted.
- Look for debris blockages inside the chute. If flow slows, stop and clear the jam (never push debris down by dropping material on top).
- Check anchor points and lashing for signs of wear or slipping.
After wet or messy projects (plaster, mud, wet drywall):
- Hose down the exterior to remove dried material.
- For interior buildup, use a weighted cloth or soft brush to gently scrub the inside walls. Never use abrasive scouring pads—they scratch the poly surface and promote sticking.
- Allow to air-dry before storage.
Quarterly or between projects:
- Lay all sections on a flat surface and visually inspect for cracks, dents, or warping.
- If a section shows significant wear, replace it. A single section costs $80–$150 and takes 20 minutes to swap.
- Store indoors or under a tarp to minimize UV and temperature cycling.
Cost Analysis: Poly Chutes vs. Rentals and Alternatives
Buying versus renting depends on project frequency and the total project value.
Purchase cost (new system, 25 ft): $400–$700
Rental cost (4-week average, 25 ft): $150–$250
Break-even calculation:
- If you run 3+ projects per year requiring a chute, buying pays for itself within 2 years.
- If you run 1–2 projects annually, renting is usually more cost-effective unless your projects are back-to-back or seasonal.
- If you run high-volume demolition (8+ projects/year), buying two or three systems and staggering them across jobs optimizes fleet utilization and cuts per-project overhead.
Hidden cost avoidance:
- No late-return fees or damage deposits.
- No transportation costs to rental yard (you store on-site).
- No scheduling delays waiting for rental availability on peak-season weeks.
See our debris chute system guide for a deeper ROI comparison across project types.
Site-Specific Configurations and Accessories
Not all job sites fit a standard vertical or angled chute. Poly systems offer flexible configurations:
Window-opening drops: A short 10-ft or 15-ft section hung from a window frame, discharging directly to a dumpster or chute bag for dumpster containment. Ideal for interior renovation work in multi-unit buildings.
Scaffold-mounted systems: Lashed to the side of a rolling scaffold for interior demolition, dust containment, and easy repositioning as the job progresses.
Modular multi-stage setups: For ultra-tall buildings, use modular debris chute systems with intermediate catch boxes at mid-height, reducing impact velocity and dust. See our trash chute sections guide for assembly best practices.
Wind tie-offs and stabilization: On breezy coastal or exposed sites, use ratchet straps or cable guy-lines to keep the chute aligned to the dumpster. Prevents spill and improves crew safety.
Discharge accessories: Netting, catch boxes, or angled deflectors slow material and reduce splatter. Poly chutes accept universal accessories without modification.
Environmental Impact and Recycling
Poly chutes are tools for efficient waste diversion, and the chute system itself is recyclable at end-of-life.
On-project benefits:
- Cleaner debris segregation. A dedicated chute stream makes it easier to separate wood, drywall, metals, and cardboard for recycling rather than commingling to landfill.
- Reduced ground spillage. Less scattered debris means faster site cleanup and lower hauling costs.
- Lower fuel and transport load. Efficient chute systems compact debris and reduce wasted truck trips.
According to EPA construction and demolition debris data, properly managed construction sites divert 50–80% of debris from landfills. Poly chutes are a key tool in that workflow.
At end-of-life (10+ years), poly sections are accepted by most commercial plastics recyclers. Contact your local solid-waste authority or a certified e-waste/plastics recycler for options.
Common Issues and Troubleshooting
Chute is clogging or slowing flow:
- Stop loading and wait 10–15 minutes for lighter material to settle and dislodge.
- From the top of the chute, toss 2–3 clean wood blocks or cardboard squares to break up the jam.
- Never stand below the chute while clearing, and never force debris from below.
- If blockage persists, disassemble the clogged section(s), clear the interior, and reassemble.
Spillage from joints or sides:
- Inspect all clamps and bolts. Vibration from heavy loading can loosen fasteners over hours.
- Check for cracks in poly sections—hairline cracks can widen under load and cause lateral leaks.
- Verify the chute is aligned to the dumpster and not angled sideways.
- If leaking persists, replace the cracked section or add a catch tarp below the leak.
Chute drifting or misaligned with dumpster:
- Wind, loading vibration, or loose anchor points cause drift. Check all lashing points and re-tension.
- Use ratchet straps on the outlet to lock the chute position to the dumpster edge.
- On very windy sites, add guy-lines or cable bracing at mid-height to stabilize the chute.
Poly sections cracking or becoming brittle in cold weather:
- Poly becomes more rigid and prone to cracking below 32°F, especially if overloaded.
- In winter, reduce loading pace and allow material to flow at a gentler rate.
- Store poly chutes indoors during extended off-season in cold climates.
Frequently Asked Questions
How long does a poly debris chute typically last?
With proper maintenance and indoor storage during off-season, a poly chute lasts 7–10 years of active use. Real-world contractor experience shows systems lasting 5 years under heavy demolition work and 10+ years for lighter residential renovation projects. The modular design means you can replace individual sections rather than the entire system, extending usable life further.
Can a poly chute handle heavy materials like concrete or brick?
Standard poly chutes are rated for 400–600 lbs/ft and work well for asphalt, roofing, drywall, and mixed demolition debris. Concrete chunks and brick are denser and can exceed poly’s safe load limit, causing blockages or material ejection. For projects with significant masonry, confirm chute specifications with your supplier, or specify a reinforced-wall poly or aluminum system designed for heavy loads.
Is renting a poly chute cheaper than buying?
For a single or one-off project, renting at $150–$250/month is cheaper than buying ($400–$700). But if you run 3+ projects per year, the cost of ownership drops below rental rates within 18–24 months. Consider your project pipeline: steady work in the same season justifies a purchase; sporadic projects favor renting.
What is the proper angle for a poly debris chute?
OSHA and industry best practice call for a 45–50 degree angle from vertical. This angle balances gravity-driven flow with controlled descent—too steep causes ejection and spillage; too shallow causes blockages. On steeply pitched roofs or very tall buildings, use intermediate catch boxes to slow material and maintain control.
Do poly chutes require anchoring or lashing?
Yes. A poly chute must be secured at the top (to scaffolding, a roof edge, or window frame) and aligned at the discharge (to the dumpster). Lashing prevents wind drift, vibration-induced loosening, and accidental dislodging during loading. Use commercial-grade ratchet straps or cable and inspect lashing weekly. Loose chutes spill debris and create safety hazards.
Can I use a poly chute indoors?
Yes, poly chutes are excellent for interior renovation work. They contain dust, protect flooring, and allow flexible routing through hallways or down stairwells. Window-opening drops and scaffold-mounted configurations are popular for interior demolition. Ensure adequate ventilation and that the chute outlet is positioned safely outside or into a contained dumpster.
What maintenance is really necessary?
Weekly: inspect joints and clamps, look for clogs. After messy projects: hose down the outside and scrub the interior lightly. Quarterly: visually inspect for cracks; store indoors. That’s it. Poly requires minimal upkeep compared to canvas (which needs constant cleaning) or aluminum (which corrodes and requires protective coatings). A short preventative routine saves money on premature replacement.
Ready to Upgrade Your Debris Management?
Poly debris chutes are the contractor’s choice for reliability, cost efficiency, and ease of use. Whether you’re tackling a single residential renovation or managing a fleet of demolition projects, a poly system scales with your business and pays for itself through cleaner sites, faster cleanup, and fewer operational headaches.
Explore our full range of debris chute systems, check out modular trash chute options for multi-stage setups, and read how demolition-focused crews optimize their workflows. Our team is ready to help you spec the right system for your next project. Contact us today for a quote or to discuss your site-specific requirements.