

Table of Contents
- What Are Trash Chute Sections?
- How Modular Sections Connect
- Choosing the Right Section Length
- Assembly and Installation Workflow
- Safety Considerations During Setup
- Common Assembly Mistakes and How to Avoid Them
- Maintenance and Cleaning Between Jobs
- Cost Comparison by Section Count
- Troubleshooting Clogs and Misalignment
- Comparing Chute Section Materials
- Environmental and Recycling Compliance
- Frequently Asked Questions
- Ready to Order Your Chute Sections?
What Are Trash Chute Sections?
Trash chute sections are individual modular segments of polyethylene tubing—typically 10, 25, or 50 feet in length—that connect end-to-end to form a complete debris disposal path from a job site above to a dumpster on the ground. Each section is a self-contained tube with standardized connection points (male and female coupler ends) that lock together, allowing you to customize the total height and angle of your chute without ordering custom-length pieces.
The modular design solves a real contractor problem: every job site has different heights, obstructions, and spatial constraints. Rather than committing to a fixed 40-foot or 60-foot chute that might not fit your roofline or window opening, you buy only the sections you need and assemble them on-site in minutes.
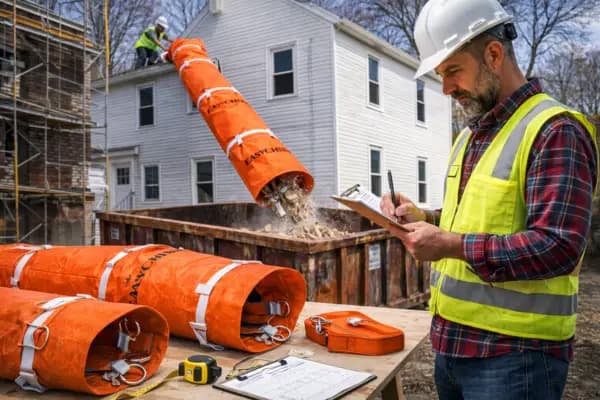
These sections are designed for high-volume debris flow—roofing shingles, drywall scraps, demolition rubble, insulation, and general construction waste all move through them smoothly. The interior surface is engineered to minimize friction and clogging, and the bright orange safety color makes the chute visible on busy job sites.
How Modular Sections Connect
Each trash chute section uses a two-part coupler system: the male end (a protruding sleeve) of one section slides into the female end (a recessed cup) of the next. The connection is secured with a locking band or compression collar that tightens around the overlap, creating a snug seal that prevents debris from escaping at the joint.
Connection steps (typical):
- Align the male end of the upper section with the female end of the lower section.
- Slide the upper section down 4–6 inches into the lower section’s receiving end, creating an overlap.
- Tighten the locking band or compression ring by hand or with a wrench until snug—do not over-tighten, which can crack the polyethylene.
- Verify the joint moves no more than ¼ inch when you push firmly on the upper section.
The overlapped joint design allows for slight angular adjustment—important on sites where you’re routing the chute around obstacles. Most contractors can connect or disconnect a section in under two minutes once they’ve done it once or twice. The modular system also makes disassembly easy at the end of the job: reverse the tightening steps, slide the sections apart, and stack them for transport or storage.
Always inspect connection points before loading debris. A loose band or cracked female end will allow debris and moisture to spill into walls or onto workers below. If a coupler is damaged, replace that section rather than attempting a repair.
Choosing the Right Section Length
Trash chute sections come in standard lengths: 10 feet, 25 feet, and 50 feet. The choice depends on your total vertical drop, number of job-site obstacles, and how many sections you’re comfortable managing during setup and takedown.
10-foot sections: Best for tight spaces, interior drops (stairwells, elevator shafts), and jobs where you only need 10–30 feet of chute. Easier to handle manually and rotate around corners. Ideal for remodels in occupied homes or condos where space is premium.
25-foot sections: The contractor sweet spot for most roofing tear-offs, multi-story demolition, and exterior wall drops. Two or three sections cover most residential jobs without excess. Balanced between manageability and efficiency.
50-foot sections: Reserved for large commercial jobs, high-rise work, or projects where you need a single long run with minimal connections. Reduces the number of joints (fewer potential leak points) but requires more labor to lift and position, especially on windy sites where a long chute acts like a sail.
A typical residential roofing tear-off (single-story to two-story) uses one 25-foot or two 10-foot sections. A three-story condo renovation might use three 25-foot sections (75 feet total) to reach from the roof to the dumpster in the parking lot below. See our chute length sizing guide for region-specific examples.
Assembly and Installation Workflow
A streamlined assembly process keeps your crew on schedule and minimizes safety risks. Here’s the workflow most contractors follow on site.
Before arrival:
- Verify all sections are accounted for and undamaged (inspect for cracks, dents, or warped coupler ends).
- Confirm you have the correct total height (measure from intended discharge point to dumpster, accounting for angle).
- Check weather forecast—avoid assembly in high winds (>25 mph) where the chute can swing and strike the building.
On-site setup (typical 25-minute job for 2–3 sections):
- Position the dumpster directly below where the chute discharge end will be. Measure the distance and ensure it’s accessible for filling.
- Lay out all sections horizontally on the ground in the order you’ll assemble them (bottom section first).
- Attach the discharge end (wide opening) of the bottom section to the dumpster lip using the provided mounting bracket or by resting it securely in the dumpster’s edge.
- Connect the second section’s male end into the first section’s female end. Tighten the locking band snugly.
- Secure the chute to the building or scaffold using tie-off straps or brackets at 10-foot intervals to prevent swaying.
- If using a third section, repeat the connection and tie-off process.
- Do a final walk-around: confirm no debris spills at joints, all tie-offs are secure, and the discharge end sits stably in the dumpster.
For our full installation instructions, see the step-by-step installation guide.
Safety Considerations During Setup
Trash chute sections are engineered for durability, but improper installation creates fall hazards, striking hazards, and debris-spillage risks. Follow these safety protocols every time.
Fall prevention:
- Use a harness and lanyard if you’re working at height while securing the chute to the building.
- Never stand directly below the chute discharge during initial test runs—debris can bounce or spray outward.
- Ensure tie-off straps are rated for at least 300 lbs of lateral load and are inspected for fraying or damage before each use.
Loading safety:
- Educate all crew members on proper debris chunking—no oversized pieces that jam the chute’s bore.
- Never drop or throw debris with force; let gravity and the chute’s angle do the work. Excessive force can cause splashback or jam the joint.
- Assign one person to monitor the chute opening and dumpster fill level. Overfilled dumpsters can cause debris to bounce back up the chute.
Environmental:
- Contain wet debris (shingles, drywall, concrete dust) in a chute bag or catch container at ground level to prevent water and dust from spilling onto adjacent property or creating slip hazards.
- If the chute discharges near pedestrian or vehicle traffic, use cones and signage to create a 10-foot buffer zone.
Review OSHA Construction Industry safety guidelines and OSHA ergonomics standards for detailed safe-lifting and load-handling protocols.
Common Assembly Mistakes and How to Avoid Them
Most assembly failures happen fast and disrupt the job. Learn the common pitfalls and how to sidestep them.
Mistake 1: Misaligned couplers. Forcing a male end into a female end at an angle damages the connection and creates a leak. Solution: Align both sections vertically before applying downward pressure. Use a level to verify.
Mistake 2: Over-tightening the locking band. Wrapping the band so tightly that it cracks the polyethylene is a common over-correction. Solution: Hand-tighten the band until snug, then add one additional quarter-turn with a wrench. Stop. A loose band is preferable to a cracked section.
Mistake 3: Skipping intermediate tie-offs. A 50-foot chute with only top and bottom tie-offs can sway or flex in the wind, opening joints and spilling debris. Solution: Install tie-off straps every 10 feet on exterior walls or scaffolding. On interior drops (stairwells), tie-offs every 15 feet are sufficient.
Mistake 4: Discharging into a misaligned dumpster. If the chute’s discharge end is 12 inches off-center from the dumpster opening, debris spreads across the ground, creating slip hazards and forcing a cleanup crew to rake everything back into the bin. Solution: Use a laser level or line the discharge end over the dumpster center before finalizing the setup.
Mistake 5: Ignoring debris size limits. A 4×4 piece of lumber or a rolled-up carpet that’s 3 feet long will jam the chute bore. Solution: Establish a crew rule: anything larger than 6 inches × 6 inches × 12 inches gets broken down or hauled manually. Brief all workers on day one.
Maintenance and Cleaning Between Jobs
A clean chute is a flowing chute. Dried-on debris, dust, and moisture create friction, leading to clogs and slow discharge on your next job. Here’s the maintenance schedule:
After each job (same day or next morning):
- Disconnect all sections and lay them horizontally on a work surface.
- Use a high-pressure washer (below 3000 psi) to rinse the interior bore, starting from the discharge end and working toward the upper end. This flushes out dust, insulation fibers, and debris residue.
- Pay special attention to coupler joints—debris loves to hide there.
- Allow sections to air-dry for at least 2 hours before stacking or storing. Moisture left inside promotes mold and accelerates polyethylene degradation.
- Inspect the interior by running a cloth or brush through the bore to confirm it’s clean and smooth.
Weekly (if running back-to-back jobs):
- Once per week, run a brush or flexible rod through the bore to break up any buildup that high-pressure washing alone didn’t clear.
- Check all coupler bands for corrosion or cracking. Replace if visibly damaged.
- Stack sections indoors or under a tarp to prevent UV exposure and moisture ingress. UV degrades polyethylene over time, making it brittle.
Seasonal (before winter storage):
- Perform a deep clean with high-pressure wash and brush.
- Allow complete drying (24 hours, if possible).
- Store in a climate-controlled warehouse or under heavy tarps outdoors. Extreme temperature swings can cause polyethylene to crack.
- Do not stack sections more than 4 high; weight compression over a long storage period can warp lower sections.
Cost Comparison by Section Count
Purchasing decisions hinge on how frequently you run chutes and what job mix you typically handle. Here’s how to think about unit cost and total outlay.
Single 25-foot section: Lowest per-job cost but limits you to small jobs (interior drops, single-story residential). If 40% of your bids require a chute and you’re buying new each time, per-unit economics are unfavorable.
Two 25-foot sections (50-foot total): Covers most residential tear-offs and small commercial work. Average investment recovers after 4–6 paid jobs if you rent sections between uses, or after 8–10 jobs if you purchase.
Three 25-foot sections + one 10-foot section (85-foot total): Sweet spot for a mid-size contractor running 2–3 simultaneous jobs. Flexibility to tackle three-story builds and offset discharge points. Monthly rental cost is often lower than the depreciation cost of ownership; evaluate both paths in your business model.
For a detailed financial walkthrough, see our rental vs. purchase decisions guide. Many contractors find renting 2–3 times per year and owning 1–2 permanent sections the optimal balance.
Troubleshooting Clogs and Misalignment
Even with proper setup, clogs and drift happen. Quick troubleshooting keeps the crew moving.
Partial clog (slow discharge):
- Stop loading immediately and allow any stuck debris to dislodge under gravity for 30 seconds.
- If nothing moves, use a plumbing snake or flexible rod (8–10 feet long) inserted from the top of the chute to dislodge the blockage. Do not force; a twisted rod can bend the chute bore.
- Flush with water (low pressure) after dislodging to clear residue.
- If the clog persists, disconnect sections from the top down until you isolate the problem section. Replace it and resume work.
Complete blockage:
- Disconnect the chute immediately. Do not force debris through a completely blocked section—you risk cracking the coupling or bursting the bore.
- Remove the blocked section and clear it horizontally by flushing or passing a brush through the entire length.
- Reconnect and test before resuming full-volume loading.
Drift (chute discharge misaligned from dumpster):
- High winds or uneven loading on one side of the chute can cause it to sway laterally. Debris spills outside the dumpster.
- Tighten tie-off straps on the windward side and loosen slightly on the leeward side to recenter the chute.
- Add an intermediate tie-off if the chute is moving more than 2 inches.
- On multi-story drops, consider adding a fabric chute bag (catch net) at the discharge to funnel debris into the dumpster.
For full debris chute system troubleshooting and clog prevention, see our detailed system guide.
Comparing Chute Section Materials
Modern trash chute sections are predominantly high-density polyethylene (HDPE) or reinforced polycarbonate. Both have trade-offs worth understanding.
High-density polyethylene (HDPE):
- Pros: Lightweight (easy to handle on ladders and roofs), UV-resistant, smooth interior surface minimizes friction, excellent for high-volume debris flow, low cost, bright orange safety color standard.
- Cons: Can become brittle in extreme cold (below 0°F); requires careful stacking to avoid warping over time. Not suitable for projects involving sharp metal scraps that can puncture the bore.
Reinforced polycarbonate:
- Pros: More abrasion-resistant; handles sharp metal, broken glass, and demolition rubble without risk of puncture. Stiffer material reduces flex in wind.
- Cons: Heavier (more labor-intensive setup), more expensive per section, surface can become rough if scratched, reducing flow speed.
For most general construction debris (roofing, drywall, insulation, wood scraps), HDPE is the standard choice. If your crew regularly handles high-volume demolition with exposed rebar or sharp concrete pieces, reinforced sections justify the added cost.
Environmental and Recycling Compliance
Construction and demolition debris is the largest waste stream in the U.S. by volume. Using a chute system responsibly means understanding local recycling mandates and contamination rules.
Sorting and pre-chute segregation: Many municipalities require separation of recyclables (wood, metal, cardboard, drywall) from general debris before disposal. If your chute routes mixed waste into a single dumpster, you may face surcharges or refusal of the load. Solution: use two chutes (one for wood/metal, one for general) or stop and hand-sort heavy recyclables on-site.
Hazardous material avoidance: Never load asbestos-containing materials, lead paint dust, or solvent-soaked rags into a chute. These require separate disposal and can contaminate the chute, making it unusable for future jobs. Brief your crew on day one about prohibited items.
Wet debris containment: Wet drywall, wet insulation, and concrete slurry discharged from a chute create puddles, erosion, and runoff. Use a chute bag for dumpster or catch container to contain splashing and meet local stormwater rules.
The EPA construction and demolition debris facts and EPA recycling overview provide guidance on regional requirements.
Frequently Asked Questions
Can I connect different brand or length sections together?
No. Always use sections from the same manufacturer and of the same diameter (bore size). Mismatched couplers create gaps and allow debris to escape, and mixing 6-inch and 8-inch bore sections will jam at the transition. Stick to one brand throughout the job.
What’s the maximum weight capacity of a single chute section?
Capacity depends on the material and coupler strength, not the section length. A typical HDPE section rated for construction debris handles roughly 2,000–3,000 lbs of contained weight without structural failure. However, dynamic loading (dropping heavy items) exceeds static limits. See our weight capacity guidelines for specifics by section type.
How do I prevent the chute from rotating or twisting during use?
Rotation happens when debris loads unevenly on one side or wind pushes against the chute. Use tie-off straps every 10 feet, and ensure each strap has equal tension on both sides of the chute. A twisted chute can separate at joints. Inspect regularly during the job.
Can chute sections be repaired if they crack?
Small cracks (less than 1 inch) in the bore can be sealed with a two-part epoxy putty or polyethylene patch kit, but the repair is temporary and may not hold under high-volume loading. For structural integrity and safety, replace the cracked section. Repairs are not recommended for coupler ends, which bear all the connection stress.
What angle should the chute be at for optimal flow?
Thirty to forty-five degrees from vertical is ideal. Shallower angles (closer to horizontal) slow debris and increase jam risk. Steeper angles (closer to vertical) increase velocity and splashing. Most job sites naturally fall into this range when you route from a roofline or upper floor down to a ground-level dumpster.
How long do chute sections typically last if properly maintained?
HDPE sections used and maintained correctly (cleaned after each job, stored indoors, UV-protected) last 5–7 years of active use. Accelerated wear occurs with sharp metal debris, improper storage (stacked too high or exposed to sun), and skipped cleaning. Track your sections and retire any with visible bore degradation.
Can I use a chute section for anything other than construction debris?
Chute sections are designed for construction and demolition debris only. Do not use them for liquid waste, hazardous materials, or regular garbage. Liquids can degrade the interior and create slip hazards at the discharge. Hazardous materials pose safety and liability risks.
Ready to Order Your Chute Sections?
Whether you’re building out a fleet of permanent sections or renting for a one-time large project, the right chute configuration saves time and money while keeping your crew safe and compliant. Trash chute sections are the modular backbone of professional debris management—they allow you to scale from a small residential job to a multi-story demolition without over-investing in fixed equipment.
Start by assessing your typical job profile: average building height, debris mix, and frequency of chute use. Then consult our modular trash chute system overview and ordering and delivery options to find the right mix of section lengths and quantities.
If you have specific questions about your site layout, wind exposure, or local compliance needs, our team can walk through a custom configuration. Call +1-855-902-4883 to discuss your project, or request a detailed quote for sections, tie-offs, and accessories. We offer flexible rental and purchase options to match your cash flow and job schedule.