

Index
- What Is a Construction Debris Chute?
- Why Contractors Use Chutes Over Manual Hauling
- Chute Types and Configurations
- Selecting the Right Chute for Your Job
- Installation and Mounting Best Practices
- Safety Compliance: OSHA and Jobsite Requirements
- Positioning and Dumpster Alignment
- Loading Workflow and Efficiency Tips
- Maintenance and Clog Prevention
- Cost Comparison: Rental vs. Purchase
- Debris Types and Weight Limits
- Frequently Asked Questions
- Get Started with Your Chute Setup
What Is a Construction Debris Chute?
A construction debris chute is a vertical or angled tubular system that safely channels building waste from upper floors or roof level directly into a dumpster or collection bin at ground level. Modern chutes are typically made of heavy-duty polyethylene or steel and come in modular sections that connect together, allowing contractors to adjust length and angle based on jobsite layout.
The core function is simple: reduce manual handling, speed up debris removal, and keep your crew safe. Instead of carrying shingles, drywall, concrete chunks, or wood scraps down multiple flights of stairs or via elevator, workers load materials into the chute opening and gravity does the work. This translates to faster project timelines, fewer worker injuries, and cleaner jobsites.
Why Contractors Use Chutes Over Manual Hauling
Manual debris removal is labor-intensive, time-consuming, and a leading source of jobsite injury. According to OSHA Construction Industry standards, repetitive lifting and stair descent with heavy loads account for significant musculoskeletal strain. A debris chute eliminates that risk.
- Speed: Workers load material into a chute opening on the floor they’re working; no trips up and down stairs or elevator congestion.
- Labor cost savings: Fewer crew hours spent hauling translates directly to lower labor overhead per square foot of work.
- Safety: Reduced falls, back injuries, and repetitive strain. Chutes keep debris contained and moving predictably.
- Site cleanliness: Debris flows directly into the dumpster rather than accumulating on landings or stairwells, improving visibility and reducing trip hazards.
- Dumpster efficiency: Material settles and compacts as it falls, maximizing cubic footage and reducing the number of dumpster swaps needed mid-job.
Real-world example: A roofing tear-off on a 3-story colonial in suburban Massachusetts generates roughly 8–12 tons of shingles and plywood. With a chute, two workers can load and organize material in under 6 hours. Without a chute, the same job requires 4–5 workers and a full day of stair traffic, elevator use, and manual sorting.
Chute Types and Configurations
Not all debris chutes are the same. The type you choose depends on your building geometry, debris type, jobsite access, and regulatory environment.
Vertical Drop Chutes
These run straight down the facade of a building, suspended from roof-level scaffolding or rigging points. Best for new construction and major demolition on buildings with adequate exterior clearance. Vertical chutes move material fastest and are least prone to jamming.
Angled/Spiral Chutes
Used when vertical mounting isn’t possible—typical in tight urban lots or renovation projects where you need the discharge end offset from the building face. Angled chutes slow debris slightly (reducing impact at the dumpster) and allow positioning over non-adjacent loading zones.
Modular Sectional Systems
The most popular choice for contractors. A modular system consists of stackable, interlocking sections (typically 10, 25, or 50 feet long) that you assemble on-site to fit the exact height and angle needed. Modular chutes are faster to install, easy to reconfigure if jobsite conditions change, and economical for jobs requiring variable lengths.
Window-Drop Chutes
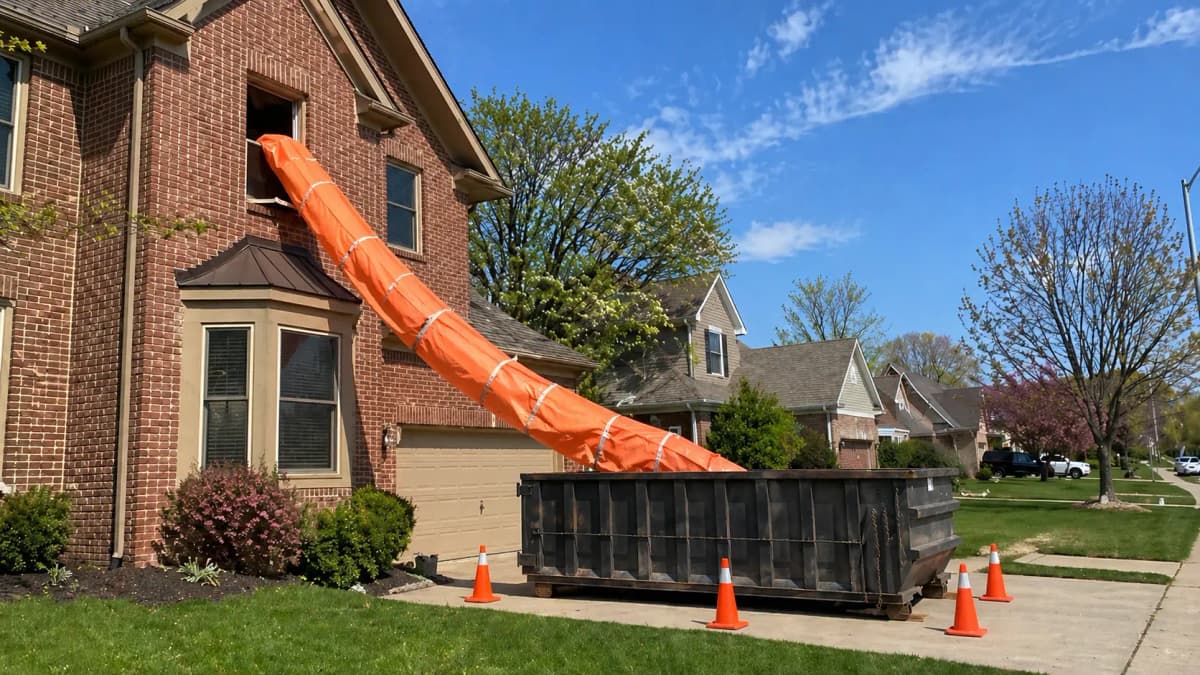
For interior renovation, especially residential remodels. Workers load material through a window opening into a chute positioned outside, directing debris into a dumpster below. These are ideal when exterior scaffolding isn’t an option and minimize interior floor traffic.
Selecting the Right Chute for Your Job
Choosing the right chute hinges on five questions:
- What is the total vertical height? Measure from the highest loading point (roof or upper floor) to ground level. This determines the number of modular sections you’ll need.
- What is the debris type and volume? Shingles and light wood load differently than concrete chunks or drywall. Heavier materials require stronger sections and may benefit from an angled chute to reduce drop-impact stress on the system and dumpster.
- Where is the dumpster positioned? If the dumpster must sit directly below the building face, a vertical chute is ideal. If ground space is tight or the dumpster needs to be offset, consider angled or window-drop options.
- What are local jobsite and building constraints? Historic districts, HOA communities, and dense neighborhoods often have noise, appearance, and staging restrictions. Some require the chute to be shielded or require specific tie-off methods for wind loads.
- How long is the job? Short-term rental is cost-effective for a 2–3 week roofing project. Multi-month renovations may justify purchasing or exploring longer-term lease agreements.
Consult our weight capacity guide and chute sections resource to understand load limits and match section specifications to your debris profile.
Installation and Mounting Best Practices
Proper installation is critical for safety and performance. Here’s a step-by-step overview:
Inspect the Mounting Points
Before you order or assemble, identify where the chute will attach. For scaffold-mounted systems, verify that the scaffold is rated for the additional load and that attachment points are sound. For roof-mounted systems, check roof framing and ensure you have proper flash-sealing to prevent water infiltration.
Assemble Modular Sections
Our installation steps guide walks through the mechanics, but in brief: stack sections from bottom to top, secure interlocking clips, and verify each joint is snug. Missing or loose clips are a common cause of chute separation and jobsite hazards.
Secure the Assembly
Once assembled, the chute column must be tied off or braced to prevent swaying or lateral movement. Use industrial strapping, cable, or rope anchored to stable building components—never rely on gravity or friction alone. Wind loads and vibration from material movement can destabilize an unsecured chute.
Install Safety Hardware
At the top loading opening, install a safety flange or collar that prevents workers from accidentally stepping into the chute. At the discharge end, ensure the chute is angled correctly (typically 45–60 degrees) so debris flows smoothly into the dumpster without piling up or rolling out to the side.
Test Before Use
Before loading crew materials, drop test-loads (scrap wood, empty bags) through the full length to confirm flow, alignment, and dumpster fit. This catches alignment or catch issues before full-scale loading begins.
Safety Compliance: OSHA and Jobsite Requirements
Construction debris chute safety is regulated under OSHA ergonomics guidance and general OSHA Construction Industry standards. Key compliance points:
- Personal protective equipment (PPE): Workers loading chutes must wear hard hats and high-visibility vests. If the chute is above pedestrian pathways, barricade the discharge zone and post warning signage.
- No riding chutes: Explicitly prohibit workers from riding chutes or allowing material to be thrown into the chute at high velocity. Debris jams and chute separation can occur, and anyone in or near the chute is at risk.
- Inspection and maintenance: Inspect the chute at the start of each workday for cracks, loose sections, or debris clogs. Document findings and address issues immediately.
- Fall protection at loading openings: If loading points are more than 6 feet above the ground and workers are standing on unguarded edges, install guardrails or harness systems to prevent falls.
- Overhead protection for workers below: If foot traffic passes under or near the discharge zone, install a protective canopy or control access to that area while loading is underway.
Many jobsites require a completed Jobsite Safety Plan that addresses chute use before the first piece of debris goes in. Work with your GC or safety manager to confirm all local requirements.
Positioning and Dumpster Alignment
Precise positioning is the difference between a smooth workflow and a frustrating, inefficient project.
Measure and Mark Before Setup
Use a plumb bob or laser level from the loading opening down to ground level. Measure the horizontal distance the discharge end will extend, then position the dumpster so the chute opening aligns directly with the dumpster opening, allowing a 6–12 inch margin on each side for flow and settling.
Account for Ground Slope
If the jobsite slopes, position the dumpster so that the chute discharge sits at the center of the dumpster opening. A chute discharging into a tilted dumpster will cause material to roll to one side, creating weight imbalance and potential overflow.
Wind and Tie-Offs
In coastal or high-wind regions, the chute column itself can sway, causing the discharge end to drift out of alignment. Install diagonal cable tie-offs anchored to building corners or ground anchors to keep the chute stable. This is especially important for tall chutes (40+ feet) on single-family or multi-unit residential sites.
Proximity to Building Entrance
Position the dumpster so that the discharge zone does not block worker entry/exit or create a safety hazard for pedestrians. Ideally, place the dumpster in a corner or along the property line, away from the main access path.
Loading Workflow and Efficiency Tips
Even the best chute system depends on smart loading discipline. Here’s how to maximize throughput and minimize downtime:
Designate a Loading Zone
On each floor where loading will occur, establish a temporary staging area near the chute opening. Workers gather material from the work zone, bring it to the staging area, and load into the chute in batches. This prevents congestion at the chute opening and keeps the loading floor organized.
Load in Batches, Not Continuously
Rather than dumping random pieces constantly, load in organized batches: 5–10 pieces at a time, pause to let material settle in the dumpster, then load the next batch. This rhythm reduces clogs, prevents dumpster overflow, and allows the discharge material to compact under its own weight.
Break Large Items
Drywall sheets, plywood, and roofing materials that are wider than the chute opening must be broken down before loading. A reciprocating saw on-site takes seconds per piece and prevents jams that can halt the entire workflow for 15–30 minutes.
Monitor Dumpster Fill Depth
Train the crew to watch dumpster fill levels. Once material reaches the top edge of the dumpster, stop loading and schedule a swap. Overfilled dumpsters spill material, create jobsite safety hazards, and result in additional hauling costs.
Keep the Discharge End Clear
Assign one person each shift to visually inspect the discharge end periodically (every 2–4 hours) and clear any debris buildup around the opening. A simple broom and shovel prevent small clogs from becoming large ones.
Maintenance and Clog Prevention
A jammed chute halts your entire debris workflow. Prevention is the best strategy.
Daily Inspection
At the start of each workday, visually inspect the chute column from ground level, looking for cracks, loose sections, or visible obstructions. If you notice anything, address it before loading begins.
Prevent Large-Item Jams
The most common clog is a piece of material that enters the chute at an angle and gets wedged. A chute bag or chute bag system reduces jams by creating a flexible funnel that guides material straight down. For jobs generating long items (2x4s, rebar, drywall strips), using a chute bag is nearly essential.
Clear Wet or Compacted Debris
In humid or rainy climates, debris can compact inside the chute, especially if roofing material or wet drywall dust accumulates. On wet days, periodically pour water down the chute to help material flow. If a clog develops, use a plumbing snake or a wooden dowel (never metal, which can damage the chute interior) to dislodge it.
Inspect Joints and Clips
Every 3–5 days, climb the chute (with proper fall protection) and visually verify that all interlocking clips are tight. Vibration from material movement can loosen clips over time. A loose joint is a safety hazard and can lead to section separation.
Document Maintenance
Keep a simple log on-site: date, time, inspection notes, any repairs or adjustments. This protects you legally and helps the safety team spot patterns (e.g., clogs always occur on Mondays after weekend rain).
Cost Comparison: Rental vs. Purchase
The rental-versus-purchase decision depends on your typical job volume and project duration.
Rental Economics
Short-term debris chute rental typically costs $150–$500 per week, depending on length and location. For a 2–3 week project, rental is economical because you avoid ownership costs (storage, maintenance, transportation). Rental also shifts liability to the equipment provider for structural integrity.
Purchase Advantages
A modular debris chute system costs $2,500–$8,000 to purchase outright, depending on total length and material. If you run 6+ projects per year and have secure storage, purchasing breaks even in 2–3 years and offers unlimited use thereafter. You also control setup schedules and don’t face rental delays or inventory constraints.
Long-Term Lease
Some suppliers offer annual lease agreements for $1,200–$2,500 per year, which works well for contractors who run frequent jobs but don’t justify full ownership. The lease typically includes delivery, pickup, and basic maintenance.
Evaluate your job pipeline. If you have 8–10 projects annually, ownership or a long-term lease is usually more cost-effective. If you have 2–3 projects per year, rental is smarter.
Debris Types and Weight Limits
Different debris types have different densities and handling requirements. Understanding these prevents overloading and equipment failure.
Roofing Material (Shingles, Underlayment, Felt)
Relatively light (50–150 lbs per bundle), but bulky and prone to bridging (creating air pockets in the chute). Load in small batches and use a chute bag to keep shingles feeding smoothly. A 50-foot chute can handle a full roof tear-off in 4–6 hours.
Drywall and Plasterboard
Moderate weight (30–50 lbs per sheet), but flat sheets can jam if they enter sideways. Break large sheets into 3–4 foot sections and feed vertically (on edge) rather than flat. A single jammed drywall sheet can halt the chute for 20+ minutes.
Concrete, Masonry, and Hard Debris
Heavy (100+ lbs per cubic foot). These materials settle quickly and compress well, maximizing dumpster use. However, they create impact stress on the chute and dumpster bottom. Use an angled chute to slow descent and reduce impact shock. Verify your weight capacity before loading heavy demolition debris.
Mixed Debris (Typical Remodel)
A combination of light wood framing, drywall, old plumbing, electrical wire, and miscellaneous items. Load in organized batches, separating recyclables (metal pipes, wire) if your market has recycling programs. Mixed debris is the most challenging to predict; when in doubt, load conservatively and monitor dumpster settling behavior.
Load Limits Summary
- Standard residential chute (10–25 feet): 500–1,000 lbs per hour safely
- Commercial chute (50+ feet, heavy-duty): 2,000–3,000 lbs per hour
- Angled chutes (40+ degree incline): Slightly lower throughput but safer for heavy materials and impact zones
When in doubt, consult the equipment manufacturer’s spec sheet or our demolition-specific setup guide.
Frequently Asked Questions
How long does it take to install a construction debris chute?
A standard modular chute installation takes 2–4 hours for a 3–4 story residential project. Most of the time is spent positioning the dumpster, assembling sections, and securing tie-offs. Once you’ve done a few installations, the process becomes routine. A scaffold-mounted system on a larger commercial site may take 6–8 hours if you’re coordinating with the general contractor and safety personnel.
Can I reuse a debris chute on multiple projects?
Yes, modular chutes are designed for repeated use. The plastic and metal sections are durable and can be reconfigured for different heights and angles. Over time, normal wear (scratches, minor cracks) doesn’t affect performance. If you own a chute, you can use it for 10+ years with minimal maintenance. Storage and transportation costs are the main drawback of ownership, so factoring in climate-controlled storage when budgeting.
What happens if the chute gets jammed mid-project?
Most jams can be cleared within 20–30 minutes using a plumbing snake or wooden rod from the top of the chute. If the jam is severe (two large pieces wedged together), you may need to disconnect sections above the jam point and remove the obstructing material manually. This is rare but underscores the importance of breaking down large debris before loading and monitoring the chute regularly. Prevention (using chute bags, loading in batches) avoids this altogether.
Are construction debris chutes rated for winter or wet-weather use?
Yes, but with precautions. In freezing temperatures, ice can form on the interior, slowing material flow. In heavy rain, water may pool in the chute if drainage isn’t adequate. Most chutes are designed with a slight downward slope to allow water drainage. In winter, you may need to increase loading frequency to prevent icing. Some contractors cover the chute top to minimize water ingress on heavy rain days.
How much does a dumpster overflow cost if chute debris overflows?
Most dumpster companies charge $150–$300 per additional haul if you exceed the contracted fill level. Keeping your crew aware of dumpster fill depth prevents overages. Many chute systems include a “dumpster monitor” who checks fill levels every 2–4 hours and signals the loading crew to pause when the dumpster is full.
Can I use a debris chute for hazardous materials like asbestos or lead-painted wood?
No. Hazardous materials must be handled separately and disposed of through licensed waste facilities. Asbestos, lead paint, and contaminated soil cannot flow through a standard chute system and create serious health and legal liability. If your demolition or remodel uncovers hazardous materials, stop loading through the chute, isolate the contaminated area, and consult a certified hazmat contractor.
What’s the difference between a debris chute and a trash chute?
Technically, the terms are often used interchangeably, but “trash chute” traditionally refers to chutes used in multi-family residential buildings for daily waste disposal, while “debris chute” refers to temporary systems for construction and demolition. Trash chutes in apartments are typically vertical, built-in, and used for smaller volumes of regular waste. Construction debris chutes are external, modular, and handle large, irregular, and heavy materials. Our debris chute vs. trash chute comparison offers more detail.
Get Started with Your Chute Setup
A construction debris chute is one of the simplest and most effective ways to accelerate your project timeline, reduce labor costs, and improve jobsite safety. Whether you’re managing a single-family roofing tear-off or a multi-unit commercial demolition, the right chute system adapts to your needs.
Start by assessing your project: What’s the total height? What debris type are you removing? How many tons per day will you generate? Then consult our regional regional setup guides or reach out directly to review specifications and explore rental or purchase options.
For detailed guidance on your specific jobsite scenario—whether that’s a scaffold-mounted chute, a window-drop setup, or a custom modular system—our contractor specialists are available to walk you through sizing, safety compliance, and workflow optimization. Call +1-855-902-2883 or visit our site to request a consultation.
Ready to streamline your next project? Let us help you choose and configure the right debris chute system for your crew’s needs.