

If you are a contractor, roofer, or junk removal crew working in Peabody, MA, and you have never run a debris chute on a job site before, the first time can feel uncertain. Where does it hang? How many sections do you need? What do you do when a window frame is narrower than you expected? These are real questions from real crews — and this guide answers all of them.
Peabody is a working city north of Boston. You have got strip-mall commercial builds off Route 1, colonial-era homes near the town center that go two and three stories up, and dense residential neighborhoods where dumpster placement takes creative thinking. Debris chute setup here has its own texture, and understanding that texture before you show up saves time, reduces risk, and keeps your crew focused on the actual work.
Why Peabody Job Sites Have Specific Setup Challenges
Peabody sits in Essex County and blends older residential stock with newer commercial corridors. That means contractors regularly face a mix of two-story capes with steep rooflines, three-story triple-deckers near downtown, and commercial strip rehabs along Route 1 that require debris management from elevated scaffolding.
Setbacks can be tight. Driveways in older Peabody neighborhoods are often narrow, which limits where you can stage a dumpster. If your dumpster has to sit 20 or 30 feet from the building face, you need a chute long enough to reach it cleanly. That is exactly the kind of planning a debris chute makes possible — it extends your reach without requiring your crew to walk material down stairs repeatedly.
Typical Building Heights You Will Encounter
- One-story ranches and bungalows: Common in south Peabody — a single 10 ft section is usually enough for roof debris or gutter work.
- Two-story colonials and capes: The most common residential build in Peabody. A 25 ft section or two 10 ft sections connected typically reaches comfortably.
- Three-story triple-deckers: Found in denser sections closer to downtown. Plan for 35 to 50 ft of chute depending on dumpster placement.
- Commercial scaffold work on Route 1 corridor: Heights vary. Measure scaffold deck height above grade and add 5 to 10 ft of buffer for dumpster positioning.
Before You Arrive: Pre-Site Planning That Saves Real Time
The fastest chute setups happen because someone did five minutes of planning before the crew arrived. When you are headed to a Peabody job, here is what to think through the night before or the morning of.
Measure the Drop Height
Use the building's story count as a rough guide: each story runs approximately 9 to 10 feet. Add the height of the window sill or roof edge above the floor, and subtract the height of the dumpster opening from grade. That net number is your required chute length. Order or bring at least 5 extra feet of chute if the dumpster position is uncertain — you can always leave a section in the truck.
Confirm Dumpster Placement Ahead of Time
Call your roll-off company and confirm exactly where the dumpster will land. In tight Peabody driveways, the driver may have to position it at an angle or further from the building than planned. A chute hung from the second-floor window needs the dumpster within a reasonable lateral distance — a chute drops mostly straight down, so if the dumpster is 10 feet to the left of the window, you will need an angled or repositioned hang point.
Check the Hang Points
EasyChute sections hang from four woven loops using standard carabiners or quick-connects. Before you get to the site, think through what you are anchoring to: a window frame header, a scaffold tube, a roof decking edge, or a ladder standoff. Each of those surfaces requires a slightly different rigging approach. If you are unsure, review the step-by-step EasyChute installation guide so the crew is not problem-solving from scratch on the ground.
What You Need in the Truck Before Pulling Out
A debris chute setup goes sideways when a crew shows up missing a simple piece of hardware. Here is a short pre-job checklist for Peabody sites:
- EasyChute sections in the right total length (10 ft, 25 ft, or 50 ft, or combinations)
- Four carabiners or quick-connect clips per hang point (four loops per section)
- A measuring tape — confirm the actual drop height on arrival
- Work gloves — the coated poly fabric has edges that can abrade bare hands during setup
- A second person if you are working above 15 feet — one person to hold the chute while the other clips it in
- Tie-off rope or bungee if you need to secure the chute's lower end toward the dumpster opening
The EasyChute sections weigh under 3 lbs per 10 ft, so even a full 50 ft kit goes up stairs easily. That weight advantage matters a lot when you are working in a triple-decker and carrying everything to the third floor before the job even starts. Learn more about how the system works on the fabric trash chute overview page.
Step-by-Step: The Actual Setup Process in Peabody
Here is what a typical debris chute installation looks like on a Peabody residential job site — from the moment you park to the moment debris is flowing.
Step 1 — Stage the Dumpster and Mark the Drop Zone
Once the dumpster is placed, stand at the building and look down at it. Mentally draw a vertical line from your intended hang point to the dumpster opening. That line is your chute path. If the dumpster is not under that line, now is the time to shift it — before the chute is in the air. Mark the ground with a chalk line or cone so the crew knows where to keep it clear.
Step 2 — Carry Sections to the Upper Floor or Roof
Take all sections up at once. They fold small and are light enough that one person can carry a full 25 ft section under one arm. Unfold them on the floor or roof deck before you try to hang them — tangled sections on a ladder is a safety problem, not just an inconvenience. OSHA construction safety standards are clear that ladder work should be minimized when alternatives exist — handling light materials on the floor before ascending is exactly that kind of risk reduction.
Step 3 — Hang the Top Section First
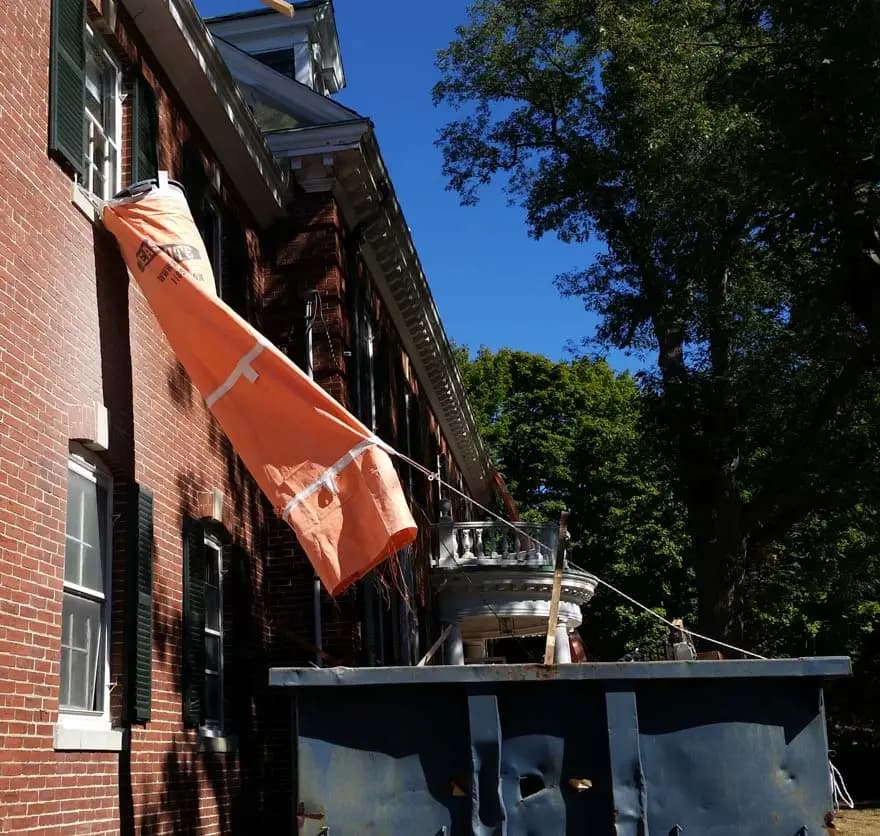
Start at the top. Clip the four woven loops of your uppermost section to the hang point — window header, scaffold tube, or roof edge anchor. Confirm all four carabiners are fully closed before you let the section go. The chute should hang vertically with its opening facing up into the work area and its lower end pointing toward the dumpster.
Step 4 — Connect Additional Sections Below with Overlap
Each section connects with a 1.5 ft overlap — you slide the lower section up inside the upper one before clipping or securing the connection. This overlap prevents debris from escaping at the joint. Work your way down, connecting sections until the lower end sits at or just inside the dumpster opening. The EasyChute video library shows this connection process clearly if you want your crew to watch it before the first job.
Step 5 — Verify Clearance and Load Test
Before the crew starts loading material, do a quick visual: is the chute clear of windows, exterior trim, and foot traffic areas below? Drop a small piece of material through to confirm it flows freely and lands inside the dumpster. If the chute is swinging away from the dumpster, tie off the bottom end with a bungee or rope to hold it in position.
What Happens During a Roofing Tear-Off in Peabody
Roofing is one of the most common use cases for debris chutes in Peabody. The city has a lot of aging asphalt shingle roofs on two-story colonials that get torn off and replaced. Here is what that specific setup looks like.
Hanging from the Roof Edge
For a standard shingle tear-off, the top section is usually hung from the roof edge itself or from a standoff bracket clamped to the fascia. The opening of the top section faces the roof deck, and the roofer shovels or slides shingles into it. EasyChute's heavy-duty 10 ft sections are built for exactly this — shingle weight, nail load, and repeated use. See the full approach in the roofing trash chute guide.
Managing Shingle Flow
Old three-tab shingles and architectural shingles move differently through a chute. Three-tab slides fast and can build up speed — keep the dumpster close so they do not ricochet out the bottom. Architectural shingles are heavier per piece and tend to drop straight without much skipping. Avoid loading more than one or two shingles at a time if the chute is especially long — bunching at a joint can create a temporary blockage, though it usually clears on its own.
Interior Gut Work and Window-Hung Setups
Interior demolition is the other major chute application in Peabody. When a contractor is gutting a kitchen, bathroom, or entire floor of a colonial, carrying debris downstairs by hand is slow and punishing on the crew's bodies. A chute hung from a second- or third-floor window changes the math entirely.
OSHA ergonomics guidance consistently identifies repetitive heavy lifting as a leading driver of musculoskeletal injuries on job sites. Using a chute to move demo debris directly from the work floor to the dumpster eliminates dozens of loaded trips per day — that is real injury prevention, not just convenience.
Fitting the Chute Through a Window Opening
EasyChute sections are designed to fit through standard window openings. The top section hangs from the window header with carabiners clipped to the header trim or a crossbar placed across the frame. The fabric drapes through the window and then hangs vertically on the exterior. If the window opening is narrow, you may need to fold the chute inlet slightly during hang — it will open up under its own weight and debris load once material starts flowing. For a detailed look at interior gut work setups, see the demolition chutes complete guide.
Keeping the Work Area Clear
When a chute is running from an upper floor window, the zone below it on the exterior must be roped off. Debris — especially drywall chunks and plaster from older Peabody homes — can generate dust and small fragments as it exits the chute's lower end. Barrier tape and signage are standard. If the job site is near a sidewalk or public way, check with the Peabody Building Department about whether a sidewalk shed or additional barrier is required for your permit.
Common Setup Mistakes Peabody Contractors Make (and How to Avoid Them)
These are the mistakes that show up repeatedly, especially on first-time chute jobs:
- Underestimating the drop height: Measure first. A chute that is 5 ft short leaves you scrambling for a makeshift extension or repositioning the dumpster under time pressure.
- Placing the dumpster too far lateral from the hang point: The chute drops vertically. If the dumpster is offset by more than a few feet, material exits at an angle and misses. Adjust dumpster placement before hanging, not after.
- Skipping the section overlap: If you skip the 1.5 ft overlap at joints, debris escapes between sections. This creates a mess, a potential hazard below, and wasted material that lands outside the dumpster.
- Loading material that is too large: A chute has a diameter. Large chunks of concrete, full-length lumber, and bathtubs do not go in a chute — they need to be broken down or hand-carried. Use the chute for what it is designed for: shingles, drywall, insulation, wood scraps, and similar debris.
- Not tying off the lower end: On windy days — and Peabody near the coast gets wind — an unsecured lower end can swing and dump debris outside the dumpster. A simple bungee fix takes 30 seconds.
For a broader look at material types and how chutes handle them, the canvas and fabric trash chute comparison page covers material compatibility in detail.
How Long Does Setup Actually Take?
This is the question every project manager asks. For a standard two-story Peabody colonial with one chute hang point and 25 ft of chute, a two-person crew that has done it once before can be fully set up — dumpster positioned, chute hung, test drop completed — in under 15 minutes. A first-time crew should budget 20 to 30 minutes.
Teardown is faster. EasyChute sections unclip, fold, and pack into their carrying boxes in minutes. Because the fabric is reusable job after job, teardown is part of your equipment recovery routine — not a disposal task. That reusability is a meaningful cost advantage over single-use poly chutes, which go into the dumpster themselves when the job ends. Compare the two options in the debris chute vs poly chute contractor comparison.
Peabody Permit and Site Compliance Considerations
Peabody is part of Massachusetts, which has active building and environmental oversight. While a debris chute itself generally does not require a separate permit, your overall demo or renovation permit will cover the work environment. A few things to keep in mind:
- If your chute extends over a sidewalk or public easement, the City of Peabody may require a right-of-way permit or traffic control plan. Check with the DPW or Building Department before setup.
- Construction and demolition debris is regulated at the state and federal level. The EPA's C&D debris guidance outlines what qualifies as regulated waste and what disposal routes are appropriate — relevant if you are dealing with older Peabody homes that may have lead paint or asbestos-containing materials.
- If your project is near Salem or the coastal estuaries, stormwater management rules may apply. Debris that escapes a chute and enters storm drains can trigger compliance issues — another reason to run a tight, properly tied-off setup.
When to Use Multiple Chute Runs on the Same Job
Larger Peabody projects — full gut renovations, commercial strip rehab work, or multi-unit residential tear-outs — sometimes benefit from two separate chute positions. This happens when:
- The building footprint is long and debris is generated at both ends (a common issue on cape-style homes with additions).
- You are working multiple floors simultaneously and do not want one crew waiting for the chute while another is using it.
- The dumpster must be split across two locations due to site constraints.
EasyChute sells sections at fixed prices with free shipping, so ordering a second kit for a large job is straightforward. Visit the contact page if you have questions about ordering multiple kits for a single project.
After the Job: Packing, Inspecting, and Storing Your Chute
One of the strongest arguments for a fabric chute over a rigid poly chute is what happens after the last load drops. Here is a quick post-job SOP:
- Unclip all carabiners from the top hang point and lower the chute hand-over-hand — do not let it free-fall onto concrete, which stresses the fabric and loops.
- Disconnect sections at the overlap joints.
- Shake each section to clear dust and debris. Drywall dust is the main accumulator — a quick shake is usually enough.
- Fold each section flat and roll or accordion-fold it into its storage box. EasyChute sections pack small enough to fit in a truck bed box or job site bin.
- Inspect the loops and seams. If a loop shows fraying or a seam has separated, flag that section for repair or replacement before the next job.
- Store in a dry location — coated poly fabric handles moisture well, but long-term storage in standing water is not ideal for any fabric product.
Treated this way, a set of EasyChute sections can run many jobs before showing meaningful wear. That per-job cost dilution is a core part of the value proposition. For crews that are new to fabric chutes, the EasyChute FAQ page covers durability, cleaning, and storage questions in detail.
Frequently Asked Questions
How many chute sections do I need for a typical two-story Peabody colonial?
For a standard two-story colonial in Peabody, you are typically looking at a drop height of 18 to 22 feet from the second-floor window sill to the dumpster opening. A 25 ft EasyChute section covers that comfortably with room for the dumpster to sit a few feet from the building face. If the dumpster is farther back or the window is on the upper portion of the second story, two 10 ft sections or one 25 ft plus one 10 ft gives you more flexibility.
Can one person set up an EasyChute on a Peabody job site alone?
For a single-story or low second-floor hang, one person can manage setup — the sections are light and the loops clip easily. For anything above 15 feet, a two-person setup is strongly recommended: one person at the top securing the clips, one person below keeping the chute aligned and the lower end positioned over the dumpster. Working alone at elevation also raises general fall-risk concerns that are addressed in OSHA construction safety guidance.
What debris types should not go into an EasyChute?
EasyChute sections are designed for loose, manageable debris: asphalt shingles, drywall sheets and chunks, insulation batts, wood scraps, plaster, and similar material. Avoid feeding in full-length structural lumber (it can wedge), large concrete blocks or slabs, and sharp metal objects like cut rebar that could puncture the fabric. Break oversized material down before it goes in the chute, or hand-carry it to the dumpster.
Do I need a permit to run a debris chute in Peabody, MA?
The debris chute itself typically does not require its own permit — it is covered under the general construction or demolition permit for the project. However, if the chute or any associated equipment extends over a public sidewalk or right-of-way, you may need a separate right-of-way permit from the City of Peabody's DPW or Building Department. It is always worth a quick call to confirm before setup, especially on jobs close to public ways or in denser downtown sections of the city.
How do I keep the chute from swinging away from the dumpster on windy days?
Peabody and the North Shore region can get coastal wind, especially on exposed rooflines. The most effective fix is to tie off the lower end of the chute with a bungee cord or a short length of rope anchored to the dumpster's side rail or handle. This holds the chute mouth in position over the opening. For longer runs, you can also use a mid-chute anchor point — a rope tied around the chute body and secured to the building — to reduce swing along the length of the run.
Is EasyChute reusable across multiple jobs?
Yes — the coated woven poly fabric is built for repeated use. After each job, shake out the section, fold it back into its storage box, and inspect the loops and seams. Treated correctly, a set of EasyChute sections can run many projects before showing meaningful wear. This reusability is what makes the per-job cost significantly lower than single-use poly chutes, which must be discarded after each project.
What is the fastest way to get EasyChute sections delivered to a Peabody job site?
EasyChute sells at fixed prices with free shipping to job sites across the United States, including Peabody, MA. Order online and ship directly to the job site address. Because the sections pack small and weigh little, standard ground shipping handles them without freight complications. If you have a time-sensitive job coming up, reach out via the contact page to confirm lead times before placing your order.
Ready to Set Up Your First Debris Chute in Peabody?
Now you know exactly what to expect — from pre-site planning and dumpster positioning to section connection, teardown, and storage. Debris chute setup in Peabody, MA is straightforward when you have the right equipment and a clear process. EasyChute gives you both: lightweight, reusable fabric sections that one person can carry up three flights of stairs and a crew can hang in minutes.
Explore the full debris chute product overview, check the EasyChute FAQ for any remaining questions, or head straight to the contact page to get your order started. Ship to your Peabody job site — free — and be ready for your next project.