

Table of Contents
- Placement & Site Assessment Mistakes
- Capacity Overload & Volume Misjudgment
- Permit & Local Code Violations
- Installation & Anchoring Errors
- Safety Oversights & Hazard Control
- Maintenance & Cleaning Neglect
- Material & Design Selection Mistakes
- Neighbor Relations & Site Courtesy Failures
- Cost Planning & Budget Missteps
- Insurance & Liability Gaps
- Pre-Launch Inspection Checklist
- Frequently Asked Questions
- Local Compliance Notes for Massachusetts
- Get Started With a Safe Setup
Placement & Site Assessment Mistakes
The most expensive debris chute failures start with a poor site survey. Contractors often rush the placement decision, assuming the closest dumpster location or most visible spot is best. In reality, placement errors can trigger neighborhood complaints, safety citations, and project delays that cost far more than a 30-minute site walk.
Common placement blunders:
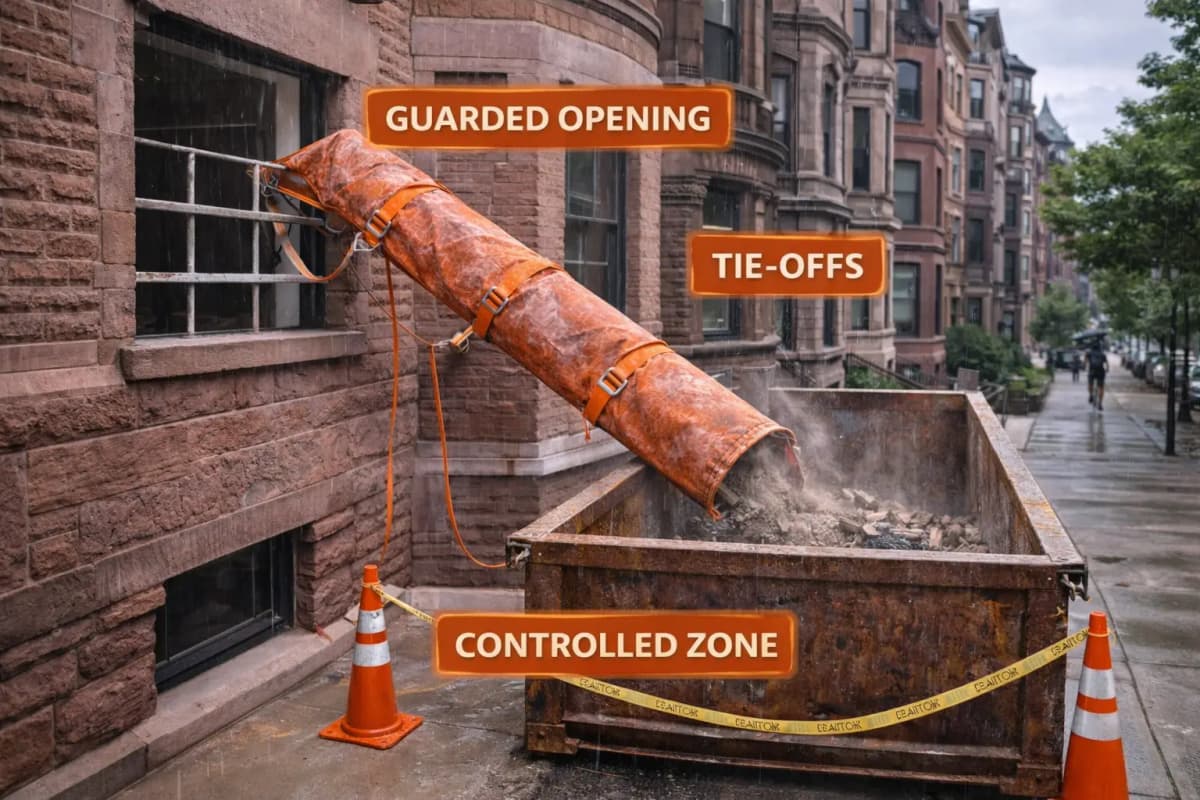
- Positioning the chute where debris overshoot lands on neighbor property or into utility lines.
- Placing the chute base in a high-traffic area, blocking entry/exit routes or parking for residents and emergency vehicles.
- Ignoring wind patterns and slope — chute discharge can scatter dust and light debris farther than contractors expect.
- Failing to account for building overhang, creating a “shadow zone” where the chute swings away from the intended dumpster on windy days.
Before anchoring, walk the perimeter and identify pedestrian zones, vehicle access routes, and boundary lines. Document the site’s slope, prevailing wind direction (especially in coastal Massachusetts where sea breezes can be strong), and any overhead obstacles. A photo record protects you if a neighbor later claims damage. Most Massachusetts municipalities require written consent or a variance if the chute extends beyond your property line, so measure twice.
Capacity Overload & Volume Misjudgment
Contractors frequently underestimate the debris volume a renovation produces, leading to a chute that fills faster than the dumpster can be serviced. Overloading causes jams, debris spillage, and project slowdowns.
Volume miscalculation drivers:
- Structural demolition: Removing walls, floors, or roofing generates 40–60% more volume than remodeling work.
- Mixed debris types: Wet drywall, bundled lumber, and rigid insulation don’t compress uniformly; they create voids and bridging in the chute.
- No buffer time: Assuming the dumpster will be swapped daily when service is only three times per week.
- Seasonal slowdown: Winter weather or holiday service gaps mean longer dumpster residence time.
Use a capacity calculator specific to your debris type and project duration. If in doubt, size up — an oversized chute is cheaper than renting a second one mid-project. Coordinate pickup schedules with your waste hauler at the start, not day-of.
Permit & Local Code Violations
Massachusetts municipalities have varying rules on debris chutes, especially in older residential neighborhoods. Skipping permits or misreading local codes creates liability and can halt work.
Permit pitfalls:
- Assuming a renovation permit covers chute installation — most don’t; a separate chute or temporary structure permit is often required.
- Ignoring zoning setback rules — some towns require the chute base to be 10+ feet from the property line.
- Missing noise ordinances — early morning or weekend chute use may be restricted.
- Overlooking historical district overlays — if the property is in a historic zone, chute visibility may need approval.
Contact your town’s Building Department and Public Works before ordering. Request the specific debris chute or temporary structure permit form. Many Massachusetts towns post these online; a few still require a phone call. File early — most permits take 5–15 business days. A debris chute setup checklist keeps you aligned with neighboring state practices too.
Installation & Anchoring Errors
A poorly anchored chute is a liability nightmare. Wind, vibration from dropped debris, and uneven loading can shift segments, misalign discharge points, and create safety hazards for workers below.
Anchoring mistakes:
- Under-bolting: Using fewer fasteners than the manual specifies to save time or cost.
- Mixing anchor types: Combining old hardware with new, or using residential-grade fasteners on a commercial chute.
- Ignoring surface prep: Anchoring directly to a painted or corroded surface without cleaning — the chute can slip under load.
- Angle errors: Misaligning chute sections so they don’t sit square; this causes binding and uneven wear.
- No secondary bracing: Omitting lateral braces on tall chutes, relying only on vertical anchors.
Follow the installation best practices in your chute manual exactly. Use a level and a measuring tape on every section. Tighten fasteners in a cross pattern (like a wheel hub) to ensure even pressure. If you’re installing a 50-foot or taller chute, hire a licensed rigger in Massachusetts; most insurers require it, and most building departments will ask for proof of professional installation.
Safety Oversights & Hazard Control
Debris chutes create hazards for workers, site visitors, and the public. Underestimating these risks leads to injuries, OSHA citations, and workers’ comp claims.
Safety gaps:
- No fall protection: Workers standing on ladders or scaffolding near the chute opening can lose balance. Handrails, toe boards, or barriers are mandatory on any opening above 4 feet.
- Lack of PPE enforcement: Hard hats and safety glasses are non-negotiable within 50 feet of an active chute discharge.
- Ignoring OSHA construction safety standards: OSHA 1926.500 (fall protection) and 1926.501 (duty to have a competent person) apply to chute operations.
- No spotters: Loading the chute without someone stationed at the discharge to watch for jams or debris spillage.
- Failure to protect kids on site: If a family is living in the renovation home, the chute zone must be cordoned and monitored — see kids on site safety protocol.
Brief all workers on chute hazards before day one. Post warning signage in multiple languages if your crew is diverse. Enforce ergonomic safe-loading practices to reduce back injuries — debris should be fed into the chute waist-high when possible, not overhead or from ground level.
Maintenance & Cleaning Neglect
Chutes clogged with sludge, grease, or compacted debris slow work and can cause overflow. Many contractors treat the chute as a “set and forget” fixture and skip regular cleaning.
Maintenance failures:
- No flushing schedule: Wet debris (drywall mud, paint cans, roof tar) builds up and hardens, choking the chute by week two.
- Ignoring wet-weather care: After rain, water pools in sections and corrodes fasteners; the chute must be inspected and dried.
- Skipping segment-to-segment checks: Debris can lodge between segments, creating invisible structural stress.
- Not cleaning the discharge: Spillage around the dumpster attracts pests and creates a slipping hazard.
Establish a cleaning and maintenance practices routine: spray the interior with water at end-of-day, remove visible blockages, and visually inspect fasteners and seams 2–3 times per week. For multi-week projects, hire a professional chute cleaning service mid-project; the $200–400 cost is cheap insurance against a $5,000 standstill.
Material & Design Selection Mistakes
Choosing the wrong chute type or material for your debris profile creates efficiency losses and premature wear.
Selection errors:
- Canvas vs. poly confusion: Canvas chutes are lighter and cheaper but wear faster and don’t shed water; poly is more durable in wet conditions but heavier to handle.
- Underrating the chute: Using a “lite duty” chute for a heavy demolition load; sections wear and fail within days.
- Ignoring debris type: Sharp metal, broken glass, and roofing tar damage canvas more quickly than drywall and wood.
- Wrong discharge angle: A shallow angle slows flow and causes binding; too steep causes bounce-back and overshoot.
Refer to a modular vs. traditional chute comparison if you’re deciding between system types. For most Massachusetts residential renovations, a standard modular poly chute in 25–50 ft. sections is ideal. Consult the manufacturer’s load chart for your debris mix.
Neighbor Relations & Site Courtesy Failures
A chute operation that ignores neighboring properties breeds complaints and can trigger municipal enforcement.
Relationship mistakes:
- No advance notice: Neighbors surprised by early-morning chute noise or a week-long setup blame the homeowner and call the town.
- Debris landing on neighbor property: Even minor spillage into a neighbor’s yard creates legal liability.
- Blocking shared driveways or sidewalks: If the chute or dumpster impedes access, you’re liable for any damage or injury.
- Ignoring noise windows: Many Massachusetts towns restrict construction noise before 7 a.m. or after 5 p.m. on weekdays; weekend use may be even stricter.
Send written notice to neighbors 48–72 hours before setup, detailing the chute location, operating hours, and your contact info. If the property is in a senior neighborhood or aging-in-place projects in Massachusetts, extra communication is essential. A brief, cordial conversation can prevent weeks of frustration.
Cost Planning & Budget Missteps
Contractors often quote chute costs without factoring in permit fees, extended rental periods, or capacity overages.
Cost pitfalls:
- No permit buffer: A 2-week delay waiting for permit approval stretches the rental period by $300–600.
- Underestimating service calls: If the chute must be serviced mid-project due to a jam, emergency calls cost 2–3x the standard rate.
- Ignoring site prep costs: Leveling ground, reinforcing weak pavement, or renting concrete pads adds $400–1,000.
- No contingency for upsizing: Realizing halfway through that you need a larger chute forces expensive mid-project changes.
Build a 15–20% contingency into your chute budget. Include permit and delivery fees in your quote, not as surprises later. A cost estimate checklist helps you capture every line item upfront.
Insurance & Liability Gaps
Many contractors assume their general liability policy covers chute operations. It often doesn’t — at least not fully.
Insurance oversights:
- Chute-specific exclusions: Some policies exclude “temporary structures” or “debris removal equipment” unless specifically endorsed.
- No waiver documentation: Failing to have the homeowner sign a liability waiver exposes you if someone is injured.
- Inadequate limits: A single injury claim can exceed your general liability cap if the chute operation wasn’t properly disclosed.
- Missing worker’s comp: All crew members handling the chute must be on your payroll or subcontractor workers’ comp coverage.
Review your insurance requirements with your agent before each project. Ensure chute rental is included. Provide the homeowner with a Certificate of Insurance and have them sign a site-safety acknowledgment. A few minutes of paperwork prevents costly disputes.
Pre-Launch Inspection Checklist
Before the first piece of debris enters the chute, perform a detailed inspection. This single step catches 80% of costly mistakes.
Pre-launch walkthrough:
- Verify permits: Post a copy of the permit (or exemption letter) on the site. Ensure all inspections required by the town have been scheduled and signed off.
- Check anchors and fasteners: Tug on each fastened point by hand; there should be no movement. Look for rust or corrosion and replace any compromised hardware.
- Inspect sections for gaps or cracks: A gap between segments allows debris to fall behind the chute, creating a fire or pest hazard.
- Test the discharge angle: Drop a few pieces of test debris (wood scraps, crumpled paper) to confirm they exit cleanly into the dumpster, not overshooting or backing up into the chute.
- Verify dumpster placement: Confirm the dumpster is on solid, level ground at least 5 feet from the chute discharge. No vehicles or pedestrians should be able to walk underneath.
- Review weather conditions: If high winds are forecast for the week, ensure lateral bracing is in place and consider a temporary windbreak.
- Brief the crew: Walk each worker through the chute’s location, discharge angle, loading zone, and PPE requirements. Assign a spotter for the first day.
- Document the setup: Take photos or a short video of the installed chute from multiple angles. This record is invaluable if a neighbor later claims damage.
Frequently Asked Questions
What is the most common debris chute mistake contractors make in Massachusetts?
Skipping the permit step. Many contractors assume a renovation permit covers the chute, or they rush the setup without filing. Massachusetts building departments are increasingly strict about temporary structures, and a stop-work order for an unpermitted chute can cost days or weeks of delays. Always contact your town’s Building Department first.
How long can I keep a debris chute on-site before I need additional permits?
Most Massachusetts municipalities allow 30–90 days for a temporary debris chute without a separate extended-use permit, but rules vary by town. Some require monthly inspections or renewal. Check with your Building Department when you file the initial permit application; some towns include the maximum duration on the permit itself. Document the install and removal dates in your project records.
Can I use a residential-grade chute for a commercial demolition project?
No. Residential chutes are designed for lighter debris loads (drywall, wood, household items) and typically have lower weight ratings. Commercial demolition (concrete, metal, heavy masonry) requires a heavy-duty chute with reinforced sections and higher fastener grades. Using the wrong chute voids the manufacturer’s warranty and can cause mid-project failure. Check the load chart on the chute manual before ordering.
What should I do if the chute jams mid-project?
Stop work immediately. Do not force debris down or attempt to clear the jam from above — you risk spillage and injury. Contact your chute rental company for emergency service (usually same-day). In the meantime, divert debris to a temporary dumpster or stop loading. A professional clearing typically costs $200–400 and takes 30–60 minutes. Prevention (regular flushing, avoiding oversized debris) is far cheaper than an emergency call.
Do I need written neighbor consent before setting up a debris chute?
Legally, no — unless the chute extends onto their property. However, notifying neighbors in writing 48–72 hours in advance prevents complaints and builds goodwill. If the property is in a senior neighborhood or multi-unit building, personal notification (a knock on the door, not just a note) is best practice. Document that you notified them; it protects you if they later complain to the building department.
How do I know if my site can support the weight of a fully loaded chute?
The manufacturer provides a load rating (usually in the manual). A typical modular poly chute loaded with debris weighs 800–1,500 lbs, plus the weight of the metal scaffolding or anchoring hardware. Most residential and commercial buildings can handle this if anchored to solid structure (brick, steel beam, concrete wall). Weak spots (deteriorated mortar, thin wood siding) cannot bear the load. Have a structural engineer inspect if you’re unsure, especially in older homes.
What’s the best way to dispose of chute debris responsibly in Massachusetts?
Massachusetts has strict construction and demolition (C&D) debris recycling laws. Most waste haulers separate cardboard, wood, metal, and drywall on-site. Confirm your hauler’s sorting practices before the project starts. The EPA has guidance on construction and demolition debris guidelines, and your town’s DPW website usually lists licensed C&D processors. Proper sorting is not only compliant; it reduces disposal costs and supports local recycling goals.
Local Compliance Notes for Massachusetts
Massachusetts Building Code (780 CMR) incorporates the International Building Code (IBC) and requires all temporary structures on a construction site to meet safety standards. Most municipalities enforce debris chute regulations under their local Zoning Bylaw or Board of Selectmen rules.
Key resources for Massachusetts contractors:
- Massachusetts Building Code (780 CMR): Available at mass.gov. Section 3401 covers temporary structures.
- Town-specific Building Departments: Contact your town’s Building Inspector for local chute rules. Larger cities (Boston, Worcester, Springfield) have dedicated temporary structures divisions; smaller towns route requests through the general Building Department.
- MA Environmental Protection Act (MCP): If the property is contaminated or has remediation activity, the chute placement may be governed by state environmental rules. Check with the Mass. Department of Environmental Protection if the site has Phase I or Phase II history.
- OSHA Regional Office (Boston): For worker safety questions, contact OSHA Region I at 617-565-9860. They provide free consultations on construction safety.
Aging-in-place renovation projects in Massachusetts often involve occupied homes. See the aging-in-place projects guide for special considerations around resident safety and noise restrictions.
Get Started With a Safe Setup
Debris chute mistakes are expensive, but they’re also preventable. The key is planning: survey your site, obtain permits, choose the right chute type, anchor it properly, and maintain it throughout the project.
Start by reviewing the step-by-step setup workflow for your project type, then refer back to this guide whenever you’re unsure about a specific requirement. If you have questions about chute sizing, placement, or local compliance, consult your town’s Building Department early — they’ll often catch issues before they become costly problems.
Ready to execute a flawless debris chute setup? Follow the pre-launch checklist above, brief your team, and document every step. Your next project will run smoother, your crew will be safer, and your reputation will be stronger.