

If you're a roofer, general contractor, or junk removal crew working in Quincy, Massachusetts, you already know the city's building stock throws curveballs. Victorian triple-deckers on streets like Hancock and Sea Street sit next to post-war brick apartment blocks in Wollaston. Downtown Quincy Center has mid-rise commercial gut jobs. The South Shore Marina district has waterfront properties where you absolutely cannot be throwing shingles off a roof by hand. Debris management is never one-size-fits-all here — and debris chute setup is no different.
This guide walks you through exactly what to expect when you set up a debris chute on a Quincy job site: from pulling up in the truck to the moment the first load of debris hits the dumpster. We'll cover site assessment, section sizing, hang methods, what can go sideways, and how to strike and store the chute when the job is done. No fluff — just the practical playbook contractors actually use.
Why Quincy Job Sites Have Specific Setup Demands
Quincy is not a homogenous city. The neighborhoods each present a distinct debris-management challenge, and your chute setup should reflect that before you unbox a single section.
Neighborhood Terrain Affects Drop Height
Merrymount and Squantum have tight residential streets with mature tree canopy that can interfere with a straight vertical drop. Marina Bay lofts and commercial properties near Quincy Center can run four to six stories, pushing you into 50 ft chute territory quickly. Quincy Point triple-deckers typically sit at two and a half to three stories, which puts most jobs comfortably in the 25 ft to 35 ft range.
- One-story roof (8–12 ft drop): A single 10 ft section is usually sufficient.
- Two-story residential (18–25 ft drop): Two 10 ft sections or one 25 ft section.
- Three-story triple-decker (28–36 ft drop): One 25 ft plus one 10 ft section, overlapping 1.5 ft at each joint.
- Four-story-plus commercial (40–55 ft drop): A 50 ft section or a 25 ft plus 25 ft combination.
Measuring the drop before you order is not optional. See our full debris chute overview for a section-sizing calculator walk-through.
Street Parking and Dumpster Placement
Many Quincy streets — especially in Germantown and Adams Shore — are narrow enough that a dumpster permit from the city's Public Works department governs exactly where your bin can sit. If the dumpster can't go directly below the drop point, you need to factor in a slight horizontal offset when you plan your anchor location. A properly hung chute drops nearly vertical, so offset the anchor by no more than two feet or you'll see debris banking off the inside walls instead of flowing cleanly.
Site Assessment Before Any Section Goes Up
Experienced crews do a five-minute site walk before unloading anything. It costs nothing and prevents the two most common setup mistakes: choosing the wrong anchor point and ordering the wrong chute length.
The Four-Point Pre-Setup Check
- Measure the vertical drop. Use a tape measure or laser distance tool from the work level (window sill, roof edge, scaffold deck) straight down to the top lip of the dumpster. Add 18 inches of clearance so the chute mouth doesn't drag on the dumpster rim.
- Identify solid anchor points. You need a structural member — a roof joist, window buck, scaffold pipe, or parapet — that can hold the weight of the chute plus the dynamic load of debris passing through. Stucco window trim is not an anchor point.
- Check for pedestrian exposure. Per OSHA Construction Industry standards, debris operations require barricading to prevent public exposure. Walk the perimeter and identify where foot traffic will pass near the drop zone.
- Assess wind direction. Quincy's coastal position means afternoon sea breezes off Boston Harbor can be significant from May through September. If wind is blowing consistently toward the building, you may need to weight the chute's lower sections or add a secondary tie-off at mid-span.
What You Need on the Truck Before You Arrive
EasyChute sections are compact enough that the full kit fits in the back of a pickup or cargo van with room to spare. A 10 ft heavy-duty section weighs under 3 lbs. A 50 ft section rolls up into a box you can carry under one arm. That said, there are a few supporting items that make setup faster.
- Carabiners or quick-connect clips (4 per section hang point): Each section hangs from four woven loop anchors. Standard locking carabiners work. Quick-connects are faster on jobs where you're relocating the chute mid-day.
- Utility rope or ratchet straps: For secondary tie-offs when wind is a factor or the anchor structure is unusually far from the drop edge.
- Tape measure and permanent marker: To mark overlap points on the sections so your crew doesn't have to eyeball the 1.5 ft connection each time.
- Work gloves: The coated poly fabric is durable but fabric edges on a windy day can still catch fingers during hang operations.
- Barricade tape or cones: Drop zone safety compliance is not optional. OSHA ergonomics and load-handling guidelines also remind us that managing debris at elevation is a manual-handling hazard for the crew loading the chute — brief your team before the first load goes in.
For a detailed walkthrough of the installation process, the EasyChute step-by-step setup guide covers every connection point with photos.
Step-by-Step: The Actual Setup Process
Here's the realistic timeline for a solo installer or two-person crew setting up an EasyChute on a standard Quincy residential job.
Step 1 — Unbox and Inspect (2–3 Minutes)
Unfold each section on the ground or a clean area of the truck bed. Check the loop anchors and seams for any damage from the last job. EasyChute's woven, coated poly fabric is reusable job after job, but a quick visual inspection catches wear before it becomes a failure at height.
Step 2 — Stage Sections in Order (1 Minute)
If you're connecting multiple sections, lay them out in the order they'll hang — top section first. This prevents the common mistake of tangling sections mid-hang when you're already on a ladder.
Step 3 — Hang the Top Section (5–8 Minutes)
The top section is the most critical. Clip the four loops to your anchor structure using carabiners. The mouth of the chute should be positioned directly at or just inside the debris source — a window opening, roof edge, or scaffold gap. Ensure the mouth is wide enough to accept the material you'll be throwing: full shingle bundles, demo drywall chunks, or bagged junk removal loads.
Step 4 — Connect Additional Sections (2–3 Minutes Per Section)
Each additional section overlaps the one above by 1.5 ft, creating a friction-fit connection reinforced by gravity once debris is flowing. No tools, no hardware — just sleeve one section into the bottom of the next. If you're running a 25 ft plus 10 ft combination, you'll make one connection. A 50 ft single section needs no connection at all.
Step 5 — Position the Discharge End (2 Minutes)
The bottom of the chute should hang inside or directly over the dumpster opening. If the chute is swinging, add a bungee or tie-off to a dumpster handle or stake driven beside the bin to stabilize it. A swinging discharge end sends debris outside the bin — a messy and potentially hazardous situation on a street like Hancock or Whitwell where pedestrians walk close to job sites.
Step 6 — Set Up the Drop Zone Barricade (3–5 Minutes)
Before anyone drops a single piece of debris, cone off a radius of at least six feet around the dumpster. Post a crew member at street level if foot traffic is active. This is non-negotiable safety practice — not a suggestion.
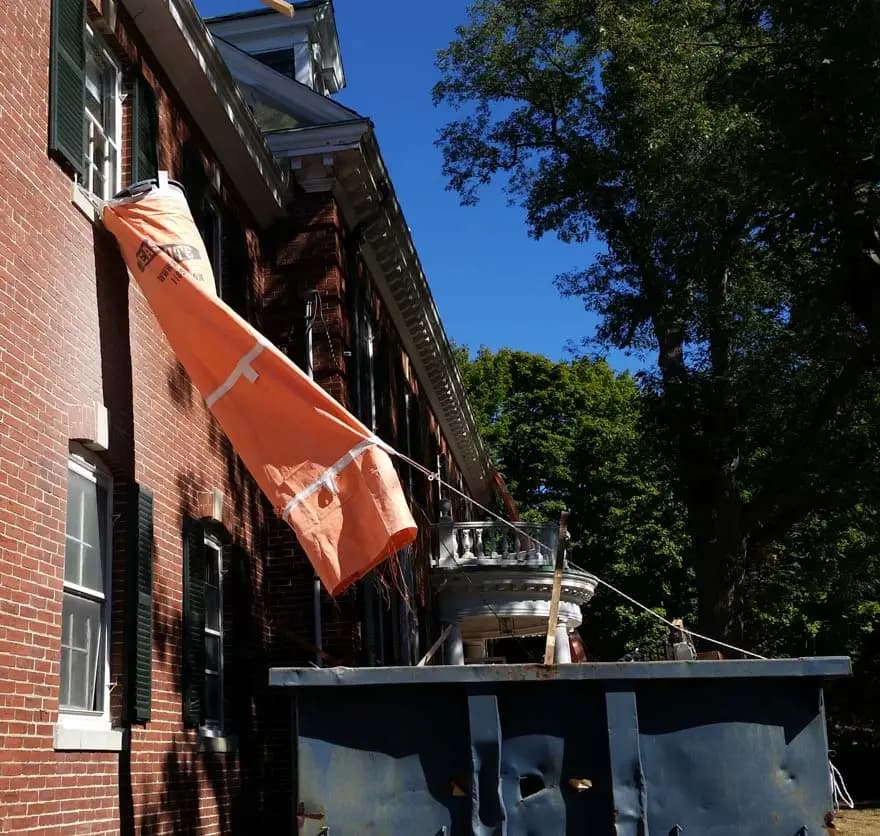
Total setup time for an experienced solo installer: approximately 15 to 20 minutes from tailgate to first load. Watch crews do this in real time at EasyChute's video library.
What Material Runs Well — and What Needs Prep
Not every material behaves the same way inside a debris chute. Knowing what flows cleanly versus what can clog saves time and protects the fabric.
Materials That Flow Cleanly
- Asphalt shingles (the most common Quincy roofing material — three-tab and architectural both work well)
- Broken drywall in chunks under 24 inches
- Flooring tiles and hardwood strips
- Insulation batts and blown-in debris
- Bagged junk removal material
- Plaster chunks from interior gut work
Materials That Need Preparation Before Loading
- Long lumber: Boards longer than 4 ft need to be cut before entering the chute. A 6 ft 2x4 dropped vertically can spear through a chute wall or jam at a connection joint.
- Wire, pipe, and conduit: Coil or bundle these tightly before loading. Loose wire can tangle on the chute walls and create a clog that requires the chute to come down for clearing.
- Large concrete chunks: Concrete over approximately 12 inches should be broken down. The weight-to-surface-area ratio creates impact forces at the discharge end that can dent dumpster walls and create rebound debris outside the bin.
- Wet insulation or saturated material: This creates a paste that clings to the interior of the chute. Rinse sections after any saturated debris run.
For more on how material type affects chute choice between canvas and synthetic fabric options, see the canvas trash chute guide and the fabric trash chute comparison.
Common Setup Mistakes Quincy Contractors Make
These mistakes come up repeatedly on South Shore job sites. Knowing them in advance is the fastest path to a smooth operation.
Mistake 1 — Underestimating Drop Height
Contractors often estimate "about two stories" and show up with a 25 ft section, then discover the actual drop is 31 ft because the first floor is raised on a foundation above grade. Always measure. A short chute means the discharge end doesn't reach the dumpster — material falls free for the last several feet and blows wide of the bin.
Mistake 2 — Anchoring to Trim Instead of Structure
Victorian window trim on older Quincy homes looks solid but is typically 3/4-inch pine. It will not support the sustained dynamic load of shingles flowing through a chute. Anchor to the rough opening framing, a window buck, or roof deck framing — not to decorative exterior trim.
Mistake 3 — Skipping the Mid-Span Tie-Off on Tall Drops
A 50 ft chute hanging straight from the roof of a four-story building catches significant wind load on a breezy harbor day. Add a secondary tie-off at the two-story level using a bungee or rope through one of the mid-section loops. This keeps the chute from swinging out and deflecting debris outside the bin.
Mistake 4 — Loading Too Fast
A debris chute is not a vertical conveyor. If two crew members are dumping material simultaneously, you can create a blockage at a connection joint — particularly with irregular-shaped demo debris. One loader at a time, with a reasonable pace, keeps material flowing and prevents the frustrating task of clearing a mid-chute jam.
Mistake 5 — Ignoring the Dumpster Fill Level
As the dumpster fills, the discharge end of the chute can become buried in debris. This creates back-pressure — material can't exit cleanly and starts jamming inside the lower section. Have someone at street level monitoring the fill level and signal the crew above to pause when the bin is approaching 80% capacity.
Roofing Tear-Off: The Most Common Quincy Use Case
The majority of debris chute setups on Quincy residential properties are roofing jobs. The city has a large stock of 1930s through 1970s homes with original or first-replaced asphalt roofs coming due for tear-off, and the South Shore roofing season runs aggressively from April through November.
For a roofing tear-off, the chute typically hangs from the eave line or a temporary anchor screwed into the roof deck — removed and patched before underlayment goes on. The mouth of the chute sits at the gutter line, and the crew pushes stripped shingles directly into the opening as they work across the roof.
EasyChute's roofing-specific guidance covers hang methods that don't damage the substrate. See the roofing trash chute complete guide for anchor placement strategies specifically for pitched roofs.
Interior Demo in Quincy Multifamily Buildings
Quincy's multifamily renovation market is active — investors continue converting older rental stock, and gut renovations in Quincy Point and Adams Shore mean debris coming out of second- and third-floor units through window openings. This is where EasyChute's window-hanging method shines.
The chute mouth fits into a standard residential window opening. The four top loops anchor to the window rough framing or to a 2x4 bridging the opening. Interior demo debris — drywall, lath, plaster, old flooring — goes straight from the work area into the chute and down to the dumpster. No carrying debris down stairs, no running wheelbarrows through finished hallways.
The interior gut work and selective demo guide covers window placement specifically for multifamily buildings where multiple floors may be demolishing simultaneously.
According to the EPA's construction and demolition debris data, C&D debris accounts for more than 600 million tons of material generated in the United States annually. Proper chute management keeps that debris contained and reduces scatter waste that creates site cleanup problems and potential environmental citations.
Permit and Neighborhood Considerations Specific to Quincy
Quincy's permitting landscape for construction operations is managed through the Building Department at Quincy City Hall. While a debris chute itself typically does not require a standalone permit, the dumpster placement on a public street does. The city's Public Works department handles temporary use permits for street-placed containers.
- Contact the Quincy Building Department before placing a dumpster on any public street or sidewalk.
- Marina Bay and certain downtown Quincy Center locations have additional restrictions during peak commercial hours — plan your dumpster placement and chute operation for off-peak windows when possible.
- Residential neighborhoods in Adams Shore and Squantum have narrow streets where delivery of a 20-yard dumpster may require a small-load hauler with a swing-arm truck rather than a standard roll-off. Confirm dumpster dimensions fit the available space before you plan your chute anchor position.
Striking the Chute: End-of-Day or End-of-Job Takedown
Takedown is the reverse of setup — and it goes faster. For a one-person crew, a 25 ft two-section setup takes about 10 minutes to strike, fold, and box. For a 50 ft single-section run, budget 12 to 15 minutes.
Proper Strike Procedure
- Remove any secondary tie-offs or stabilizing lines first.
- Disconnect the bottom section and lower it hand-over-hand, or drop it into the (now cleared or empty) dumpster and retrieve it from street level.
- Disconnect the top section from the anchor structure last.
- Shake out any residual debris from each section before folding — particularly important after insulation runs.
- Fold or roll each section and return to its storage box or bag. EasyChute sections are compact enough to fit in a standard contractor toolbox drawer if the box is unavailable.
Reusability is one of EasyChute's core advantages. The same section that handled your Quincy shingle tear-off this week can run a demo job in Braintree next week. For crews running multiple properties, this matters enormously for per-job economics.
Sizing Your Order for a Quincy Job
EasyChute sells 10 ft sections in lite-duty and heavy-duty configurations, as well as 25 ft and 50 ft sections. Free shipping applies to all orders, and products ship to job sites across Massachusetts and the United States. Here's a quick sizing reference for typical Quincy building types:
- Cape Cod / ranch (single story): One 10 ft heavy-duty section. Total drop approximately 10–14 ft.
- Colonial / two-story (18–25 ft drop): One 25 ft section. The extra length gives you comfortable reach into the dumpster without the section going taut.
- Triple-decker (28–36 ft drop): One 25 ft plus one 10 ft section with 1.5 ft overlap, effective total 33.5 ft.
- Four-story commercial or multifamily (40–55 ft drop): One 50 ft section, or two 25 ft sections overlapped at the midpoint.
When in doubt, go longer. A chute that's slightly longer than the drop can be coiled loosely at the bottom inside the dumpster. A chute that's too short is a job-site problem you can't fix without an additional order.
Visit the EasyChute product page to review all available section lengths and configurations before your next Quincy job.
Safety Standards Every Quincy Crew Should Know
Operating a debris chute is straightforward — but it carries real hazards if crews skip the basics. These are the non-negotiables.
- Drop zone barricading: No pedestrian or bystander access within the fall zone of the chute, period. Cones, tape, and a spotter at street level are minimum requirements.
- PPE at the loading point: Hard hat and safety glasses for the crew member loading material at the top. Fragments can bounce back through the mouth of the chute.
- Dumpster placement confirmation: Never operate a chute over a dumpster that is not rated and sized to receive the debris type you're running. Overloaded dumpsters can be cited by the hauler and by the city.
- Wind stops operations: If sustained wind is pushing the chute more than 15 degrees off vertical, pause operations until conditions improve. Swinging chutes can redirect material outside the dumpster and into the public right-of-way.
The OSHA Construction Industry safety standards provide the regulatory framework for all debris-handling operations at elevation. Familiarize yourself with the relevant sections before any multi-story chute operation.
For more context on how debris chutes fit into broader waste management practices, the EPA recycling overview outlines how sorted construction waste can be diverted from landfill — something chute-based operations support by keeping debris concentrated in a single container rather than scattered across a job site.
Frequently Asked Questions
How long does debris chute setup take on a typical Quincy residential job?
For a solo installer on a standard two- or three-story Quincy home, setup runs 15 to 20 minutes from the tailgate to the first load. This includes unboxing sections, performing a quick inspection, hanging the top section from the anchor point, connecting additional sections, positioning the discharge end over the dumpster, and setting up the drop zone barricade. A two-person crew cuts that time roughly in half, with one person at the anchor point and one managing sections from below.
Do I need a permit to use a debris chute in Quincy MA?
The debris chute itself typically does not require a standalone permit in Quincy. However, placing a dumpster on a public street or sidewalk does require a temporary use permit from the Quincy Public Works department. If your job site is in a historic district or near Marina Bay, additional restrictions may apply. Always confirm dumpster placement approvals before scheduling your delivery, since the chute's anchor position depends directly on where the bin can legally sit.
What section length should I order for a Quincy triple-decker?
Most Quincy triple-deckers have a finished floor-to-grade height of 28 to 36 feet at the third-floor level. The right combination is typically one 25 ft section plus one 10 ft section, connected with the standard 1.5 ft overlap, giving you an effective working length of approximately 33.5 ft. This clears most triple-deckers comfortably. If the structure sits on a raised foundation — common in Adams Shore and Merrymount — add an extra 10 ft section to account for the additional height.
Can I use an EasyChute for a roofing job in Quincy without damaging the substrate?
Yes. The standard method is to anchor the top section's loops to a 2x4 or 2x6 bridging the roof deck opening, or to screw a temporary anchor board into the deck surface and patch it before underlayment installation. The chute itself does not contact the roof surface — it hangs from the anchor point and falls straight down. Avoid anchoring to gutters or gutter fascia, which are not rated for the sustained dynamic load of a debris run.
What happens if the debris chute gets clogged mid-job?
Most clogs occur at a section connection joint or at the discharge end when the dumpster is too full to accept additional material. To clear a mid-section clog: stop loading immediately, pull the bottom section loose from the connection above, let the blockage fall free, then reconnect. If the clog is at a mid-span joint on a tall setup, you may need to lower that section to clear it at ground level. Prevent clogs by sizing material before it enters the chute — no lumber over 4 ft, no uncoiled wire, no concrete chunks over 12 inches.
Is wind a serious concern for debris chute operations in Quincy?
Yes, more so than in inland Massachusetts cities. Quincy's coastal position means sea breezes off Boston Harbor are common, particularly on waterfront properties near Marina Bay and Squantum. When sustained wind is pushing the chute off vertical, add a mid-span tie-off using rope or bungee through one of the mid-section woven loops, anchoring to a stable ground-level structure. If wind is strong enough to consistently deflect the chute more than 15 degrees off vertical, pause debris operations until conditions improve.
How do I store EasyChute sections between jobs?
EasyChute sections fold or roll into their original box or storage bag. A 10 ft section weighs under 3 lbs and fits in a standard contractor toolbox or cab storage bin. The coated poly fabric does not absorb water, so basic folding and dry storage between jobs is all that's needed. Rinse sections that handled saturated material — wet insulation, muddy concrete dust — before folding to prevent odor and fabric degradation over time. Properly maintained sections are reusable across many jobs.
Ready to Set Up Your Quincy Job Site? Order EasyChute Today
Whether you're stripping shingles off a Merrymount Cape, gutting a Quincy Point triple-decker, or doing a commercial demo in Quincy Center, the right debris chute setup makes the difference between a clean, efficient job and hours of unnecessary manual hauling. EasyChute's lightweight, reusable fabric sections — 10 ft, 25 ft, and 50 ft — ship free to your job site anywhere in Massachusetts.
Review the full product lineup, check the EasyChute FAQ, or head straight to the contact page if you have a site-specific question before you order. Contractors who want to see the system in action before committing can browse real job-site footage in the EasyChute video library. And if you're still weighing your options between chute types, the debris chute selection guide lays out every consideration side by side.
Demo it. Bag it. Chute it.