

Index
- Why Debris Chutes Matter for Family Home Renovations
- Understanding Debris Chute Types
- Connecticut Regulations and Permits
- Safety First: Protecting Kids and Pets On-Site
- Sizing Your Debris Chute System
- Step-by-Step Installation Workflow
- Cost Breakdown and Budgeting
- Neighborhood and Neighbor Considerations
- Maintenance During Your Project
- Common Setup Mistakes to Avoid
- Post-Renovation Removal and Cleanup
- Frequently Asked Questions
- Local Notes and Connecticut Resources
- Ready to Get Started?
Why Debris Chutes Matter for Family Home Renovations
When your family is living in or near an active renovation, managing construction debris becomes a critical safety and logistical challenge. A debris chute system isn’t just a convenience—it’s a safeguard against injury, property damage, and project delays.
Family renovations in Connecticut often happen while the home remains occupied or neighbors live close by. Loose debris falling from upper floors, uncovered dumpsters attracting pests, and unsecured materials blocking walkways create liability and discomfort. A properly installed debris chute system containing debris from entry to dumpster minimizes these risks and keeps the renovation site organized.
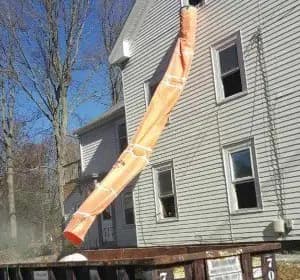
- Safety: Debris is contained within the chute; nothing falls freely or lands unexpectedly.
- Efficiency: Workers move debris quickly from upper floors down to ground-level collection without multiple manual trips.
- Neighborhood relations: A controlled system reduces noise, dust, and mess visible to neighbors.
- Timeline protection: Less time managing debris means more time on actual renovation work.
- Insurance compliance: Many homeowner and contractor policies now require or recommend chute systems for multi-story work.
Understanding Debris Chute Types
Connecticut contractors have two main debris chute options: modular reusable systems and traditional single-use chutes. Understanding the differences helps you pick the right fit for your family renovation scope and budget.
Modular Reusable Debris Chutes
Modular chutes are constructed from stackable polyethylene or canvas sections (typically 4 ft. to 6 ft. per section) that lock together vertically. They are lightweight, durable, and designed to be used repeatedly across many projects. For family renovations spanning multiple months or seasons, modular systems offer better long-term cost efficiency.
- Lightweight setup: One or two workers can assemble sections in an hour or two.
- Scalable height: Add or remove sections as your project grows or shrinks.
- Reusable: If you plan a second renovation in the future, you own the asset.
- Professional appearance: Safety-orange finish looks contractor-grade and reassures neighbors.
Single-Use or Traditional Chutes
Traditional gravity chutes (often canvas or rigid plastic) are rented for shorter durations and are pre-built to a fixed height. For quick kitchen or bathroom renovations (4–6 weeks), rentals may make more financial sense.
- No assembly required: Delivered and installed by the rental company.
- Lower upfront cost: Rental rates are predictable; no ownership burden.
- Maintenance-free: Rental company handles repairs and replacements.
- Shorter commitment: Return the chute when your project ends.
For a deeper comparison, see our Modular Trash Chute vs. Traditional Chute Comparison guide.
Connecticut Regulations and Permits
Connecticut’s building and safety codes require debris containment on residential renovation sites, especially when work extends above the ground floor. Your local town in Connecticut—whether Wallingford, New Britain, Hartford, or another municipality—may have specific permit, noise, and debris-disposal requirements.
Permit Requirements
Most Connecticut towns require a building permit for renovations involving structural changes, roof work, or multi-story debris removal. The permit application typically includes site plans showing where the debris chute will be positioned, how long it will remain on-site, and how debris is being disposed.
- Contact your town’s building department before purchasing or renting a chute.
- Expect a 3–5 business day permit turnaround for straightforward residential projects.
- Some towns waive chute-specific permits if the renovation is under a certain square footage.
- Proof of liability insurance is often required alongside the permit application.
Setback and Proximity Rules
Connecticut building codes typically require debris chutes be set back a minimum distance from property lines (usually 3–5 feet) to avoid discharging onto neighbor property. The chute must also be positioned so debris lands fully within the dumpster and does not create a hazard for pedestrians or vehicles.
If your lot is narrow or your driveway tight, consult your local town building inspector early to confirm chute placement is code-compliant.
Noise and Hours Restrictions
Connecticut residential neighborhoods often have noise ordinances limiting construction activity to daytime hours (typically 7 a.m.–6 p.m. weekdays, fewer hours on weekends). Debris chutes create noise during filling and unloading. Plan your most active debris-disposal work during permitted hours to avoid neighbor complaints and fines.
Safety First: Protecting Kids and Pets On-Site
If your family is living in the home during renovation or if neighbors have children and pets nearby, the debris chute requires careful safety management. Unsecured chute openings, pinch points, and vibration during debris loading can cause injuries.
Chute Opening Safety
The upper-floor opening where workers load debris must be:
- Signed and marked with high-visibility tape or signs warning of the opening.
- Never left unattended when workers are moving debris; always keep the opening gate or protective barrier in place when not actively loading.
- Monitored by a designated person if children or non-working household members are present on-site.
- Covered or gated if the chute will be idle for hours; never leave it open as a “shortcut” or rest area.
For detailed guidance, review our Trash Chute Setup With Kids On Site safety article.
Vibration and Noise Isolation
Debris falling through the chute creates vibration and noise that can alarm children and stress pets. Mitigate by:
- Scheduling heaviest debris-loading work during the morning or midday when families are more likely to be away from home or expecting noise.
- Using canvas-lined or cushioned-bottom chute sections to dampen the impact sound.
- Keeping pets in a quiet room or away from the chute area during peak loading times.
If your family has young children or elderly relatives on-site, see our Debris Chute Setup for Pet-Friendly Renovations article for expanded best practices.
Pinch Points and Entrapment Hazards
Modular chute sections lock together with safety clips. Before each use, inspect clips for damage and ensure all connections are tight. Loose sections can create gaps or shift unexpectedly, creating a pinch hazard.
- Weekly clip inspections: Walk the entire length of the chute and check every lock point.
- No climbing on chutes: Make it clear to all workers and family members that the chute is not a structural element for climbing.
- Proper chute angle: A 45–50-degree angle prevents debris from lodging mid-chute and reduces pressure on sections.
Sizing Your Debris Chute System
The size and capacity of your debris chute depends on the scope of your renovation, the number of stories involved, and how long the project will run.
Determining Chute Diameter
Most residential debris chutes come in diameters of 12, 18, or 24 inches. Smaller diameters (12 in.) suit modest kitchen or bath renovations with lighter debris. Larger diameters (18–24 in.) handle heavier loads like roofing materials, insulation bundles, and structural lumber faster.
- 12-inch chute: Lightweight debris (drywall, flooring, light wood), 2–3 week projects, 1–2 workers per shift.
- 18-inch chute: Mixed debris (insulation, HVAC components, some lumber), 4–8 week projects, 3–5 workers per shift.
- 24-inch chute: Heavy loads (roofing, structural demolition, bulk insulation), long-term projects, high-volume daily debris.
Calculating Height and Section Count
Measure the vertical distance from the highest floor where debris will enter to the ground level where your dumpster sits. Standard sections are 4–6 feet tall; add 1–2 extra sections for a safe discharge angle and clearance from the dumpster lid.
Example: A two-story home with a 20-foot vertical height needs approximately 4–5 sections (24–30 feet of chute) plus mounting hardware and angle adjustment.
Dumpster Coordination
Your chute discharge point must align with the dumpster opening. Position the dumpster on your driveway before installing the chute. If space is tight, a smaller-diameter chute or a rental service (which handles positioning) may be a better fit than ownership.
For sizing guidance specific to your renovation type, see our Renovation Debris Chute Cost Estimate Checklist.
Step-by-Step Installation Workflow
Proper installation is the foundation of safe and efficient debris management. Whether you are renting or purchasing a modular system, follow this workflow.
Pre-Installation Inspection
Before assembly:
- Inspect all sections for cracks, splits, or missing clips. Damaged sections compromise safety and efficiency.
- Test locking mechanisms on a few sections to ensure they click securely.
- Check mounting hardware for rust, bent bolts, or missing fasteners.
- Verify dumpster placement and confirm the chute discharge will clear the dumpster rim by at least 6 inches.
Mounting and Securing
The chute must be attached to the building using grade-8 bolts, lag screws, or commercial-grade mounting brackets rated for the weight of a full chute plus debris. Installation typically requires:
- A mounting point every 6–8 feet along the height of the chute.
- Bolts through rim board, band board, or solid framing (never into siding alone).
- Bracing or guy-wires on the bottom section if the chute extends more than 15 feet or faces prevailing winds.
- A qualified installer or contractor to ensure bolts are torqued to specification and hardware is corrosion-resistant.
For detailed step-by-step guidance, see our Debris Chute Installation guide.
Angle and Discharge Adjustment
Set the chute at a 45–50-degree angle from vertical. Too steep (more than 50 degrees) and debris falls too fast, creating impact damage and safety risks. Too shallow (less than 45 degrees) and debris jams or moves slowly. Use adjustable mounting brackets or shims to fine-tune the angle.
Final Safety Check
Before any debris enters the chute:
- Shake or tug the chute at multiple points to confirm it is rigid and shows no movement.
- Walk around the base and verify debris discharge clears the dumpster and surrounding area.
- Install warning signs or high-visibility tape around the opening and at the base.
- Brief all workers on proper loading technique, item size limits, and safety protocols.
Cost Breakdown and Budgeting
Debris chute costs for Connecticut family renovations vary by system type, duration, and whether you rent or purchase. Understanding the cost breakdown helps you budget accurately.
Rental Costs (Short-Term: 4–8 Weeks)
Renting a modular or traditional chute for a typical family renovation in Connecticut typically costs:
- Delivery and setup: $150–$300 per visit.
- Weekly rental: $80–$150 per week, depending on chute size and diameter.
- Pickup and removal: $100–$250.
- Total for 6-week project: $600–$1,200 (including setup, 6 weeks rental, pickup).
For a location-specific estimate, see our Debris Chute Rental Cost Estimate for Wallingford, CT guide, which includes Wallingford and nearby towns.
Purchase Costs (Long-Term Ownership)
Buying a modular chute system offers better long-term value if you plan multiple renovations or a prolonged project:
- Modular chute kit (18-inch diameter, 5 sections): $900–$1,800.
- Mounting hardware and fasteners: $100–$250.
- Installation labor (contractor): $300–$600.
- Total first-year investment: $1,300–$2,650.
- Year-2+ reuse: $50–$100 (maintenance, clips, minor repairs).
For purchase-vs.-rental analysis, see our Debris Chute Rental vs. Purchase ROI Calculator.
Additional Costs to Budget
- Building permit: $50–$200 (Connecticut varies by town).
- Dumpster rental: $350–$600 per week (separate from chute cost).
- Liability insurance rider: Often included in contractor insurance; verify your policy covers debris chute use.
- Debris disposal tipping fees: Charged by the landfill or recycler (typically $10–$25 per ton in Connecticut).
Neighborhood and Neighbor Considerations
Family renovations in Connecticut often occur in established residential neighborhoods where neighbors are close by. Proactive communication and considerate practices preserve relationships and reduce complaints.
Pre-Project Neighbor Notification
Before installation, notify neighbors in writing (email or printed letter) at least 2 weeks in advance. Include:
- Project start and expected end dates.
- Work hours (e.g., “Monday–Friday, 7 a.m.–5 p.m. EST”).
- Primary contractor contact number in case of issues or emergencies.
- Brief description of the debris chute system and assurance that debris will be contained.
- Parking and street-access plans if work vehicles will use shared areas.
Managing Dust and Noise
Debris chutes themselves are relatively quiet compared to demolition equipment, but combined with power tools and dumpster loading, they add to overall site noise.
- Load debris during daytime hours (avoid early mornings, evenings, and weekends when neighbors are home or sleeping).
- Use a canvas-lined or cushioned-discharge chute to reduce impact noise.
- Cover the dumpster or use a lid to muffle the sound of debris landing.
- Sweep and water down the immediate area daily to minimize dust from debris spilling or wind-blown dust from the dumpster.
Property and Boundary Respect
Ensure your chute and dumpster do not encroach on neighbor property. If your lot line is tight:
- Confirm chute placement with your surveyor or lot plan before installation.
- Negotiate temporary easement agreements if you need to position the chute near a property line (get written permission).
- Clean up any debris that falls outside your property immediately.
- Offer to compensate neighbors if their landscaping or driveway is affected by the project.
Maintenance During Your Project
A well-maintained debris chute operates safely and efficiently from start to finish. Weekly and daily maintenance tasks keep sections secure, clear, and ready.
Daily Checklist
- Inspect the chute opening for loose debris, blockages, or objects lodged inside.
- Clear any spillage around the base of the chute and dumpster.
- Verify locking clips on all visible sections are engaged and tight.
- Check the discharge angle and confirm debris is landing in the dumpster, not spilling outside.
Weekly Deep-Clean
- Walk the entire length of the chute and inspect each section for cracks, splits, or discoloration.
- Test and replace any damaged clips or fasteners immediately.
- Hose down the interior and exterior (if safe to do) to remove dust and caked-on debris.
- Check mounting bolts and hardware for looseness or corrosion; tighten or replace as needed.
Clearing Jams and Blockages
Large items or packed debris can lodge mid-chute. Never force objects down or strike the chute with hammers (this can damage sections or loosen mounting bolts). Instead:
- Turn off work above the blockage.
- From the ground, use a long pole or stick to gently dislodge the obstruction from below.
- If the jam persists, disassemble the section above the blockage and manually remove the debris.
- Inspect the section and all adjacent clips before re-assembly.
For ongoing maintenance guidance, see our Trash Chute Cleaning & Maintenance Tips article.
Common Setup Mistakes to Avoid
Many Connecticut contractors and homeowners encounter preventable problems during debris chute setup and operation. Learning from these mistakes saves time, money, and safety headaches.
Mistake 1: Incorrect Angle and Discharge
Problem: Chute installed too steep (>55 degrees) causes debris to slide too fast, creating dangerous impact and spillage. Too shallow (<40 degrees) causes jams.
Solution: Install at 45–50 degrees. Use a level or angle gauge during setup, and adjust shims under mounting brackets to fine-tune.
Mistake 2: Undersizing the Chute or Dumpster
Problem: Choosing a 12-inch chute for a full-scale roofing or framing renovation creates constant jams and slows the project. Similarly, a too-small dumpster overflows, creating spillage and extra pickup trips.
Solution: Assess your debris volume upfront. For multi-story renovations with framing, insulation, or roofing, choose an 18–24-inch chute and schedule a dumpster large enough to hold 1–2 weeks of debris without overflow.
Mistake 3: Improper or Missing Mounting
Problem: Bolts installed into siding alone (not framing) or missing lateral bracing leads to chute sway, vibration, and eventual failure. Neighbors and workers lose confidence in safety.
Solution: Bolt into solid rim board, band board, or structural framing. Space bolts every 6–8 feet. Add lateral bracing or guy-wires on the bottom section if height exceeds 15 feet.
Mistake 4: Not Securing the Chute Opening
Problem: Leaving the chute opening unattended or unsecured during meal breaks or after-hours invites neighborhood children to explore, creating liability and safety hazards.
Solution: Install a lockable gate, cover, or collapsible door at the chute opening. Keep it closed whenever no workers are actively loading debris. Install high-visibility warning signs.
Mistake 5: Ignoring Local Permits and Setback Rules
Problem: Installing the chute without a permit or placing it too close to a property line can result in fines, forced removal, or neighbor disputes.
Solution: Contact your town’s building department early. Confirm permit requirements, setback distances, and noise restrictions before ordering or installing the chute.
For an expanded checklist of common errors, see our Debris Chute Mistakes to Avoid article.
Post-Renovation Removal and Cleanup
Once your renovation is complete, safe removal of the debris chute and thorough cleanup leave your property in good condition and restore neighbor relations.
Timing the Removal
Plan removal for the day or week your renovation is officially finished. Leaving a chute up after the project ends looks incomplete and can violate your building permit. If the project extends longer than expected, coordinate with your rental company or property manager to adjust rental dates.
Chute Removal Procedure
- Ensure the chute is empty and no debris is lodged inside.
- Disconnect mounting bolts and hardware carefully to avoid damaging the building facade.
- Lower sections in reverse order (top to bottom) to prevent sections from falling or twisting.
- Inspect wall-mounting holes for damage or plaster cracks; repair and patch as needed.
- If the chute was rented, coordinate with the rental company for pickup; if you own it, store sections in a dry area for future use.
Site Cleanup and Restoration
After the chute is removed, complete these cleanup steps:
- Remove and dispose of any remaining debris, shims, or fasteners.
- Patch mounting holes in the facade using sealant, caulk, or paint-matched filler.
- Sweep and pressure-wash the driveway to remove dust and stray debris.
- Final landscaping touch-up (reseed grass, replace mulch, trim overhanging branches if any were damaged).
- Walk the property and driveway with neighbors if relationships were strained; offer apologies for any inconvenience and confirm satisfaction with cleanup.
Frequently Asked Questions
Do I need a permit for a debris chute on my residential property in Connecticut?
Most Connecticut municipalities require a building permit for renovations involving structural changes or multi-story debris removal. Contact your town’s building department to confirm. Permits typically cost $50–$200 and take 3–5 business days to issue. Having a permit also protects you legally and is often required by homeowner insurance policies.
Can I install a debris chute myself, or do I need a contractor?
Modular chute assembly can be done by handy homeowners or contractors in an afternoon, but mounting the chute securely to the building requires drilling into framing, installing grade-8 bolts, and ensuring lateral stability. We recommend hiring an experienced contractor or installer ($300–$600 labor) to guarantee safety and comply with building codes.
What is the difference between a rental and a purchase?
Rentals are best for short projects (4–8 weeks) and come with delivery, setup, and removal included ($600–$1,200 total). Purchasing is better for long-term use or multiple renovations; a modular system costs $1,300–$2,650 upfront but is reusable for years. If you plan a second renovation or a very long project, ownership makes sense.
How do I keep neighbors from complaining during the renovation?
Notify neighbors 2 weeks in advance, provide your contractor contact number, schedule heavy debris-loading work during daytime hours, and use a covered dumpster or canvas-lined chute to reduce noise. A proactive, respectful approach prevents most neighbor disputes.
What size chute do I need for a kitchen and bathroom renovation?
A typical kitchen or bathroom renovation (6–8 weeks) generates enough debris for a 12–18-inch diameter chute. A 12-inch chute suits light loads (drywall, flooring, light demolition); an 18-inch chute handles mixed loads faster and is more forgiving of larger items. Measure your two-story height (typically 20–25 feet) and use 4–5 modular sections.
Is a debris chute safe if I have kids or pets at home?
Yes, if properly installed and supervised. Keep the chute opening locked or covered when not in active use, install warning signs, and brief all household members on the hazard. Schedule heavy debris-loading work when kids are at school or away from the home. For more details, see our Trash Chute Setup With Kids On Site guide.
What happens if debris jams inside the chute?
Never force objects down or strike the chute. Stop work above the blockage and use a long pole from below to gently dislodge the debris. If the jam persists, disassemble the section above and manually remove the obstruction. Inspect all clips and sections before reassembling. See our Trash Chute Cleaning & Maintenance Tips article for detailed jam-clearing procedures.
Local Notes and Connecticut Resources
Connecticut municipalities regulate debris chutes under local building codes and zoning ordinances. Before installing a debris chute for your family renovation, consult your town’s building or public works department.
- Connecticut Department of Consumer Protection — State contractor licensing and building standards (verify your contractor or installer is licensed).
- Town of Wallingford, CT — Building Department permit applications and local setback rules (typical example; other towns have similar departments).
- Connecticut Environmental Protection Act — Oversees construction and demolition debris disposal; confirm your debris is properly sorted and recycled per state guidelines.
For Connecticut-specific debris chute setup guides and nearby-town examples, see our Debris Chute Setup Checklist for Rhode Island (Rhode Island shares similar regulatory structures with Connecticut) and our Debris Chute Setup for Manchester, NH guide (applicable if your project is near the border).
Ready to Get Started?
A well-planned debris chute system turns a chaotic renovation into an organized, safe, and efficient project. Whether you are renting a system for a quick kitchen remodel or purchasing a modular chute for long-term family renovations in Connecticut, the right choice depends on your timeline, budget, and project scope.
Review our guides on rental pricing in nearby towns, cost estimation, and common mistakes to avoid to make an informed decision.
When you’re ready to move forward, contact us or reach out to a local debris-chute rental or sales company in Connecticut. Provide your project scope, building height, renovation duration, and specific town or ZIP code, and they will deliver a customized quote and installation timeline. With proper planning and the right equipment, your family renovation will stay safe, organized, and on schedule.