
Table of Contents
- What Is Debris Chute Setup?
- Why First-Time Contractors Need Rhode Island–Specific Guidance
- Types of Debris Chutes Available for RI Contractors
- Pre-Setup Planning & Site Assessment
- Rhode Island Permits & Regulatory Compliance
- Equipment Selection & Placement Strategy
- Step-by-Step Installation Workflow
- Safety & Operational Protocols
- Cost Breakdown for Rhode Island First-Timers
- Common Mistakes First-Time Contractors Make
- Maintenance & Ongoing Care
- Frequently Asked Questions
- Ready to Get Started?
What Is Debris Chute Setup?
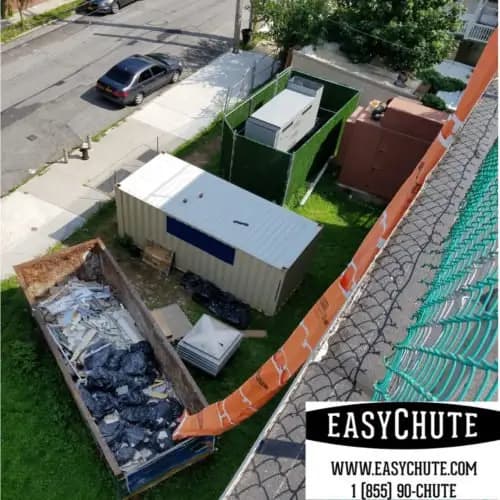
A debris chute system is a modular, segmented tube that allows workers to safely drop construction and demolition debris from upper stories of a building down to a ground-level collection bin or dumpster. For first-time contractors in Rhode Island, the setup process involves selecting the right chute type, securing it to the building exterior, ensuring proper ground-level collection, and maintaining safe operational workflows throughout the project.
The chute protects pedestrians, reduces manual debris hauling, speeds up jobsite cleanup, and minimizes dust and debris scatter. Unlike traditional hand-carrying or rope-and-bucket methods, a properly installed debris chute keeps the worksite organized and meets modern safety standards.
Why First-Time Contractors Need Rhode Island–Specific Guidance
Rhode Island is a densely populated, older state with a mix of residential neighborhoods, historic districts, and tight urban lots. First-time contractors must navigate several RI-specific constraints that contractors in less-populated areas often don’t face:
- Compact residential lots: Rhode Island homes are built close to property lines and adjacent structures, leaving little room for debris chute placement and ground-level staging areas.
- Dense street parking: Many RI neighborhoods lack dedicated construction staging areas, making safe dumpster access and chute positioning challenging.
- Historic district restrictions: Properties in designated historic areas may require design approval for temporary debris management systems.
- Neighbor proximity: Noise, dust, and debris management are politically sensitive in tight residential communities.
- Local permit timelines: Rhode Island municipalities have varying approval timeframes; understanding your town’s process saves weeks of delays.
Having a Rhode Island–focused setup playbook helps first-timers anticipate these challenges and avoid costly delays or neighbor complaints.
Types of Debris Chutes Available for RI Contractors
Modular Segmented Chutes
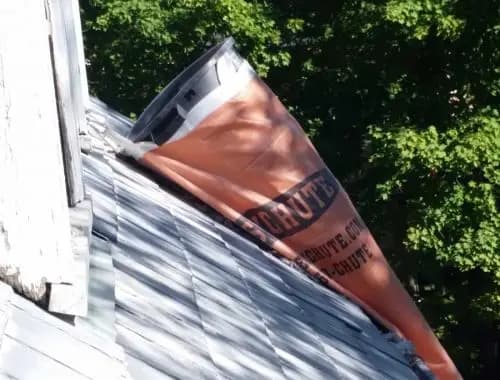
Modular chutes are made of lightweight, interlocking polyethylene or aluminum sections that stack vertically as you need height. They’re the most popular choice for residential and light commercial work in Rhode Island because they’re easy to transport, set up in hours, and can be repositioned if needed. The bright orange color ensures high visibility and reduces accident risk.
Canvas and Poly Chutes
Traditional canvas or heavy-duty polyethylene chutes hang from cables or frame supports and are often used for demolition and high-volume debris. Rhode Island contractors working on larger renovation or demolition projects may choose these for durability and capacity, but they require more complex rigging and professional installation.
For a detailed comparison of material options and cost trade-offs, see our canvas vs. poly chute comparison guide.
Gravity Chutes (Hard Pipe)
Rigid metal chutes are bolted or welded to the building structure for permanent or semi-permanent installations. These are rare for first-time contractors on short-term residential projects, but may apply to multi-year renovations or condominium common-area work.
Pre-Setup Planning & Site Assessment
Step 1: Survey the Site and Measure Constraints
Walk the property with a measuring tape and take photos from multiple angles. Note the following:
- Height from roof/top floor to ground level
- Width and depth of available exterior wall space
- Proximity to windows, doors, electrical lines, and adjacent properties
- Ground-level space available for dumpster placement
- Roof load capacity and anchor points (if rooftop staging is needed)
- Pedestrian and vehicle traffic patterns near the work zone
Step 2: Identify Anchor Points and Mounting Options
Debris chutes must be securely fastened. Look for:
- Permanent roof structure or parapet walls
- Exterior wall studs or rim boards (do not rely on vinyl siding or trim alone)
- Temporary bracing or framing if the structure is exposed during demolition
- Load-rated brackets rated for the full weight of a chute plus debris impact force
Do not guess about load capacity. Over-torqued or under-anchored chutes are a leading cause of accidents and liability claims.
Step 3: Check Ground-Level Access and Dumpster Placement
Confirm that your dumpster or collection bin can be positioned directly below the chute discharge without blocking sidewalks, fire lanes, or neighbor access. In Rhode Island’s tight neighborhoods, you may need a neighbor agreement or municipal permission to place a dumpster partially into the street.
Rhode Island Permits & Regulatory Compliance
Municipal Building Permit Requirements
Rhode Island requires building permits for most renovation and demolition work. A debris chute is considered part of the construction management plan, and many municipalities require specific debris management approvals as a condition of the building permit.
Contact your town’s building department early—don’t assume your permit is valid until you ask. Common RI approval timeframes range from 5 to 15 business days, depending on whether the project is in a historic district or requires a variance.
Sidewalk Obstruction and Street-Use Permits
If your dumpster or chute support extends into the public right-of-way, you’ll need a street-use or sidewalk obstruction permit. Providence, Warwick, Pawtucket, and Cranston each have different processes. Budget an extra 1–3 weeks for these approvals.
Occupancy and Neighbor Coordination
If the property is occupied (family, tenants, or businesses), Rhode Island’s construction noise ordinances typically restrict work hours to 7 a.m.–6 p.m. on weekdays. A debris chute generates noise during loading and unloading; communicating this to your neighbors and following local noise rules is both a legal and practical requirement.
For a comprehensive Rhode Island-specific checklist, see our debris chute setup checklist for Rhode Island contractors.
Equipment Selection & Placement Strategy
Chute Length and Diameter
Rhode Island residential homes typically range from 25 to 45 feet in height (two to four stories). Most modular chutes come in 10-foot sections; you’ll likely need 3–5 sections. Diameter options range from 18 to 36 inches; smaller diameters (18–24″) work for light renovation debris (drywall, tile, wood), while larger diameters (30–36″) handle mixed demolition waste and heavier materials.
For first-time contractors unsure of their debris volume, choose a 24-inch chute as a middle ground. It’s fast enough for typical residential renovation pacing and forgiving if debris is slightly larger than expected.
Angle and Support Structure
Debris chutes work best at an angle of 45–60 degrees from vertical. A steeper angle (closer to vertical) speeds debris flow but increases impact force on the dumpster; a shallower angle (more horizontal) is gentler but risks debris jamming.
For Rhode Island’s compact lots and close-proximity neighbors, a slightly more vertical angle (50–55 degrees) reduces the chute’s horizontal footprint and keeps debris from bouncing laterally.
Ground-Level Collection Setup
Position your dumpster directly below the chute discharge, with at least 6–12 inches of clearance around all sides (unless physically constrained). Use plywood boards or impact protection under the discharge to reduce noise and prevent dumpster damage. In occupied properties, install plywood deflectors and a removable sound-dampening apron around the discharge zone.
Step-by-Step Installation Workflow
Pre-Installation Checklist
- Permits and approvals are in hand (building, street-use, and neighbor agreement, if applicable).
- All tools are on site: wrench set, socket set, level, safety harness (for rooftop work), hard hats, and gloves.
- Chute sections are accounted for and inspected for damage.
- Two workers minimum (one to hold, one to tighten) are available for the duration.
- Dumpster is positioned and level before chute assembly begins.
Assembly and Mounting
- Lay the first section on the ground. Inspect the locking ring and gasket for dirt or damage. Clean if needed.
- Position the base anchor. Secure the bottom-most section to the ground or a portable base using L-brackets and bolts. Ensure the chute is vertical or at your pre-planned angle.
- Attach the second section. Slide it over the locking ring of the first section (or insert the male connector, depending on your chute design). Hand-tighten the locking ring, then use a wrench to tighten in a star pattern (like tightening a wheel) to ensure even pressure.
- Repeat for each section. As you add height, use temporary bracing or cables to keep the growing tower stable. Do not rely on the locking rings alone to hold the chute upright before all anchor points are secured.
- Secure the top to the building. Use load-rated brackets (minimum 500 lbs per bracket, minimum two brackets) to anchor the top section to the roof parapet, roof edge, or wall studs. Use the appropriate fasteners (lag bolts for wood, anchor bolts for concrete/masonry). Over-tighten slightly—these are safety-critical fasteners.
- Install side bracing. If the chute exceeds 30 feet or is exposed to wind, add diagonal or cross-bracing every 10–15 feet using cable or rigid struts.
- Perform a stability test. Gently push on the chute at mid-height. It should not sway more than 1–2 inches laterally. If it moves excessively, tighten fasteners or add bracing.
Final Inspection
Before any debris enters the chute, inspect all locking rings, fasteners, and anchor points one more time. Document your installation with photos and a signed setup checklist. This protects you if a neighbor reports the chute or an inspector shows up unexpectedly.
See our detailed step-by-step setup workflow guide for video walkthroughs and troubleshooting tips.
Safety & Operational Protocols
Loading the Chute Safely
Improper loading is the most common source of debris chute accidents. Train all workers on these rules:
- Never throw debris into the chute. Place it carefully and guide it in. Throwing creates impact hazards and can jam the chute.
- Keep the chute clear. Check for blockages every 30 minutes of active use. If debris jams, use a wooden pole or broom handle to dislodge it—never insert your arm or hands into a jammed chute.
- Post a spotter at ground level. Someone must watch the discharge zone and warn others away before debris exits.
- No riding the chute. Enforce this rule, especially on multi-crew sites or when onsite supervision is light.
- Secure the chute top. Use a removable screen or cage at the chute entrance to prevent accidental falls or unauthorized access.
For comprehensive safety protocols, including procedures for occupied homes and sites with children, see our guide on safety protocols for occupied sites.
Compliance with OSHA and Rhode Island Safety Regulations
All debris chute operations must comply with OSHA construction industry safety standards. Key regulations include:
- Fall protection for workers at heights above 6 feet (harnesses, guardrails, or personal arrest systems).
- Safe stacking and load distribution to avoid overloading the chute or ground collection area.
- Proper handling and ergonomic practices during loading—see OSHA ergonomic best practices for lifting techniques that reduce strain.
- Hazard communication for any materials that may need special handling (asbestos, lead paint, chemical waste).
Debris Segregation and Waste Disposal
Rhode Island contractors must manage multiple waste streams responsibly. Separate recyclable materials (metal, wood, concrete) from general demolition waste and hazardous materials. Check your dumpster rental agreement to confirm accepted materials; mixed waste may incur overage fees or require multiple bins.
Familiarize yourself with EPA construction and demolition debris guidelines to ensure compliant disposal and maximize recycling opportunities.
Cost Breakdown for Rhode Island First-Timers
Rental Costs
A typical modular debris chute rental in Rhode Island (3–5 sections, 24-inch diameter, 30-day term) ranges from $800–$1,500 depending on the provider, delivery location, and whether you need daily or weekly pickup of the collection bin.
Providence and Warwick tend to be slightly more expensive due to higher delivery and logistics costs. Rural areas like Smithfield or West Greenwich may be cheaper, but delivery times are longer.
Permits and Fees
- Building permit extension for debris management: $50–$150 (usually included in the main permit).
- Street-use or sidewalk obstruction permit: $100–$300 (varies by town).
- Dumpster rental (separate from chute): $300–$600 for a 20-yard bin, $400–$800 for a 30-yard bin (30-day term).
Labor for Installation
If you’re installing the chute yourself with your crew, budget 4–6 hours of labor (two workers) for a typical residential installation. If you’re hiring a specialized rigging company, expect $400–$800 in labor costs plus travel fees.
Protection and Contingency
Add $150–$300 for protective barriers, warning tape, cones, and sound-dampening materials, especially if you’re working in an occupied home or close to neighbors.
For a detailed cost comparison and hidden expenses, review our hidden costs guide for first-time buyers and our Providence debris chute rental pricing analysis. You can also use our rental vs. purchase ROI calculator to determine whether renting or buying makes financial sense for your typical project volume.
Common Mistakes First-Time Contractors Make
Underestimating Debris Volume
First-timers often think a smaller chute or shorter rental period will save money, then find themselves overwhelmed by mid-project. A typical bathroom renovation generates 4–6 cubic yards of debris; a kitchen renovation, 6–10 cubic yards. If you’re working on multiple rooms, assume 1.5–2× your initial estimate.
Failing to Secure Permits Before Setup
Rushing to install a chute without proper permits creates liability risks and invites municipal enforcement action. Rhode Island building inspectors are increasingly attentive to temporary site structures. Budget the full permit timeframe into your project schedule.
Poor Anchor Point Selection
Anchoring a chute to roof trim, vinyl siding, or unsupported fascia is a recipe for collapse. Always identify solid structural members (rafters, trusses, rim boards, masonry) before installation. When in doubt, hire a structural engineer or rigging professional to verify anchor points ($200–$400 consultation fee, well worth the insurance).
Neglecting Neighbor Communication
Debris chutes generate noise, dust, and visual impact. Neighbors who feel blindsided by a suddenly installed chute are more likely to call the city or lodge complaints. A brief conversation, a courtesy notice, and a commitment to quiet hours go a long way in Rhode Island’s tight neighborhoods.
Skipping Operational Training
Not all workers intuitively know how to load a debris chute safely. Conduct a 5-minute toolbox talk on your first day, demonstrating proper placement (no throwing), jam-clearing procedure, and ground-level safety. Revisit the talk weekly if crew turnover is high.
For a comprehensive checklist of mistakes to avoid, see our common mistakes checklist for contractors.
Maintenance & Ongoing Care
Daily Operational Checks
Before each workday, inspect the chute for:
- Visible damage, cracks, or loose locking rings (tighten if needed).
- Debris blockages or buildup inside the tube (clear before use).
- Anchor fasteners and bracing (look for rust, looseness, or corrosion).
- Weather-related movement or sway (high winds can cause temporary misalignment).
Weekly Deep Cleaning
Once a week (or more frequently if handling wet debris), flush the interior of the chute with water to clear dust and sticky debris. Use a garden hose from the top, and position someone at the bottom to catch rinsed material and guide it into the collection bin.
End-of-Project Inspection and Removal
Before returning the chute to the rental company, inspect it inside and out for damage you caused (distinguishing rental wear from damage you’re liable for). Remove all fasteners and anchors cleanly, patch any holes in the building exterior with caulk or sealant, and haul away all bracing materials.
A well-maintained chute that you return in good condition protects your rental deposit and reputation with future rental vendors.
Frequently Asked Questions
Do I need a permit to rent a debris chute in Rhode Island?
Yes. Most Rhode Island municipalities require a building permit that includes debris management specifications. Some towns also require a separate street-use permit if the chute or dumpster extends into the public right-of-way. Contact your town building department at least 2–3 weeks before your project start date to confirm timing. Proceeding without permits risks fines, work stoppages, and liability exposure.
Can I set up a debris chute on an occupied home?
Yes, but you must implement additional safety and noise controls. Install protective barriers around the discharge zone, limit loading hours to daytime (and follow your town’s noise ordinance), and notify occupants in writing before starting. See our guide on safety protocols for occupied sites for detailed procedures. Some homeowners prefer you to arrange an alternative debris removal method (hand-hauling, debris removal service) to minimize disruption.
What’s the difference between renting and buying a debris chute?
Renting is best for one-off projects or small contractors (lower upfront cost, delivery and pickup included). Buying makes sense if you run 4+ projects per year and have secure storage. Use our rental vs. purchase ROI calculator to model your specific situation. Most first-time contractors should rent for their first 2–3 projects to test workflow and build expertise before investing in equipment.
How do I know if my chute is too heavy for its anchor points?
Each anchor point should be rated for at least 500 lbs of combined load (chute weight plus impact force). If you’re unsure about your anchor points, hire a rigging professional or structural engineer ($200–$400) to verify before assembly. This is a critical safety check and far less expensive than a collapsed chute or liability claim.
What materials can I put down a debris chute?
Small to medium debris (drywall, tile, lumber, plaster, insulation) moves freely. Avoid: heavy steel items (rebar, large pipes), intact appliances, buckets of liquid, hazardous materials (paint, asbestos, chemicals), and oversized single pieces (whole doors, large windows). Check with your dumpster rental company about restrictions; mixed debris may require special handling or additional fees.
How do I prevent debris from backing up and jamming the chute?
Keep the collection bin directly below the discharge and don’t allow it to fill beyond 75% capacity. Clear the chute opening every 30 minutes of continuous use, and assign one worker to monitor flow. If debris does jam, stop use immediately, position a spotter below, and carefully use a wooden pole or broom handle (never your hands) to dislodge it from above.
What should I do if a neighbor complains about the chute during my project?
Address complaints promptly. Listen to their specific concern (noise, dust, debris scatter, visual impact), and offer a concrete solution (limit hours, add sound dampening, reposition the dumpster, etc.). Document your conversation and any adjustments you make. If the complaint escalates to the city, your proactive response will be valuable if inspectors investigate. In Rhode Island’s close-knit neighborhoods, a reputation for professionalism and responsiveness is essential for repeat business.
Ready to Get Started?
Debris chute setup doesn’t have to be intimidating. With proper planning, the right permits, and a clear installation workflow, first-time Rhode Island contractors can execute efficient, safe, and compliant projects from day one.
Next steps:
- Download your town’s building permit application and street-use permit form (available on your municipality’s website).
- Walk your jobsite with a measuring tape and take photos of anchor points and ground-level access.
- Call or email 2–3 debris chute rental providers in Rhode Island to confirm availability, pricing, and delivery lead times.
- Review our Rhode Island-specific setup checklist and print a copy for your job folder.
- Schedule a 30-minute onsite walkthrough with your crew to review safety protocols and training.
- For detailed step-by-step guidance, see our installation process guide for Rhode Island.
If you’re deciding between renting and purchasing, or comparing your debris chute system options, take advantage of our modular vs. traditional chute comparison and our rental vs. purchase ROI calculator. Both tools are designed to help first-time contractors like you make confident, data-driven decisions.
Questions? Contact EasyChute at +1 855-902-0883 or visit https://easychute.com to request a Rhode Island pricing quote or speak with a contractor advisor.