

Index
- Why Roofing Contractors Need Trash Chutes
- Types of Chutes for Roofing Tear-Offs
- Site Assessment and Placement Strategy
- Dumpster Positioning and Debris Flow
- Safety Protocols and OSHA Compliance
- Installation and Setup Workflow
- Operating a Roofing Chute: Crew Efficiency
- Maintenance and Clog Prevention
- Cost Analysis: Rental vs. Purchase
- Common Mistakes and How to Avoid Them
- Debris Chute Performance Metrics
- Regional Considerations: Wind and Weather
- Frequently Asked Questions
- Ready to Streamline Your Roofing Debris Removal?
Why Roofing Contractors Need Trash Chutes
A residential roofing tear-off on a 2,000 sq. ft. roof generates 15–25 tons of debris: shingles, felt, nails, wood decking, and flashing. Without a chute system, that tonnage lands on the driveway, front yard, or street — creating liability, traffic hazards, and customer frustration. Trash chutes solve this problem by channeling debris directly into a dumpster, keeping the work zone clean and compliant.
For roofing crews, a chute is not a luxury; it’s a workflow multiplier. Roofers work faster when they don’t have to handhaul bundles down ladders or scaffolding. Safety improves because workers aren’t scrambling over piles of sharp, loose debris. Insurance and municipal codes increasingly require debris containment on residential jobs — a chute checked that box in minutes.
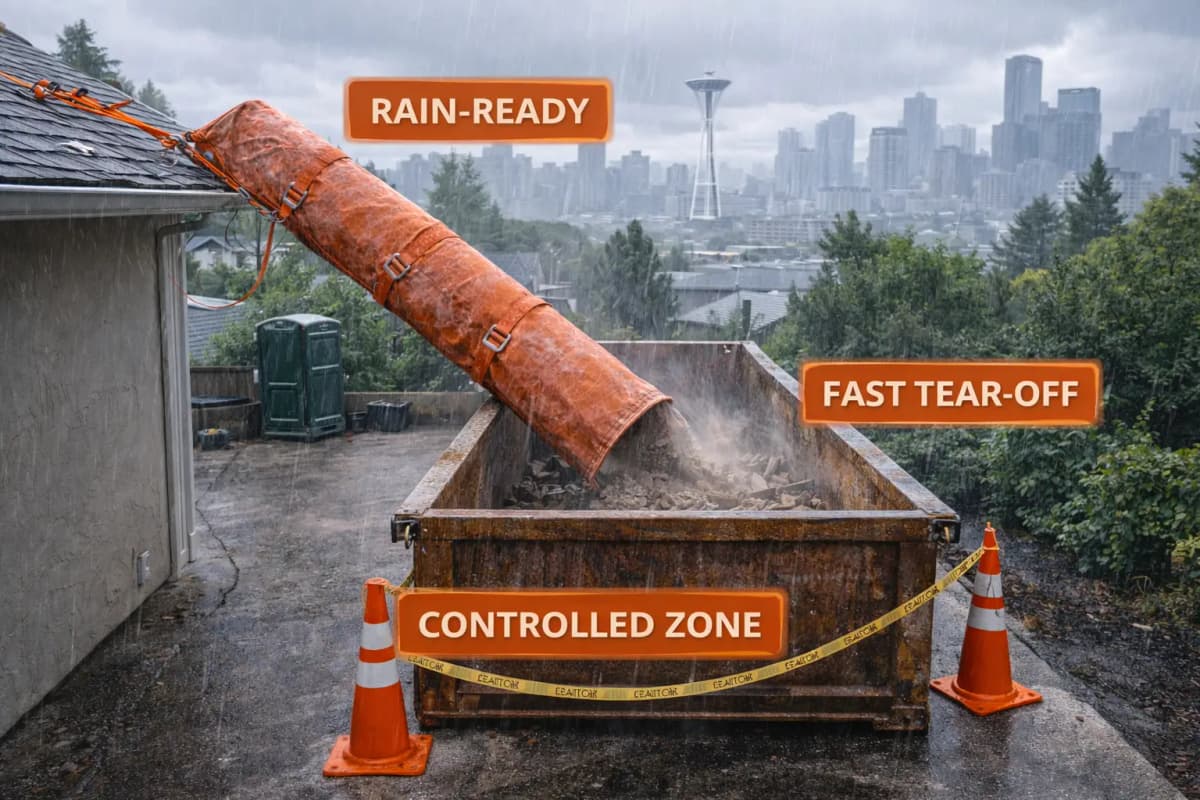
The Business Case for Chutes
- Crew productivity: Workers load a chute 30–50% faster than manual cleanup methods.
- Liability reduction: Contained debris means fewer slip-and-fall claims, fewer neighbor complaints.
- Schedule predictability: You finish the job on time, every time, without debris-removal delays.
- Driveway protection: No rutted, damaged concrete; customer satisfaction stays high.
- Municipal compliance: Many jurisdictions require dust and debris containment; a chute satisfies local code.
Types of Chutes for Roofing Tear-Offs
Not all chutes are the same. Roofing contractors should understand the main categories to choose the right tool for their project scope and site constraints.
Heavy-Duty Aluminum and Poly Systems
Most roofing operations use a heavy-duty trash chute made from aluminum frames with polyethylene sleeves (orange or translucent). These systems are designed to handle the weight and volume of shingles, felt, and decking — materials that come down fast and hard. Heavy-duty models have reinforced joints, higher weight-per-section capacity (200–500 lbs. per section), and durable interior surfaces that withstand abrasion from nails and debris edges.
Modular and Sectional Design
A modular trash chute system consists of 10–50 ft. lengths of stackable sections. You add or remove sections to match your roof height, making it ideal for 1-story ranch homes up to 4–5 story multi-family projects. Modularity also means easier transport, faster setup, and the ability to use the same chute across multiple job sites.
Window-Drop vs. Roof-Mounted Chutes
For roofing tear-offs, a roof-mounted chute (fed from the roof edge via bundles of shingles) is standard. However, some roofers also use window-opening chutes on upper floors to move debris from interior demolition or insulation removal. Know the difference: roof-mounted handles the highest volume and is your primary tool for tear-offs; window-drop is supplemental for multi-floor projects.
Site Assessment and Placement Strategy
Before you order a chute, walk the site and measure three things: roof height, driveway width, and ground obstacles. A poor placement decision can cost you a day of work and create safety hazards.
Measuring Roof Height Accurately
- Use a laser distance meter or measure from ground level up a wall or existing gutter.
- Add 2–3 feet to your roof-peak measurement if the chute will hang over an edge; the discharge end must clear ground obstacles.
- Account for pitches: a 8/12 roof on a 30-ft.-wide house is not the same height on both sides.
- Order a debris chute system that covers your height range; most come in 10, 25, 50, and 75-foot configurations.
Driveway and Ground Space
Identify the spot where the dumpster will sit. It must be within 20–30 feet of the discharge end (chute drop-off) to minimize spray and spillage. Check for overhead wires, tree branches, or parked cars. If the driveway is narrow or sloped, you may need to position the dumpster on the street — check local parking ordinances first.
Roof Edge and Mounting Points
Look for solid mounting: eaves trough brackets, roof edge beams, or (on flat-roof commercial buildings) roof-mounted frames. A chute system weighs 200–600 lbs. and holds up to 1,000 lbs. of debris at a time; you need secure anchor points rated for lateral and downward loads. Never hang a chute from gutters or fascia alone — reinforce with a roof edge bracket.
Dumpster Positioning and Debris Flow
The dumpster is the catch point — positioning it correctly means fast, predictable debris flow and a clean site.
Optimal Distance from Chute Discharge
Position the dumpster 15–25 feet directly below the chute discharge. Roofing debris (light, bulky shingles) spreads laterally as it falls; a wider gap means more spillage on the driveway. If you must place the dumpster farther away, angle the chute slightly or use a chute bag at the discharge end to funnel material straight down.
Dumpster Orientation and Size
- 30-yard dumpster: Standard for roofing tear-offs up to 3,000 sq. ft., holds ~13 tons.
- 40-yard dumpster: For homes 3,000–5,000 sq. ft. or mixed demo/roofing jobs.
- Open-top vs. roll-off: Open-top (belly dumps) work best for chutes — debris falls straight in. Roll-offs have high sides that can interfere with discharge angle.
- Placement edge: Position the dumpster so the chute discharge is centered 3–4 feet from the dumpster’s nearest edge, not over the corner.
Managing Spillage and Dust
Even with perfect placement, roofing debris (especially felt and granules) will scatter. Place plywood, tarps, or cardboard around the dumpster base to catch stray material and make final cleanup quick. For high-wind days, use dust suppression netting on the dumpster sides or mist the chute interior lightly with water to reduce airborne granules.
Safety Protocols and OSHA Compliance
Trash chutes are high-hazard equipment. OSHA construction safety standards require that all debris chutes be anchored, inspected, and operated safely. Falls and struck-by incidents top the injury list on roofing jobs; a chute system, when properly installed, mitigates both.
Installation Safety Checklist
- Secure anchoring: All chute sections must be tied to the building frame (not gutters or fascia). Use rebar, cable, or roof-edge brackets rated for the system weight plus full-load lateral forces.
- No overloading: Do not stuff more than one 90-lb. bundle of shingles per minute down the chute. Overloading causes jams, bursting, and ground impact injuries.
- Discharge clearance: Ensure the chute discharge hangs at least 3–4 feet above the dumpster floor to allow material to break apart and spread evenly.
- Worker positioning: No worker should stand directly beneath the chute discharge or in the debris fallout zone. Post a spotter if anyone must work near the dumpster.
- Hard hats and high-visibility vests: Mandatory for all workers on the roof or ground near the chute.
Lifting and Loading Ergonomics
Proper lifting mechanics and ergonomics reduce cumulative injury. Roofing debris is heavy and bulky; teach your crew to load bundles in pairs (two workers per ~80-lb. bundle) rather than solo lifts. Bend at the knees, keep loads close to the body, and never twist or throw bundles into the chute — control the placement and let gravity do the work.
Inspection and Maintenance
- Inspect all chute sections for dents, cracks, or separation before each use.
- Check all tie points and anchor bolts at the start of each day.
- If a section is damaged, remove it from service and replace it — do not patch or continue with a compromised chute.
- After heavy rain or wind, re-inspect anchors and straps before resuming work.
Installation and Setup Workflow
Setting up a trash chute for a roofing tear-off takes 1–2 hours with a trained crew. Here’s the standard playbook.
Pre-Installation Site Preparation (Day Before or Morning Of)
- Confirm dumpster delivery time and position with the waste company.
- Clear the driveway of parked cars, landscaping, and obstacles.
- Lay plywood or tarps in the spillage zone around the dumpster base.
- Notify neighbors if you’re on a shared driveway or near an HOA property.
- Check weather forecast; delay if high winds (>20 mph) are expected.
Chute Assembly and Hanging
- Lay out sections: Assemble all chute sections on the ground in order. Check that connectors and gaskets are clean and undamaged.
- Mount the roof bracket: Secure the top section to the roof edge or frame using bolts and lock washers. Use a level to ensure vertical alignment.
- Stack and connect sections: Slide each section into the one above, using the factory connector tabs. Hand-tighten first, then use a wrench to snug bolts (not overtight; you’ll damage threads).
- Angle the discharge: The bottom section should angle slightly toward the dumpster center. Adjust the roof bracket if needed to achieve a 5–10 degree downward tilt.
- Tie-off and bracing: Run diagonal cables or straps from the chute to the roof frame to prevent swaying. Use carabiners or cable clamps rated for at least 500 lbs. tension.
- Final safety inspection: A second person should walk the perimeter and confirm all bolts are tight and no sections are loose or misaligned.
Dumpster Positioning Under the Chute
Once the chute is up, position the dumpster. The discharge end should be 3–4 feet above the dumpster floor, centered over the bin’s opening. If the dumpster is too far back or too far forward, reposition it — do not attempt to adjust the chute after it’s anchored.
Learn more about how to install a trash chute step-by-step for additional details on anchoring and safety checks.
Operating a Roofing Chute: Crew Efficiency
Once the chute is installed, the way your crew uses it determines your productivity and safety. A roofing tear-off typically runs 2–4 days depending on roof size; managing the flow of material smoothly keeps everyone on schedule.
Crew Roles and Station Setup
- Roof crew (2–3 workers): Remove shingles and felt, bundle and palletize on the roof near the chute opening. Prepare material so bundles are within arm’s reach of the chute.
- Chute feeder (1 worker): Load bundles into the chute at a steady rate — aim for one 80–100 lb. bundle every 60–90 seconds. Take breaks to let the dumpster partially fill and debris settle.
- Dumpster spotter (1 worker): Stand clear of the discharge zone but visible to the roof crew. Communicate via radio if the dumpster is getting full or if debris is piling up outside the bin.
- Ground cleanup crew (1–2 workers): Remove spillage, rake stray shingles and felt, and prep for trash removal. This crew can also help unload shingle bundles from the roof if the pace slows.
Loading Pace and Rhythm
A steady loading pace prevents jams and keeps the team in sync. On a sunny day with dry shingles, most crews can move 20–30 tons in a 6–hour shift. On humid or rainy days, material is heavier and the pace slows; plan accordingly and don’t push past what the crew can handle safely.
Breaks and Rotation
Chute feeding is repetitive and strenuous. Rotate workers every 2 hours so fatigue doesn’t lead to unsafe loading. Encourage hydration and take longer breaks mid-day to prevent heat exhaustion, especially in summer.
Maintenance and Clog Prevention
Clogs happen when debris jams in the chute, usually where sections connect or where the angle becomes too shallow. Preventing them saves hours of downtime.
Common Clog Points and Prevention
- Section connectors: Felt and granules accumulate where two sections overlap. Clean this joint at the end of each work day with a stiff brush and compressed air.
- Bunched felt: If felt wraps around itself as it falls, it can jam the chute bore. Insist that workers tear felt into 3–4 ft. sections rather than stuffing whole 36-ft. rolls into the chute.
- Shallow discharge angle: If the bottom section angles less than 5 degrees, debris slows and bunches. Check the angle after every site move; adjust the roof bracket if needed.
- Nails and flashing: Long nails and metal trim can snag felt or catch on the chute seams. Have workers remove nails before chuting or bundle nail-studded felt loosely so it breaks apart as it falls.
Clearing a Jam Safely
If a clog occurs, do not descend into the chute from the roof. Instead:
- Stop all loading immediately. Post a spotter to prevent anyone else from feeding the chute.
- From the ground, use a long pole (16–20 ft. reach) to gently dislodge the blockage from below. Do not poke upward into the discharge zone; work from below to push the jam down.
- If the jam persists, disconnect the bottom section (safest method) and clear the stuck debris by hand from the side, not from above.
- Reconnect, test with a small amount of material, and resume once flow is confirmed.
Never attempt to clear a clog from the roof by poking a stick down the chute; you risk the stick popping out and striking someone below, or you falling into the chute yourself.
Cost Analysis: Rental vs. Purchase
Most roofing contractors rent trash chutes rather than buy them outright. Understanding the economics helps you price jobs accurately and bid competitively.
Rental Costs (2026 Market Rates)
- Single-job rental (3–5 days): $300–$600 for a standard 25–50 ft. debris chute rental.
- Weekly rental (7 days): $450–$800.
- Monthly rental (30 days): $1,000–$1,800.
- Delivery and pickup: Often bundled into the rental fee; confirm with your supplier.
- Damage waiver or deposit: Most rental companies charge $100–$300 refundable deposit or optional damage insurance ($50–$100 per rental).
Purchase Economics
A new debris chute system costs $2,000–$5,000 depending on quality and modular length. If you do 15+ roofing tear-offs per year, buying pays for itself in 18–24 months. Purchase makes sense if you:
- Run a year-round roofing operation with steady tear-off volume.
- Work in remote areas where rental logistics are slow and expensive.
- Want to differentiate your bid by including “free” chute setup (you absorb the capital cost into pricing).
Factoring Chute Costs into Your Bid
For a typical 2,500 sq. ft. roofing tear-off:
- Rental chute: $400 (3-day rate) + $100 delivery = $500 project cost.
- Dumpster: 30-yard bin, 3-day rate: $350–$500.
- Total debris removal overhead: $850–$1,000 per job.
- Labor savings (vs. manual cleanup): 1–2 crew-days saved = $800–$1,600 labor cost avoided.
- Net benefit: Even with rental, you save $300–$800 per job and improve crew morale.
Most roofing contractors roll the chute rental into their material cost and pass it on to the customer, or absorb it and recover it through faster crew productivity on multiple jobs per month.
Common Mistakes and How to Avoid Them
Twenty years of roofing chute deployments reveals recurring pitfalls. Avoid these and your jobs run smoothly.
Mistake #1: Underestimating Roof Height
The problem: You order a 25-ft. chute for a “one-story” home, but the roof peaks at 32 feet. The chute barely reaches, and the discharge angle is too steep, causing jams.
Prevention: Use a laser meter and always measure twice. Add 2–3 feet to your measured height to account for the discharge overhang and angle adjustment. When in doubt, rent a longer chute; it’s $50–$100 extra and saves a troubleshooting trip.
Mistake #2: Placing the Dumpster Too Far Away
The problem: You position the dumpster 40 feet from the chute discharge to keep it off the client’s driveway. Roofing debris scatters across the yard; cleanup takes an extra day.
Prevention: Negotiate dumpster placement with the customer upfront. Explain that a 15–25 ft. distance from the chute discharge is standard and necessary for efficiency. If the driveway is small, rent two smaller dumpsters positioned closer, or use a chute bag to funnel discharge into a more distant bin.
Mistake #3: Ignoring Anchor Points
The problem: You hang the chute from the gutter and fascia because they’re convenient. The chute sways in the wind, sections separate, and debris sprays sideways. On the third day, a gutter bracket fails and the chute drops 20 feet.
Prevention: Scout the roof beforehand and identify solid anchor points: roof-edge beams, structural rafters, or metal eave trusses. Install a roof-edge bracket or frame that ties into the building structure, not the cosmetic trim. This takes an extra 30 minutes but is non-negotiable for safety.
Mistake #4: Overloading the Chute
The problem: Your crew gets excited and starts feeding two bundles of shingles every 30 seconds. The chute jams, sections warp, and you spend 4 hours clearing blockages.
Prevention: Establish a loading pace before the job starts — typically one bundle per 60–90 seconds. Train your chute feeder to this rhythm. If the crew wants to go faster, they’re better off with a second chute or a construction debris chute rated for higher volume. Respect the equipment’s design limits.
Mistake #5: Not Communicating Weather Constraints
The problem: You install a chute on a windy day without checking the forecast. By noon, a 25-mph gust rocks the chute, debris flies sideways, and you have to uninstall and reschedule.
Prevention: Check wind forecasts before installation. In coastal areas or high-elevation zones, winds above 20 mph are unsafe; postpone setup. If you’re already installed, add diagonal guy-wires or remove sections to reduce the wind load profile on very gusty days.
Debris Chute Performance Metrics
Tracking performance across jobs helps you refine your estimates and identify bottlenecks. Here are the metrics that matter.
Volume Moved Per Hour
Most crews move 4–6 tons per hour using a chute on a roofing tear-off, depending on material condition and crew size. Light, dry shingles move faster (~6 tons/hr.); wet or heavy felt moves slower (~3–4 tons/hr.). Use this to estimate how long a tear-off will take and how many dumpster loads you’ll need.
Labor Hours for Installation and Removal
Budget 1.5–2 hours for installation (including site assessment, anchoring, and testing) and 0.5–1 hour for removal and cleanup. Total overhead is 2–3 labor hours per job. At $60/hour burdened labor cost, that’s $120–$180 per project — a cost many roofing firms recover in productivity gains within the first day.
Spillage and Dumpster Efficiency
A well-placed chute with good discharge control should keep 85–95% of debris inside the dumpster. If you’re seeing 20%+ spillage, your placement or discharge angle is off. Adjust and re-measure; small tweaks yield big improvements in efficiency and cleanup cost.
Regional Considerations: Wind and Weather
Where you work affects how you set up a chute. Coastal and high-wind zones demand extra bracing; hot, dry regions have different debris-flow patterns than humid ones.
Coastal and High-Wind Sites
If you work in Florida, New England, the Great Plains, or any area with sustained winds above 18 mph, add diagonal cables and increase anchor point density. Some contractors use adjustable wind-resistant chute designs or shorter sections (10-ft. modules instead of 25-ft.) to reduce the sail profile. A second set of guy-wires cost $100–$200 and can prevent a catastrophic anchor failure.
Hot and Dry Climate Considerations
In the Southwest and intermountain West, dry roofing debris is lightweight and prone to airborne granule loss. Mist the chute interior lightly with a garden hose to suppress dust. It costs 10 minutes of setup but dramatically reduces neighborhood dust complaints and improves visibility for the spotter below.
Humid and Wet Climates
In humid regions (Southeast, Pacific Northwest), felt and shingles absorb moisture and become heavier. Budget slower loading rates (3–4 tons/hr. instead of 5–6 tons/hr.) and monitor anchor straps for rust or corrosion on extended multi-day jobs. If you’re renting the same chute repeatedly, inspect bolts and tie-downs for moisture damage.
Frequently Asked Questions
How much weight can a standard roofing chute handle per section?
A heavy-duty modular chute section typically handles 250–400 lbs. at any given time, with a maximum loading rate of one 80–100 lb. bundle per 60 seconds. This prevents jams and ensures the system discharges material evenly. If you’re moving dense material (roofing shingles with water absorption), stick to the lower end of this range and take more frequent breaks.
What’s the difference between a rental chute and a purchased one?
Rental chutes are serviced and inspected regularly by the rental company; they’re insured and come with technical support. Purchased chutes are yours to maintain, repair, and store, but you amortize the cost over many jobs. For contractors doing fewer than 15 tear-offs per year, rental is typically more cost-effective. High-volume operations (20+ jobs/year) usually benefit from ownership.
Can I use a debris chute on a flat-roof commercial building?
Yes, but the installation is different. On flat roofs, you typically use a roof-mounted frame anchor bolted to the structure, rather than hanging from eaves. Refer to modular debris chute system setup guides for flat-roof specifics, or contact your rental supplier for site-specific advice.
What if the homeowner’s neighbor complains about dust or noise?
Dust suppression (light misting of the chute) and scheduling the loudest loading hours between 8 a.m. and 4 p.m. (standard in most municipalities) minimize complaints. If the neighbor is particularly sensitive, consider loading materials during the early morning window and offer a courtesy cleanup sweep of their property at the end of the day. Most complaints dissolve with proactive communication.
How do I know if my chute is installed safely?
Perform a visual safety walk: check that all bolts are tight (use a wrench to verify), that all anchor points are secure and tied to structural members (not trim), that sections are vertically aligned with no gaps, and that the discharge angle is 5–10 degrees toward the dumpster. A second person should validate your observations before any crew member loads material into the chute.
Is a chute worth renting for a small 1,000 sq. ft. roof tear-off?
On a 1,000 sq. ft. roof, you’ll generate 5–7 tons of debris. Manual cleanup on a small lot is feasible for one crew in 1–2 days, but a chute accelerates the job to 4–6 hours of active work. If your time is valuable and you do multiple small jobs, a chute rental ($300–$400) is worth the investment for speed and crew morale. If this is a one-off job, manual cleanup is cheaper.
What regulations or permits do I need to set up a roofing chute?
EPA construction and demolition debris recycling guidelines encourage source separation of roofing materials (asphalt shingles vs. felt vs. decking) where possible. Some municipalities require a debris-control plan or permit for chutes on residential properties. Always check your local building department; most approve standard chute systems without special permits if they’re properly anchored and operated.
Ready to Streamline Your Roofing Debris Removal?
A trash chute transforms roofing tear-offs from messy, time-consuming operations into efficient, site-controlled projects. Your crew works faster, your customers stay happy, and your liability shrinks. The setup is straightforward when you follow the playbook: measure twice, anchor securely, position the dumpster close, load at a steady pace, and communicate with your team.
Whether you’re renting for a single job or buying for a fleet of crews, EasyChute supplies modular, contractor-grade systems designed for the unique demands of roofing tear-offs. Our heavy-duty poly chutes handle the volume, our modular design fits any roof height, and our support team is here to help you spec the right system for your project.
Contact EasyChute today to discuss your roofing debris-removal needs. We offer free site assessments, rental availability in most markets, and expert advice on placement and safety. Call +1-855-902-4883 or visit our website to get started.
Your next tear-off job can run cleaner, safer, and faster. Let’s make it happen.