

Index
- What Is Debris Chute Rental?
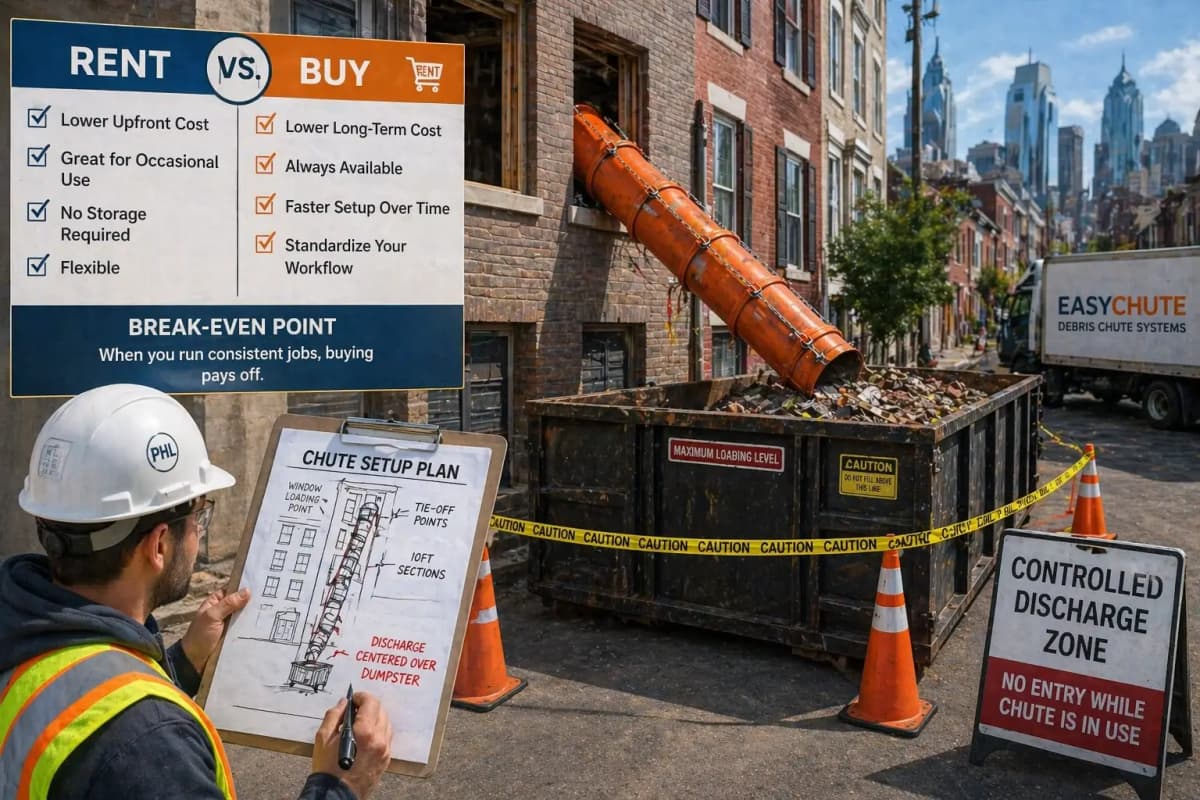
- Why Rent Instead of Buy?
- Rental Cost Factors and Pricing Models
- Types of Chutes Available for Rent
- Rental Duration and Flexibility
- Delivery, Setup, and Installation Requirements
- Safety Compliance and OSHA Requirements
- How to Choose a Debris Chute Rental for Your Project
- Debris Chute Rental vs. Alternative Debris Management
- Operational Playbook: Running a Rented Chute
- Common Rental Mistakes and How to Avoid Them
- Local Permits and Compliance by Region
- Frequently Asked Questions
- Ready to Rent a Debris Chute?
What Is Debris Chute Rental?
Debris chute rental is a short-term lease arrangement for a modular, tubular debris management system designed to safely funnel construction, demolition, and remodeling waste from elevated work areas directly into ground-level dumpsters. Instead of paying capital costs to purchase equipment outright, your team rents the system for the duration of your project—whether that’s two weeks or two months—then returns it when the job is complete.
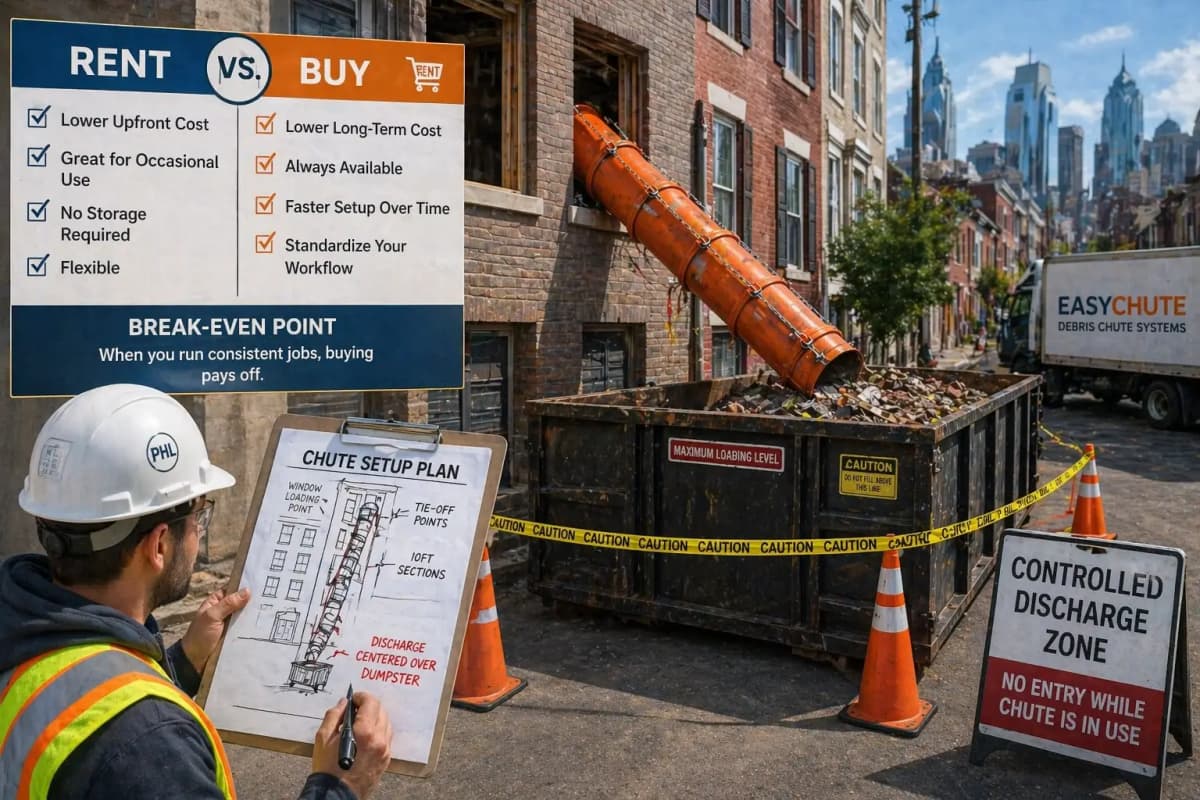
A typical rental chute comprises segmented polyethylene or aluminum tubing sections that stack vertically, supported by mounting brackets and tie-offs. Workers load debris from upper floors or rooflines, and materials slide down gravity-powered chutes at a controlled pace into a waiting dumpster below. The rental provider handles transport, basic setup assistance, and takedown, while your crew manages day-to-day loading and minor maintenance.
Modern debris chute rental solutions serve residential remodelers, roofing contractors, demolition firms, general contractors, and facility managers across the US. The systems are OSHA-compliant when properly installed and reduce labor costs, injury risk, and project timelines compared to manual hauling or multi-trip dumpster cycles.
Why Rent Instead of Buy?
The decision to rent rather than purchase hinges on project frequency, storage space, capital constraints, and crew expertise. Here’s why rental is often the smarter choice:
- No upfront capital outlay. A quality construction debris chute purchase can run $3,000–$8,000+. Rental spreads that cost over weeks, keeping monthly cash flow intact.
- No storage or maintenance burden. You don’t own the equipment, so no warehouse space, cleaning, inspections, or repairs on your dime between jobs.
- Right-sized for each project. Rent a 25-foot system for a townhouse remodel, a 50-footer for a multi-story demo. Buy once, and you’re locked into one length.
- Flexibility and mobility. If a project runs long or starts early, adjust rental dates. If your crew moves to a new city, the rental provider arranges local delivery.
- Compliance and support. Rental providers inspect equipment for safety, handle permitting paperwork, and offer on-site setup guidance—reducing your liability.
- Lower insurance and liability exposure. The provider carries equipment insurance; you avoid claims related to a system you don’t own.
Rental Cost Factors and Pricing Models
Debris chute rental pricing varies by supplier, region, chute type, and rental length. Understanding the main cost drivers helps you budget accurately and negotiate favorable terms.
Base Rental Rate (Weekly or Monthly)
Most providers quote a weekly or monthly rental rate plus optional delivery fees. In 2026, typical ranges are:
- Lite-duty chutes (residential scale, 25–35 ft): $150–$300/week or $500–$800/month
- Heavy-duty chutes (commercial/demo, 50–75 ft): $250–$500/week or $800–$1,500/month
- Premium or custom-length systems: $400–$750/week or $1,200–$2,500/month
Longer rental periods (12+ weeks) often qualify for discounts of 15–25%. Ask your provider about seasonal rates—spring and summer construction booms may have higher rates than winter slowdowns.
Delivery and Pickup Fees
Transport costs typically run $200–$600 depending on distance from the rental depot and site accessibility. Some providers waive delivery fees for long-term rentals (8+ weeks). Confirm whether pickup is included or charged separately at project end.
Setup and Installation Labor
Many rental companies include basic setup (anchoring, tie-offs, initial testing) in the rental fee. However, complex installations—custom heights, tight spaces, or specialized mounting—may incur additional labor charges ($300–$1,200). If your crew can handle setup yourself, confirm that the provider will credit or waive setup labor fees.
Damage and Return Condition
Rental agreements typically cover normal wear and tear but charge for damage caused by misuse, overloading, or negligent return. A heavily dented or rust-stained chute upon return might trigger a $200–$500 damage fee. Use protective coverings and perform light rinsing if debris buildup occurs during the rental period.
Optional Add-Ons
Extended liability insurance, additional chute bags, protective tarps, and expedited delivery each add $50–$300 to the bill. Ask what’s included in the base rate and what’s optional.
Types of Chutes Available for Rent
Rental providers typically offer several chute configurations tailored to different project scopes and constraints. Understanding the options ensures you select the right fit for your crew and site conditions.
Poly Debris Chutes
A poly debris chute is constructed from lightweight, high-density polyethylene in segments that stack and nest together. Poly chutes are durable, rust-resistant, and quiet during operation. They’re ideal for residential and light commercial work, particularly in tight quarters or historic neighborhoods where noise is a concern. Typical lengths: 15–50 feet. Cost: mid-range rental rates.
Aluminum Chutes
Aluminum systems are lighter and more corrosion-resistant than steel, making them popular in coastal or humid climates. They conduct heat less and offer better visibility through transparent sections. Aluminum chutes rent at slightly higher rates due to premium material cost but reduce crew fatigue during handling.
Modular vs. Fixed-Length Systems
A modular debris chute system allows you to add or remove segments on the fly, adapting to varying floor heights. Fixed-length rentals are pre-assembled and delivered as-is. Modular systems offer flexibility; fixed-length systems are faster to deploy if you know your exact height requirements upfront.
Window-Drop Chutes
For townhouses, brownstones, or narrow alleys where roof access is limited, a window debris chute can be mounted through an upper-floor window opening, directing debris down the exterior into a dumpster below. Rental availability for window configurations is regional; confirm with your provider early.
Rental Duration and Flexibility
Rental terms range from weekly to seasonal, with flexibility built in for project delays or scope changes. Here’s what to expect:
Standard Rental Periods
- Weekly rentals: Best for short demolition jobs (1–2 weeks). No long-term commitment but higher per-day cost.
- Monthly rentals: Ideal for kitchen or bathroom remodels, small-scale roofing tear-offs. Better rate per day than weekly.
- 12–16 week rentals: Suited to major renovation or multi-unit projects. Discounted rates offset longer commitment.
- Seasonal or open-ended: Some providers allow flexible start/stop dates if you lock in a minimum period (e.g., 8 weeks minimum, but you can end early with 2-week notice).
Extension and Early Termination Clauses
If your project runs long, most rental agreements allow weekly extensions at a prorated rate (sometimes discounted if you’re already in a long-term lease). Early termination may incur a penalty equal to 1–2 weeks’ rent, so factor that risk into your initial bid. Clarify extension and exit terms in the rental contract before signing.
Seasonal and Weather Considerations
Spring and fall are peak rental seasons for residential remodeling and roofing; winter may offer lower rates and more available inventory. If you’re booking for summer months, reserve 4–6 weeks in advance. Extreme weather (ice, snow, hurricane season) may delay delivery or pickup; confirm the provider’s weather policy.
Delivery, Setup, and Installation Requirements
Professional delivery and setup are crucial for safety and project timelines. Here’s what the process typically entails:
Pre-Delivery Site Assessment
Before renting, the provider will ask about:
- Building height and number of stories
- Roof or floor access (stairs, elevator, scaffold)
- Ground-level space for dumpster positioning
- Electrical, utility, or structural obstructions
- Local permits or HOA/building management approvals
Provide clear photos and measurements. If the site is unusually constrained, the provider may charge for a site visit ($200–$500) to assess feasibility.
Delivery Timeline
Standard delivery takes 3–7 business days from rental agreement signature. Rush delivery (1–2 days) is available but costs 50–100% more. Weekend and holiday deliveries incur premium fees. Confirm delivery date and a 2-hour arrival window in writing to avoid surprises.
On-Site Setup and Installation
The rental company typically handles:
- Unloading chute segments from the truck
- Assembling and stacking sections vertically
- Securing brackets and tie-offs to the building or scaffold
- Positioning the dumpster for alignment with the chute discharge
- Testing for stability and clearance
- Initial safety briefing for your crew
This process usually takes 2–4 hours. Your crew should have a designated contact on-site to confirm clearances, access, and final positioning.
Site Preparation Responsibility
You are responsible for:
- Clearing the delivery path (driveway, entryway) of obstructions
- Arranging parking for the delivery truck (often a 20–30-foot vehicle)
- Securing building access (keys, codes, escort for locked facilities)
- Confirming dumpster availability and positioning on pickup day
- Notifying neighbors or building management of the rental period
Permit and Compliance Coordination
Many municipalities require permits for exterior chute installation or street-level dumpster placement. Some rental companies handle permit applications; others expect you to obtain them. Verify responsibility before signing the rental agreement. Lead times for permits can be 2–4 weeks, so plan ahead.
Safety Compliance and OSHA Requirements
Debris chutes are governed by OSHA construction safety standards and other local regulations. Renting from a reputable provider ensures baseline compliance, but your crew must follow safe loading and operational practices.
OSHA Chute Standards
Key requirements include:
- Proper tie-offs and anchoring: Chutes must be secured at regular intervals (typically every 10–15 feet) with cable, chain, or bolted brackets. Do not over-tighten, which can crack poly sections.
- Clear discharge zone: The ground beneath the chute discharge must be cordoned off to prevent workers or pedestrians from standing below. A minimum 10-foot perimeter is standard.
- Load limits: Every chute has a weight capacity guide. Overloading increases spillage, damage, and collapse risk. Your rental contract specifies capacity; post it prominently at the chute entrance.
- Proper loading technique: Debris must be fed into the chute opening in controlled amounts, not dropped from height or packed tightly.
- Personal protective equipment (PPE): Crews loading and unloading chutes must wear hard hats, safety vests, and, in some cases, gloves and eye protection.
- Regular inspections: The provider may conduct weekly or bi-weekly safety inspections. Your crew should report visible cracks, loose segments, or misalignment immediately.
Ergonomics and Injury Prevention
Loading heavy debris repeatedly poses ergonomic risk. Follow OSHA ergonomics guidelines to reduce strain injuries:
- Rotate crew members through loading and other tasks every 1–2 hours.
- Use lightweight hand tools or pry bars to break up heavy pieces before chuting.
- Never lift debris higher than shoulder height to feed the chute; position the chute entrance at a comfortable working height.
- Train crew on proper lifting mechanics (bend knees, keep back straight, engage core).
Environmental and Waste Compliance
Refer to EPA construction and demolition debris facts regarding disposal methods. Depending on project type, hazardous materials (asbestos, lead paint) may require separate handling—they cannot go down the chute. Confirm disposal protocols with your waste hauler and rental provider upfront.
How to Choose a Debris Chute Rental for Your Project
Selecting the right rental chute requires honest assessment of your project scope, site constraints, and crew capabilities. Follow this decision framework:
Step 1: Define Your Project Parameters
Document:
- Project type: Roofing tear-off, full demolition, kitchen remodel, multi-unit renovation, etc.
- Building height (in feet): Count stories or measure roof-to-ground distance. Add 5–10 feet for discharge clearance above the dumpster.
- Debris volume and type: Roofing shingles, drywall, framing lumber, concrete, mixed demo waste. Each has different density and flow characteristics.
- Project duration (in weeks): Realistic timeline including weather delays and scope creep buffer.
- Site constraints: Alley width, driveway slope, window access, utility lines, HOA rules, parking limitations.
Step 2: Compare Chute Types and Capacity
Once you’ve documented parameters, select a chute type:
- For residential roofing: A poly debris chute in the 25–40 foot range, weekly rental, quiet operation.
- For demolition or heavy multi-unit work: A heavy-duty or modular debris chute system, 50+ feet, monthly or longer lease.
- For tight urban lots or window access: A specialized window-mount or lightweight aluminum system.
Confirm that the chute’s rated capacity (in tons per day) aligns with your expected waste volume. A small remodel might generate 5–10 tons over two weeks; a full-scale demo could be 20–30 tons in one week.
Step 3: Solicit Quotes from Multiple Providers
Request written quotes including:
- Base rental rate (weekly or monthly) for your chosen dates
- Delivery and pickup fees
- Setup/installation labor (included or separate)
- Damage waiver or insurance add-ons
- Extension or early-termination penalties
- Warranty and inspection frequency
Compare total project cost, not just the lowest weekly rate. A provider with higher rental cost but included delivery, setup, and inspections may prove more cost-effective than a bare-bones quote with hidden fees.
Step 4: Verify Safety and Compliance
Before signing, confirm that the provider:
- Has valid liability insurance (minimum $1–2 million coverage)
- Performs pre-delivery safety inspections and documents them in writing
- Provides OSHA compliance training or documentation
- Offers 24/7 emergency support if the chute malfunctions during your rental
- Can coordinate with local permit agencies or provide guidance on permitting
Step 5: Finalize the Rental Agreement
Read the contract carefully. Key points to clarify or negotiate:
- Exact rental start and end dates (hour of pickup matters)
- Conditions for extending the rental without penalty
- What constitutes “damage” that triggers additional fees
- Responsibilities for site preparation, dumpster placement, and permits
- Contact information for emergency repairs or adjustments
Debris Chute Rental vs. Alternative Debris Management
Debris chutes are not the only solution for managing construction waste. Understanding alternatives helps you choose the best method for your project.
Manual Hauling (Hand-Carry and Wheelbarrow)
Cost: Minimal upfront but high labor burden.
Best for: Very small remodels (single bathroom, minor roof repair) with low debris volume and accessible ground-level exits.
Cons: Slow, labor-intensive, high injury risk, poor morale for crew, inefficient for multi-story work.
Dumpster-Only Approach (Multiple Drop-Offs)
Cost: Dumpster rental: $400–$1,000/month; multiple dump runs: $200–$500 each.
Best for: Short projects where debris fits in 1–2 dumpsters and crews can carry loads to the dumpster via stairs or ground level.
Cons: Repeated hauling still requires labor; dumpster does not reduce loading burden for upper-story work.
Chute + Dumpster (Rental Synergy)
Cost: Chute rental ($300–$600/week) + dumpster rental ($400–$800/month) = $1,100–$1,400/month for both.
Best for: Multi-story or high-volume projects where gravity-fed loading is faster and safer than manual hauling.
Pros: Reduced labor hours, faster project completion, lower crew injury risk, predictable timeline, professional appearance.
Debris Bags or Chute Bags
Cost: $50–$150 per bag; you still haul to curb or dumpster.
Best for: Residential interior remodels (drywall dust, old flooring) where you want to contain mess but don’t have exterior chute access.
Cons: Labor-intensive; bags still require manual handling and trips to a collection point.
Debris Chute Rental—The Efficiency Winner
For most commercial and larger residential projects, debris chute system for contractors rentals offer the best balance of cost, safety, and speed. A rented chute reduces labor hours by 30–50%, accelerates project timelines, and keeps crews focused on productive work rather than hauling. If your project spans multiple weeks and involves multiple stories, rental chutes almost always outpay their cost through labor savings alone.
Operational Playbook: Running a Rented Chute
Once your chute is installed, establish clear operational procedures to maximize efficiency and minimize safety risks.
Pre-Use Daily Checklist
Each morning before loading begins:
- Visual inspection: Walk the chute from top to bottom. Look for cracks, loose segments, debris buildup, or tilting. Report any issues to the rental company immediately.
- Dumpster positioning: Confirm the dumpster is directly centered beneath the discharge point, level, and accessible to pickup trucks. Never allow dumpster drift due to settling or wind.
- Tie-off and anchor verification: Check that all cables, brackets, and bolts are tight and secure. Re-tighten if needed using appropriate tools (do not over-torque poly sections).
- Crew briefing: Remind loaders of proper technique (controlled debris feed, no overstuffing, PPE compliance, emergency procedures).
- Zone clearance: Ensure the ground zone below the chute discharge is cordoned off and no workers are standing beneath or near the opening.
Loading Protocol
Instruct your crew:
- Feed debris slowly and steadily. Do not toss or drop pieces from height into the chute opening. Break up large items (drywall, framing) into smaller pieces before loading.
- Never overload the opening. A blocked chute will back up and can jam or crack. Clear openings keep debris flowing.
- Rotate loaders every 1–2 hours. Repetitive loading is fatiguing; rotation reduces injury and maintains quality control.
- Do not load prohibited materials. Hazardous waste, liquids, loose fasteners, or oversized metal should be disposed of separately.
- Monitor discharge speed and spillage. If debris is piling up around the dumpster base rather than flowing into it, the dumpster may be full or the discharge may be misaligned. Investigate and adjust.
Weekly Maintenance Tasks
- Rinse the interior: If wet debris or dust is accumulating inside the chute, use a hose to flush lightweight material downward (on a day when the dumpster is positioned and stable). This prevents jams and corrosion.
- Check tie-offs and anchors again. Wind, settling, and vibration from loading can loosen fasteners. Tighten as needed.
- Remove external debris or ice. In wet or cold weather, icicles or debris buildup on the exterior can add weight and affect stability. Clear as safely as possible.
- Report any cracks, dents, or leaks to the rental company. Document with photos. Minor wear is normal; significant damage may trigger charges at return.
Dumpster Coordination
- Schedule full-dumpster pickups proactively. Don’t wait until the dumpster is overflowing; arrange a swap 1–2 days before capacity is reached. Overflow creates a safety hazard and slows loading.
- Time dumpster pickups when your crew is not loading. Coordinate with the dumpster service so that swaps occur early morning or late afternoon, away from peak loading hours.
- Reposition the dumpster immediately after swap. After a new dumpster is dropped, confirm it is square beneath the chute discharge before your crew resumes loading.
End-of-Day Shutdown (If Leaving Debris in Chute Overnight)
- Allow any remaining debris to settle. Do not leave the chute overflowing or partially jammed overnight; weather or vibration could cause collapse or spillage.
- If debris is stuck, do not attempt to force it downward by pushing or tapping from above. Contact the rental company for guidance.
- Cover the chute opening (if applicable) to prevent rain from entering or debris from blowing out.
Common Rental Mistakes and How to Avoid Them
Learning from others’ missteps can save time, money, and safety incidents. Here are the most common debris chute rental errors:
Mistake 1: Underestimating Project Duration
Problem: You book a 4-week rental, but the project runs 6 weeks due to weather or scope creep. You face late extension fees or, worse, the chute is picked up mid-project and you scramble to find an alternative.
Solution: Add a 20–30% buffer to your time estimate when booking. It’s cheaper to pay for unused rental time than to rush extensions or face project delays. Negotiate a flexible end-date clause (e.g., “end by week 8, no penalty if released earlier”).
Mistake 2: Overloading the Chute or Ignoring Capacity Limits
Problem: Your crew loads heavy debris beyond the rated capacity, causing jams, cracks, or anchor failures. Damage fees or a total equipment failure mid-project ensue.
Solution: Post the capacity limit visibly at the chute entrance. Educate your crew on what “full” means (opening nearly blocked, not overflowing). Break oversized or dense debris (concrete, metal) into smaller pieces. If your project generates debris faster than the chute can handle, arrange for a second chute or schedule staggered dumping cycles.
Mistake 3: Neglecting Tie-Offs and Anchoring
Problem: You assume the rental company’s initial setup is sufficient, but over weeks of loading and weather exposure, fasteners loosen. The chute tilts or sways, creating a collapse or spillage hazard.
Solution: Perform the weekly tie-off and anchor checks outlined in the operational playbook. Tighten any loose bolts using the correct tools. If your site experiences high wind, vibration, or settling, perform checks twice weekly. Report persistent loosening to the rental company—it may indicate a systemic installation issue they should correct at no charge.
Mistake 4: Failing to Coordinate Dumpster Positioning
Problem: Debris discharges beside or below the dumpster because the dumpster has shifted or settled. Spillage creates a cleanup burden and a safety hazard. Insurance claims or local code violations may follow.
Solution: After every dumpster swap or any visible rain/settling event, have your site lead physically verify that the dumpster opening is directly aligned with the chute discharge. Use a plumb line or level if alignment is unclear. Take a photo of correct alignment for the record.
Mistake 5: Not Budgeting for Permit Delays
Problem: Your project requires a chute permit, but the city takes 3 weeks to issue it. You’ve already paid rental setup fees or reserved the chute, and the delay costs productivity or forces you to push back the chute delivery.
Solution: Research local permit requirements 6–8 weeks before you need the chute. Engage with the city early. Some rental companies assist with permitting; leverage that. Factor permit lead time into your rental booking. If the permit is delayed, most rental companies will defer the rental start date or pro-rate fees if you communicate proactively.
Mistake 6: Loading Prohibited or Hazardous Materials
Problem: Your crew loads asbestos-containing insulation, lead-painted trim, or chemical containers down the chute. The dumpster operator discovers it, refuses pickup, and fines you. Environmental cleanup costs spiral.
Solution: Before the chute arrives, conduct a materials survey of the project. Identify any asbestos, lead, mercury, or chemical-bearing items. Arrange separate, compliant disposal for those materials (licensed hazmat contractor, drop-off facility). Educate your crew on what’s prohibited. Post a laminated “Do Not Chute” list at the chute entrance with photos of prohibited items.
Mistake 7: Ignoring Weather and Seasonal Considerations
Problem: Winter ice accumulates on the chute exterior, adding weight and reducing stability. Spring rain floods the interior and rusts metal components. Summer heat softens poly sections if the chute is in direct sun for extended periods.
Solution: For cold-weather rentals, plan weekly rinsing to clear ice. For multi-season rentals, use protective tarps over exposed sections (do not fully enclose, as condensation can trap moisture). Ensure drainage holes at the chute base are clear so that rainwater does not pool. In very hot climates, consider lightweight tarps that reflect sun without trapping heat.
Local Permits and Compliance by Regional Considerations
Permit and compliance requirements for debris chutes vary significantly by municipality. In Massachusetts (where EasyChute is based), most municipalities require a permit for exterior chute installation, especially if tie-offs cross building lines or the chute obstructs adjacent properties.
Typical Permit Requirements
- Building permit or variance: Required if the chute modifies the building exterior or is installed for longer than a defined temporary period (often 120–180 days).
- Street or sidewalk permit: Required if the dumpster occupies public right-of-way or the chute discharge is visible from the street.
- HOA or historical review: Needed in deed-restricted communities or historic districts. Some HOAs prohibit chutes altogether; others require architectural approval.
- Utility clearance: Confirm no power lines, water mains, gas lines, or fiber-optic cables are in conflict with chute placement or tie-offs.
Typical permit costs range from $100–$500 and processing takes 2–6 weeks. Your rental company may handle the paperwork or guide you through it; clarify upfront.
Regional Resources
For Massachusetts-specific guidance, consult your local building department or the state building code (mass.gov provides municipal contact directories). Neighboring states often have similar processes but different timelines and fee structures. Ask your rental provider for regional compliance checklists; they usually maintain templates for major markets.
Frequently Asked Questions
How long can I rent a debris chute?
Rental terms are flexible, ranging from as short as one week to several months. Weekly rentals are best for short demolition or tear-off jobs; monthly or longer leases are typical for major renovations. Most providers offer discounted rates for rentals of 8+ weeks. You can also extend a rental on a week-by-week basis if your project runs longer than expected, though extensions after the initial contract may cost slightly more.
What is the typical cost of a debris chute rental?
In 2026, weekly rental rates range from $150–$300 for lite-duty residential chutes to $250–$500 for heavy-duty commercial systems. Monthly rates typically offer 15–20% savings per week. Delivery fees add $200–$600. Total project cost depends on chute type, project duration, site location, and setup complexity. Request quotes from multiple providers to compare total costs, not just the weekly rate.
Do I need a permit to install a debris chute?
Most municipalities require a permit for exterior chute installation, especially if the chute is mounted to the building or the dumpster occupies public right-of-way. Permit timelines are typically 2–6 weeks and costs range from $100–$500. Check with your local building department early in your project planning. Some rental companies assist with permit applications or provide templates. Failure to obtain a permit can result in fines or project shutdown orders.
What materials can I dispose of down a debris chute?
Standard construction debris (wood, drywall, roofing shingles, brick, concrete, insulation) is fine. Prohibited materials include asbestos, lead paint, hazardous chemicals, liquids, and loose metal fasteners or sharp objects. Oversized items (HVAC units, bathtubs, metal doors) should not be chuted; they risk jamming the chute. Confirm specific restrictions with your rental company and arrange separate disposal for hazmat items with a licensed contractor.
Can I rent a debris chute for a residential project?
Yes, absolutely. Many rental providers offer lite-duty systems specifically designed for residential remodels, roofing tear-offs, and window-based debris loading. Residential rentals are often shorter in duration (1–4 weeks) and use smaller chute heights (15–35 feet) than commercial jobs. Pricing is more affordable than for heavy-duty systems. Confirm that the provider serves your area and that local zoning or HOA rules permit exterior chute installation on residential properties.
What happens if my rented chute is damaged during the rental period?
Most rental agreements cover normal wear and tear. Damage caused by misuse, overloading, or negligent handling may trigger fees ranging from $200–$1,500 depending on severity. Cracks in poly sections, bent aluminum, or rust from neglected cleaning are often charged to the customer. To minimize damage charges, perform weekly visual inspections, avoid overloading, protect the chute from weather when possible, and report any issues to the rental company promptly. Ask about damage waivers or insurance riders that may reduce your out-of-pocket liability.
How quickly can a debris chute be delivered?
Standard delivery takes 3–7 business days from contract signing. Rush delivery (1–2 business days) is available at a premium cost of 50–100% above standard delivery fees. Weekend and holiday deliveries incur additional fees. Confirm your delivery date in writing and request a specific time window (e.g., Tuesday 8 AM–10 AM) to ensure your site is staffed and prepared. Factors like distance from the rental depot and site accessibility can affect delivery speed; ask your provider for realistic timelines upfront.
Ready to Rent a Debris Chute?
Choosing to rent a debris chute is a straightforward decision when you have a commercial or multi-story project that generates significant waste. The right rental chute saves your crew labor hours, accelerates project completion, and keeps your site safe and organized.
Next Steps:
- Document your project scope: Height, debris type, duration, and site constraints. Use the framework from the “How to Choose” section above.
- Research regional providers: Ask for referrals from other contractors, check online reviews, and request quotes from at least three suppliers.
- Request written quotes: Include all fees (rental, delivery, setup, damage waiver) so you can compare total project cost accurately.
- Verify safety and compliance: Confirm insurance, OSHA compliance documentation, and permit assistance before signing.
- Finalize and book: Sign the rental agreement, clarify any ambiguous terms, and confirm delivery dates in writing.
- Prepare your site: Clear delivery paths, arrange dumpster positioning, and brief your crew on safe loading procedures.
For specialized guidance on trash chute for demolition contractors, installation process, or unique site challenges (tight alleys, window access, coastal wind tie-offs), EasyChute offers detailed regional guides and direct support. Explore debris chute system for contractors resources tailored to your project type and location.
Your project deserves a rental partner who understands the demands of construction sites. Get a quote today and experience the difference a professional debris chute rental makes in keeping your crew safe, productive, and focused on quality work.