

Index
- What Is a Window Debris Chute?
- Why Contractors Choose Window Chutes
- Safety & Compliance: OSHA Standards
- Window Chute Sizing and Capacity
- Installation, Placement, and Securing
- Dumpster Positioning and Site Layout
- Common Mistakes and How to Avoid Them
- Window Chute vs. Other Debris Methods
- Maintenance and Clog Prevention
- Cost Considerations and ROI
- Best Practices for Multi-Story Projects
- Frequently Asked Questions
- Local Notes
- Get Started Today
What Is a Window Debris Chute?
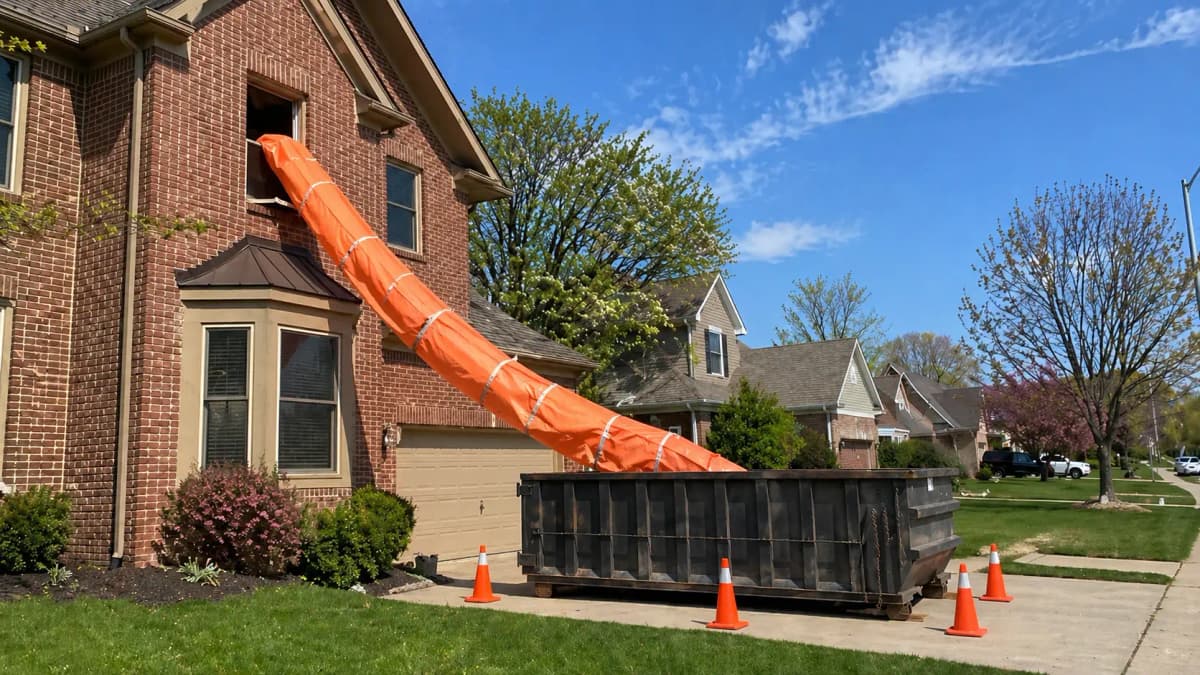
A window debris chute is a flexible, modular polyethylene tubular system that allows workers to drop construction waste, drywall, insulation, roofing material, and other debris directly from upper-floor window openings down to a dumpster or collection bin at ground level. The chute is lightweight, reusable, and disassembles for transport between job sites.
Unlike exterior wall-mounted chutes that are permanently rigged, window chutes fit through existing window openings or temporary cutouts, making them ideal for renovations where exterior access is limited or aesthetically restricted. The system typically consists of 10–50 foot sections of interlocking poly tubing that stack vertically and discharge into a standard dumpster.
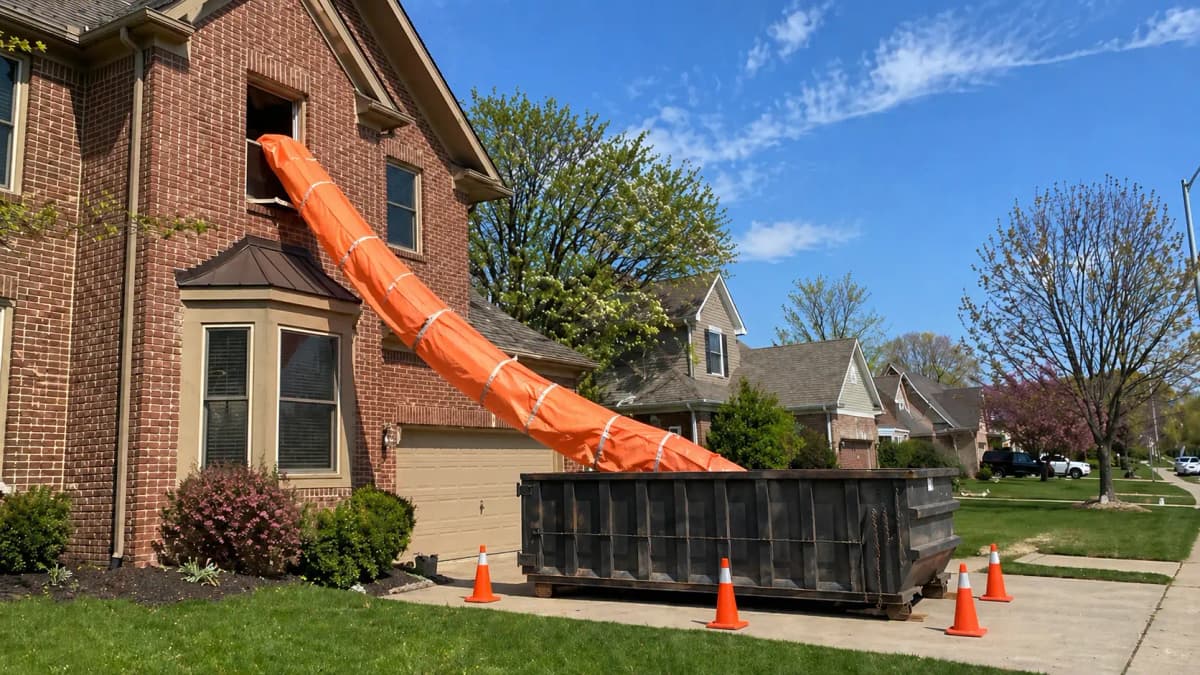
Window chutes are especially common in urban and suburban renovation work—brownstones, condos, office build-outs, and roofing tear-offs where fast, contained debris removal is critical to workflow efficiency and neighbor relations.
Why Contractors Choose Window Chutes
Window debris chutes solve three persistent problems on commercial renovation projects: time waste from manual hauling, safety risks from workers carrying loads down stairs, and neighbor complaints about dust and debris outside the building.
- Speed: A single chute allows continuous, high-volume debris drop without crew idle time. Materials flow directly into a dumpster instead of relying on hand-carry or exterior ramps.
- Worker safety: Eliminates repetitive trips up and down stairs while carrying heavy loads—a key OSHA ergonomics concern on interior renovations.
- Neighbor and site protection: Contained interior drop keeps dust and debris off sidewalks, adjacent properties, and parked cars. Reduces property-damage disputes and municipal complaints.
- Flexibility: Fits windows of various sizes, works on both retrofit and new-construction projects, and adapts to tight lots where traditional crane or exterior chute placement is impossible.
- Cost-effective: Rental or purchase price is typically lower than crane service or multiple dumpster swaps, and the system is reusable across dozens of projects.
Contractors also appreciate that window chutes require minimal site infrastructure—no exterior scaffolding, no street permits in many cases, and no need to block lanes or sidewalks with equipment.
Safety & Compliance: OSHA Standards
Window debris chutes must comply with OSHA construction safety standards, particularly regarding fall protection, load control, and housekeeping. OSHA 1926.500 (Scaffolding) and 1926.501 (Duty to have fall protection) directly apply to elevated chute work.
Key Safety Requirements
- Secured inlet: The chute opening at the window must have guardrails or edge protection on all sides to prevent workers from falling into or near the chute during feeding.
- Secured chute path: The entire length of the chute must be tied off to the building using rope, cable, or strapping at least every 10 feet to prevent swing-out or collapse if struck.
- Dumpster clearance: The discharge end must be at least 6 feet clear of building walls and obstructions so debris exits safely into the bin and does not bounce back or hit bystanders.
- Dust and spillage control: A chute with a closed-loop design (fully enclosed poly tubing) contains debris better than open troughs. If dust is a concern, specify a dust-control liner or closure system.
- Access control: The chute inlet and discharge must be clearly marked and kept clear of non-authorized personnel. Use caution tape and signage on all job sites.
Site supervisors must also ensure that no one stands or works directly beneath the chute during active debris drop, and all workers feeding materials into the chute wear hard hats and safety glasses at minimum.
Window Chute Sizing and Capacity
Window chute sizing is determined by three factors: the height of the drop (number of stories), the volume and weight of debris expected, and the window opening dimensions available.
Standard Chute Heights
- 10-foot segments: Typical for two-story drops and interior stairwell openings. Quick setup, low weight, easy to maneuver.
- 25-foot chutes: The most common for 3–4 story commercial renovations and roofing tear-offs. Balances capacity with ease of assembly and tie-off.
- 50-foot+ modular stacks: Used for high-rise and large-scale demolition projects. Requires professional rigging and multiple tie-off points.
Refer to our weight capacity limits guide for specific material ratings. As a general rule, standard poly chutes handle 500–1,500 lbs per drop cycle before requiring bin emptying.
Window Opening Clearance
The chute inlet must fit comfortably through the window frame with at least 2 inches of clearance on all sides. For a standard 3-foot by 4-foot window, most circular or oval chute profiles (typically 24–30 inches in diameter) will fit. Verify existing window size before ordering.
On projects where the window is smaller, contractors sometimes create a temporary opening through an adjacent wall or interior partition, which gives more flexibility and allows for a larger-diameter inlet.
Installation, Placement, and Securing
Professional installation of a window debris chute takes 1–2 hours and involves four main steps: prep the window, assemble chute segments, secure the chute to the building, and position the dumpster.
Step 1: Window Prep
- Clear the window opening of any obstacles (blinds, screens, glass, frames if doing a temporary cutout).
- Measure the opening dimensions and verify chute diameter will fit.
- If the opening is not already large enough, cut or remove trim/siding to accommodate the inlet. Patch afterward.
- Install temporary edge guards (wood blocks, rubber bumpers, or foam padding) around the inlet perimeter to protect the chute from abrasion and the window frame from damage.
Step 2: Assemble Chute Sections
- Lay out all chute segments on the ground or indoors.
- Stack sections from bottom to top, interlocking each joint according to the manufacturer’s instructions.
- Use a forklift, crane, or pulley system to raise the assembled chute vertically outside the building. Never attempt to feed chute sections through the window and assemble them mid-air.
- Guide the chute into the window opening and secure the inlet collar with clamps or bolts to a fixed frame or bracket.
Step 3: Secure to Building
Tie off the chute every 10 feet using:
- 3/8-inch diameter rope or cable rated for at least 500 lbs tensile strength.
- Anchor points on the building (window frames, structural columns, roof edges, or temporary tie-off brackets bolted to the facade).
- Clamps or metal bands around the chute body to attach rope without bunching or pinching the poly.
The goal is to keep the chute plumb (vertical) and prevent lateral swing if wind picks up or if debris strikes the side during discharge.
Step 4: Dumpster Positioning
Place the dumpster directly below the chute outlet, with at least 6 feet of clear space on all sides. The discharge end should hang 3–4 feet above the dumpster bottom to allow debris to tumble in without bouncing or rolling out.
Use wheel chocks or parking barriers to prevent the dumpster from shifting if the debris flow is heavy. Never place the dumpster on a sloped driveway where it could roll.
Dumpster Positioning and Site Layout
Correct dumpster placement is essential to safety, cleanliness, and workflow continuity on window-chute projects. Poor placement causes debris spillage, creates hazards for pedestrians, and delays debris disposal.
Site Survey Steps
- Mark the building corner directly below the window opening with chalk or spray paint.
- Measure the horizontal distance from the building wall to the chute discharge—typically 2–4 feet for standard poly chutes.
- Place dumpster so its center aligns with the chute outlet. The outlet should point toward the center of the bin, not the edge.
- Verify no utility lines (electric, gas, water, sewer) are near the dumpster location. Call 811 (or your local utility locating service) before placing any equipment.
- Check for overhead wires, tree branches, or building eaves that might interfere with the chute path.
Ground-Level Prep
- Level the ground as much as possible. Use cribbing (steel plates or wood blocks) to stabilize the dumpster on uneven terrain.
- Lay protective plywood or tarps around the dumpster to catch spillage and protect the underlying surface (driveway, lawn, or pavement).
- Set up caution tape and cones in a 10-foot radius around the dumpster to restrict pedestrian access during active debris drop.
For guidance on city-specific dumpster regulations and street permits, see our dumpster placement strategies for your region.
Common Mistakes and How to Avoid Them
Experience shows that the following errors slow projects, damage equipment, or create safety issues:
Mistake 1: Undersizing the Dumpster
Problem: A 10-yard dumpster fills too quickly on high-volume demo work, forcing multiple swaps and dead crew time waiting for pickup.
Solution: For typical interior renovation (drywall, flooring, insulation removal), use a 20–30 yard dumpster. For roofing tear-offs or structural demolition, go 30+ yards or plan for frequent swaps in advance with your waste provider.
Mistake 2: Failing to Secure the Chute Properly
Problem: A loosely tied chute sways in wind or bounces when heavy debris loads hit the interior walls, causing contact with the building facade or pedestrians below.
Solution: Use rigid clamps and grade-rated rope. Tie off at least every 10 feet. Have a supervisor walk the length of the chute on Day 1 and mid-project to check for slipping or wear.
Mistake 3: Overloading the Chute Inlet
Problem: Cramming large pieces of lumber, wallboard, or metal studs into a small inlet opening causes jams, which then back up and create unsafe work conditions.
Solution: Break oversized debris into smaller pieces before feeding. Establish a size limit (e.g., no piece larger than 2 feet) and brief crews on Day 1.
Mistake 4: Ignoring Moisture and Weather
Problem: Rain or snow inside the chute reduces friction and causes material to slide too fast, creating dangerous discharge velocity and spillage.
Solution: Cover the chute inlet during rain or snow with a tarp or plywood cap. Inspect the chute interior regularly and dry it out if needed. On humid days, monitor discharge speed and adjust feeding pace.
Mistake 5: No Fall Protection at the Inlet
Problem: Workers leaning too far into an unsguarded inlet to drop materials risk falling partially into the chute opening.
Solution: Install a fixed guardrail or edge barrier around the inlet that requires workers to place materials at waist height, not lean over. This also prevents accidental drops of tools.
Window Chute vs. Other Debris Methods
Contractors often choose between window chutes, exterior wall chutes, crane service, and manual hand-carry. Each has trade-offs:
Window Chute
- Pros: Fast, low cost, no street permits needed, works on tight lots, reusable.
- Cons: Limited to renovations (not ideal for new construction with no windows), requires proper tie-off, chute must disassemble for next job.
Exterior Wall Chute (Permanently Mounted)
- Pros: Stays in place for entire project, can handle very heavy loads (demolition-grade).
- Cons: Requires facade anchors, often needs permits and HOA approval, more expensive to rent/buy, installation takes longer.
Crane + Debris Bin Drop
- Pros: Handles the largest volume and weight in shortest time.
- Cons: Very expensive ($2,000–$5,000+ per day), requires street permits, traffic control, insurance. Only economical for large demos or multi-week projects.
Manual Hand-Carry (No Chute)
- Pros: No equipment rental cost.
- Cons: Slowest method, high worker fatigue and injury risk, neighbors hate the daily truck traffic.
For most 3–5 story renovations, a window chute strikes the best balance of speed, cost, and safety. See our debris chute systems comparison for more detail.
Maintenance and Clog Prevention
A well-maintained window chute runs smoothly and lasts for dozens of projects. Poor maintenance leads to jams, discharge slowdowns, and unsafe work stoppages.
Daily Checks
- At the end of each day, inspect the chute exterior for loose clamps, fraying rope, or contact damage.
- Check the dumpster to confirm debris is flowing cleanly and not piling up at the chute outlet.
- Remove any debris lodged in the inlet that might block tomorrow’s work.
Weekly Cleaning
- If dust or fine particles are visible inside the chute, use a long stick or brush to dislodge buildup from the interior walls.
- For wet or muddy debris, rinse the interior chute with a pressure washer at low PSI (500–1,000 max) to avoid damaging the poly tubing.
- Allow the chute to dry before resuming work.
Clog Prevention
Clogs occur when materials jam or compress inside the chute. Common culprits include:
- Large pieces of wood, metal, or rigid insulation wedged sideways in the opening.
- Wet drywall or plaster that sticks to the inner walls.
- Fiberglass insulation balled up and pressed against the sides.
Prevention strategies:
- Brief workers on size and material limits before work starts.
- Feed softer materials (insulation, rockwool) separately from heavy solids (wood, metal).
- Use a chute with a larger diameter (30+ inches) for projects with mixed debris types.
- If clog occurs, do not force materials down. Stop work, secure the chute, and disassemble sections from the top until you reach the jam. Clear the blockage by hand (wearing gloves), then reassemble.
Cost Considerations and ROI
Window debris chute pricing varies by rental duration, chute height, and supplier, but understanding the cost structure helps justify the investment.
Typical Pricing
- Rental (per week): $200–$600 for a 25–50 foot poly chute system.
- Delivery and pickup: $100–$300 per trip.
- Purchase (new): $1,500–$4,000 for a complete modular 25–50 foot system.
- Used systems: $800–$2,000 if buying secondhand from other contractors.
ROI Calculation
On a typical 2–4 week interior renovation project:
- Chute rental: ~$1,000–$2,000 (including delivery).
- Labor saved: Faster debris removal reduces crew idle time by ~20%, saving 40–60 labor hours at $50–$75/hr = $2,000–$4,500.
- Reduced dumpster swaps: Larger capacity chute allows 1–2 fewer dumpster trips, saving ~$500–$1,000 in disposal fees.
- Safety and liability: Lower injury risk from fall hazards and repetitive strain—reducing insurance claims and potential OSHA fines.
Net ROI: $2,500–$5,000+ per project. On high-volume contractors running 20+ projects per year, purchasing a system (vs. renting) breaks even in 4–6 months.
Best Practices for Multi-Story Projects
Large commercial renovations spanning 5+ stories or multiple zones require additional planning to keep debris flowing safely and efficiently.
Multi-Chute Workflow
- One chute per zone: On a 6-story office build-out, deploy separate chutes on floors 2, 4, and 6 to avoid bottlenecks and allow simultaneous debris drop from multiple crews.
- Staggered dumpster placement: Position dumpsters in different locations (side-by-side or sequential) to prevent debris backup and congestion.
- Crew coordination: Designate a site supervisor to manage debris flow and prevent overloading any single chute or dumpster.
Material Separation
On large projects with construction debris chute networks, separate material types to streamline recycling and disposal:
- Chute 1: Drywall and plaster (diverted to drywall recycling).
- Chute 2: Wood, insulation, roofing (diverted to mixed-waste dumpster).
- Chute 3: Metal, copper wire, aluminum (diverted to metal scrap bin).
This sorting reduces disposal costs and can generate revenue from recyclable material sales. See EPA construction and demolition debris data for regional recycling incentives.
Insurance and Liability
- Ensure your general liability policy covers temporary chute rental and discharge liability. Inform your insurer before deploying a chute.
- Require the chute supplier to provide a Certificate of Insurance listing your project as “additional insured.”
- Conduct a pre-deployment safety walkthrough with all crews and supervisors, documenting training in your project safety log.
Frequently Asked Questions
Can a window debris chute fit a non-standard window shape?
Most window chutes are cylindrical or oval, designed to fit rectangular windows 3–4 feet wide. Smaller windows (under 2.5 feet) or unusual shapes (arched, circular) may require a custom inlet adapter or cutting a temporary opening. Contact your chute supplier with exact window dimensions; they can often fabricate a transition collar at minimal cost.
What is the maximum weight capacity for a standard 25-foot poly chute?
A standard 25-foot poly chute typically handles 500–1,200 lbs per drop before the dumpster fills or the chute requires servicing. For weight capacity limits, consult your supplier’s specification sheet. Heavy materials like concrete, asphalt shingles, or wet drywall weigh more per volume than insulation or empty wallboard, so adjust feeding pace accordingly.
Do I need a permit to install a window debris chute?
Permit requirements vary by city and county. Many municipalities do not require permits for temporary interior chutes that don’t anchor to the exterior facade. However, some cities (especially NYC and Boston) require a Temporary Debris Chute Permit. Check with your local building department or city OSHA construction liaison. When in doubt, apply; permits typically cost $100–$500 and take 1–2 weeks.
What happens if the chute discharges debris outside the dumpster?
Improper positioning or an undersized dumpster causes spillage. If debris overflows, stop feeding immediately, pause the crew, and either reposition the dumpster or request a second bin. Never let spillage accumulate on the ground—it blocks traffic, damages the property, and exposes bystanders to falling debris. Some contractors use wide catch tarps beneath the chute outlet as a secondary containment layer.
Can I use a window chute for heavy demolition (concrete, masonry)?
Standard poly chutes are rated for general construction debris (wood, drywall, roofing, insulation). Concrete, bricks, and other masonry are very heavy and may exceed capacity or crack the poly tubing. For demolition-grade work, upgrade to a reinforced or metal chute system, or use a crane-based bin drop. See our demolition-grade chute systems guide for specifications.
How long does it take to assemble and remove a window chute?
Assembly (inlet to discharge) typically takes 1–2 hours with 2–3 workers and a forklift or pulley system. Securing all tie-offs adds another 30–60 minutes. Disassembly and removal take the same time. Plan for a full workday on the first and last days of your project. Our step-by-step installation guide walks through each phase.
What is the lifespan of a rental chute vs. purchasing one?
A well-maintained rental chute is typically 3–5 years old and rated for 50+ deployments. Poly material degrades over time when exposed to UV and weather, but interior-only chutes (stored between projects) last longer. Purchasing a new chute and storing it properly (indoors, out of direct sun) will give you 10+ years and 100+ project deployments, making ownership cost-effective for active contractors. Inspect your system annually and replace worn sections.
Local Notes
Debris chute regulations and best practices vary by state and municipality. Here are some key resources:
- Massachusetts (Saugus area): Check with the Saugus Building Department and local fire marshal for temporary debris chute approvals. Most North Shore residential areas allow interior chutes with minimal permits.
- New York (NYC): NYC requires a Temporary Debris Chute Permit from the Department of Buildings. Applications are available at NYC DOB NOW.
- New Jersey & Connecticut: Regulations are local. Contact your county construction official or town building inspector for requirements.
For EPA guidance on debris recycling and waste diversion, see the EPA construction and demolition debris resource page for your state.
Get Started Today
Window debris chutes are a proven way to accelerate renovation projects, protect worker safety, and maintain clean job sites. Whether you’re renting for a single project or building a fleet for your company, EasyChute supplies reliable modular chute segments and expert installation support.
Ready to streamline your next project? Contact our team at +1 (855) 902-0883 or ordering@easychute.com for a free site assessment, equipment quote, and delivery schedule. We serve commercial contractors across the US and can have a chute on your job site in 48–72 hours.
Our specialists can also guide you through local permitting, multi-chute workflows for large projects, and material recycling partnerships in your region. Let’s build smarter debris management together.