

Index
- Why Milwaukee Jobsites Need a Proper Debris Chute
- Milwaukee Project Types That Benefit Most
- Choosing the Right Chute Length for Milwaukee Buildings
- Setup Guide: Roofing Tear-Offs
- Setup Guide: Window-Drop and Interior Remodels
- Setup Guide: Full Demo and High-Volume Tear-Outs
- Midwest Weather and Seasonal Chute Considerations
- Dumpster Placement on Milwaukee Streets and Driveways
- Safety and OSHA Compliance on Milwaukee Sites
- Common Mistakes Milwaukee Contractors Make With Debris Chutes
- Local Notes: Milwaukee Permits, Waste Rules, and Resources
- Frequently Asked Questions
- Get a Debris Chute Delivered to Your Milwaukee Jobsite
Why Milwaukee Jobsites Need a Proper Debris Chute
Milwaukee is a working contractor’s city. The housing stock leans heavily toward late-19th and early-20th century construction — Cream City brick bungalows, two-flats, and four-squares that routinely need full roof tear-offs, gut remodels, and floor-by-floor commercial demo work. On a block where homes are 18 inches apart and a neighbor’s car is always parked in the worst possible spot, tossing debris from a second or third story is not a real option.
A properly rigged debris chute solves three problems at once: it protects people on the ground, it keeps the driveway and yard clean enough to satisfy finicky city inspectors, and it dramatically speeds up how fast your crew can move material. When you’re running a roofing tear-off on a Milwaukee bungalow and getting paid by the square, every minute your crew wastes hauling bundles down a ladder is money left on the table.
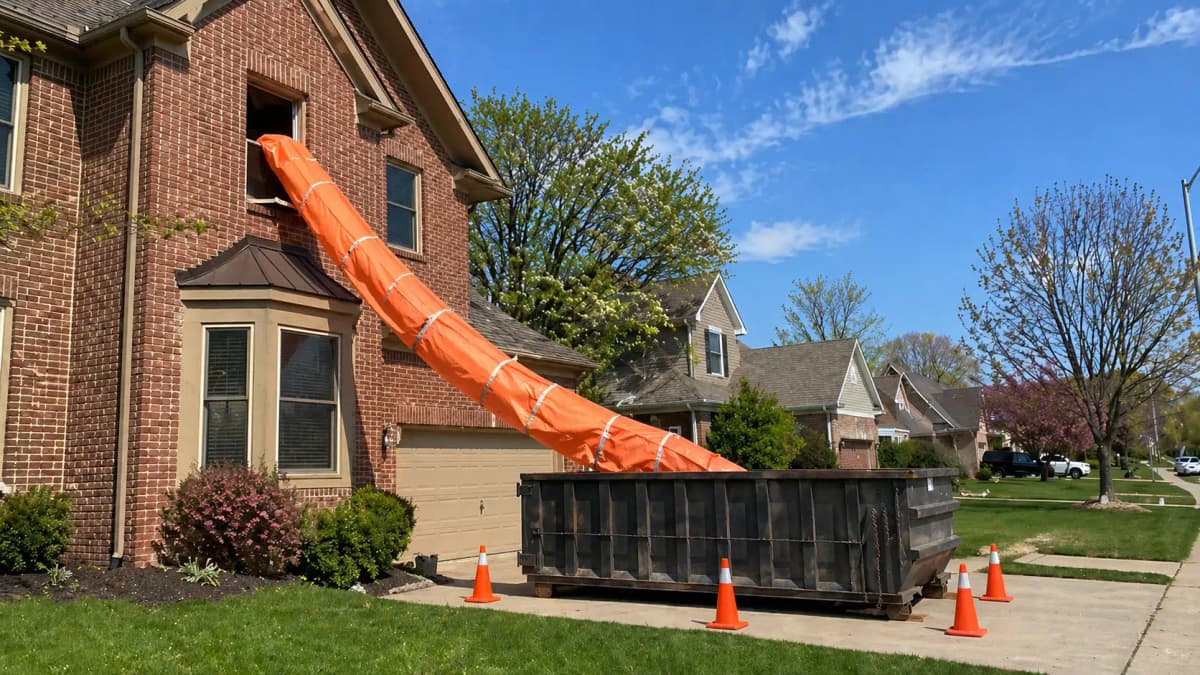
The good news is that EasyChute’s modular debris chute system ships directly to Milwaukee, and setup on most residential projects takes under 30 minutes. This guide walks you through every project type, every season, and every common mistake so your next Milwaukee job runs clean.
Milwaukee Project Types That Benefit Most
Milwaukee’s construction market has a distinctive profile. Understanding which project types create the highest chute ROI helps you decide when to add a chute to the bid versus when it’s optional.
Roofing Tear-Offs on Residential Bungalows
The single-story and story-and-a-half bungalow is Milwaukee’s most common residential form. Steep pitches and layers of old shingles mean tear-off debris adds up fast. A chute keeps shingles flowing continuously from peak to dumpster without anyone on the ground handling material until the bin is full. See our dedicated page on Milwaukee roofing cleanup and shingle flow for a deep dive into that specific workflow.
Two-Flat and Four-Square Gut Remodels
Milwaukee’s rental housing stock is heavily weighted toward two-flats and four-squares — two- and three-story buildings where interior demo debris (plaster, lath, drywall, flooring) has to travel from upper floors to a dumpster on the street or in the alley. A window-drop chute setup eliminates stair-carries entirely, which is where the biggest labor savings accumulate on these projects.
Commercial Demo in the Third Ward and Walker’s Point
Milwaukee’s urban neighborhoods have seen significant commercial rehab activity in recent years. Multi-story brick buildings being converted to mixed-use or residential generate enormous volumes of masonry debris. High-volume chute setups — three or more sections reaching four to six stories — are the standard approach on these jobs. Our trash chute for demolition contractors guide covers the specific techniques for high-volume masonry loads.
Flat-Roof Commercial Tear-Offs
Industrial and commercial flat roofs in Milwaukee’s near-north side and Menomonee Valley corridors require their own setup logic. The chute anchor goes at the roof perimeter rather than a ridge, and dumpster placement is typically tighter due to loading docks and adjacent structures. Getting the angle right is critical for gravel and membrane debris.
Choosing the Right Chute Length for Milwaukee Buildings
Getting chute length right upfront prevents mid-job fixes that waste time and expose your crew to unnecessary risk. Milwaukee’s building heights follow predictable patterns once you know the housing stock.
Story-by-Story Height Reference
- Single-story bungalow eave: 8–10 ft — a single 10-ft section often reaches
- Story-and-a-half ridge: 16–20 ft — two sections with a 5-ft overlap allowance
- Two-flat (2nd floor window opening): 14–18 ft — one to two sections depending on ground clearance
- Three-story four-square or two-flat + basement: 24–30 ft — three sections minimum
- Commercial/industrial (4–6 stories): 40–60 ft — four to six sections; account for dumpster height
Always measure from the loading point (window sill, roof edge, or scaffold platform) to the top of the open dumpster — not to the ground. Subtract that number from your total drop height to determine how much free section you have. For a full breakdown of the 10-, 25-, and 50-ft system options, the choosing the right chute length guide walks through the math in detail.
Accounting for Milwaukee’s Alley-Access Sites
A significant number of Milwaukee residential properties — especially in Bay View, Riverwest, and Brewers Hill — have usable rear-alley access. Alley setups often change the vertical drop calculation because the dumpster sits lower than the front-driveway grade. Add 18–24 inches to your section count when working a rear-alley drop where the alley surface is lower than the building’s first-floor level.
Setup Guide: Roofing Tear-Offs
Roofing tear-offs are the most common chute use case in Milwaukee and the one where a solid setup routine pays back the fastest.
Step-by-Step Roofing Chute Setup
- Position the dumpster first. Align it parallel to the fascia directly below your planned discharge point. The chute opening should clear the dumpster wall by no more than 12 inches — too much overhang and shingles bounce out.
- Set the top collar at the eave or ridge cap. Use the hook bracket supplied with the system; loop it over the fascia or ridge and tighten the strap before hanging any sections below.
- Add sections from the top down. Each section slides into the one above it with a minimum 6-inch overlap — never less. On a Milwaukee house with a steep 8:12 pitch, sections tend to bow outward under a debris load; make sure the overlap is tight before the first shingles go down.
- Confirm the discharge angle. Walk around to the dumpster side and look up the chute. You want a straight, unobstructed path. If a section is twisted, correct it now — not after 20 squares of shingles have already blown the alignment.
- Brief the crew. One person feeds the top; no one stands under the chute during active loading. Post a spotter at the dumpster when shingle volume is high.
For more on debris chute weight capacity, especially when running thick old-growth wood shingles or slate, review that guide before your next heavy tear-off.
Setup Guide: Window-Drop and Interior Remodels
Window-drop setups are the go-to method for Milwaukee two-flat gut remodels and interior demo work where workers are moving plaster, drywall, and flooring down from upper floors. A good window-drop chute setup eliminates almost all stair-carry labor on upper-floor demolition.
Window Opening Prep
- Remove the sash if possible — it creates a wider, cleaner loading port and prevents frame damage from repeated heavy impact.
- On Milwaukee’s old Cream City brick buildings, check that the window opening’s brick surround is structurally solid before mounting the collar bracket. Spalling or cracked mortar needs a temporary wood ledger to distribute the load.
- Protect the interior floor directly in front of the window with a rubber mat or scrap plywood — crew members will be dumping debris continuously and foot-traffic wear adds up quickly on a long demo job.
Collar Mounting on a Brick Facade
Brick openings in Milwaukee bungalows and two-flats are typically 28–36 inches wide — wide enough for EasyChute’s standard collar with clearance to spare. Set the collar’s horizontal bar across the interior of the opening and clamp it tight. For brick exteriors with no wood frame to grip, use the strap-tension method: run the strap around the collar and through the room to an anchor point (a joist, a wall stud, a doorframe) on the opposite wall. This eliminates any reliance on the masonry itself to hold the collar in place.
For a complete walkthrough of every attachment scenario, see the full debris chute for window opening guide.
Ground-Level Dumpster Alignment for Window Drops
Position the dumpster so the chute’s discharge end sits approximately 12 inches inside the dumpster’s long wall. On Milwaukee streets, that usually means pulling the dumpster as close to the building foundation as your permit allows. If the sidewalk setback forces the dumpster further from the building than ideal, add an extra chute section and angle the lower section inward — you have roughly 15 degrees of angular flexibility before sections start to bind.
Setup Guide: Full Demo and High-Volume Tear-Outs
Full interior demo and structural tear-out projects — common in Milwaukee’s older commercial inventory and in larger residential rehabs — create debris volumes and material weights that require a more robust chute plan.
Multi-Section Commercial Setup
On a four- or five-story Milwaukee commercial building, you’re typically running four to six sections of chute hanging from a scaffold tie-off point or from a temporary bracket bolted to the structure at the roof parapet. This is where the scaffold debris chute setup methodology matters most. Key points:
- Anchor every third section independently to the building face — long unsupported runs develop dangerous pendulum sway under heavy masonry loads.
- Use intermediate tie-off straps at each floor level wherever possible.
- On sites where scaffold isn’t present, use a window-bracket at each floor to create the same effect.
- Keep the chute’s vertical run as close to 90 degrees as possible. Excessive outward angle causes debris to jam at joints.
Managing Heavy Masonry Debris
Milwaukee’s old brick and plaster buildings produce particularly heavy demolition loads. Brick chunks, plaster ceilings, and concrete block add up to weights that can stress chute joints if fed in large batches. Train your crew to feed the chute in controlled portions — no more than a wheelbarrow-sized load at one time. This keeps the flow steady, prevents joint separation, and protects the dumpster from impact damage. Review our debris chute weight capacity guide before any masonry-heavy job. The Detroit large tear-out debris removal guide also covers high-volume workflows on similar Midwest building stock.
Midwest Weather and Seasonal Chute Considerations
Milwaukee’s climate is not gentle. Winter temperatures drop well below freezing, spring brings freeze-thaw cycles, and summer adds humidity and occasional severe storms. Each season creates specific chute challenges Milwaukee contractors need to plan around.
Winter and Early Spring (November–April)
- Frozen sections: Polyethylene chute sections stored in a cold truck or trailer overnight can stiffen. Give them 20–30 minutes to warm before trying to connect sections — forcing cold, stiff sections risks cracking the collar lip.
- Ice at the discharge end: Wet debris freezing at the chute’s base can create a plug. Check the discharge end at the start of each shift if overnight temps dropped below 25°F.
- Frozen dumpster lips: Ice accumulation on the dumpster rim can deflect debris. Keep a rubber mallet on site to break ice buildup before loading begins.
- Wind: Milwaukee’s lake-effect wind can be brutal. Use all available tie-off straps during winter setup; in winds above 25 mph, consider pausing loading until gusts settle.
Summer (June–September)
Summer brings fewer structural challenges but introduces dust and storm-storm concerns. Hot, dry demo debris — especially old drywall compound and plaster — produces significant silica-laden dust when it impacts the bottom of the chute. Keep a tarp over the dumpster opening when the crew takes breaks to prevent rain-soaking of debris between loads. For reference on how nearby Midwest contractors handle similar summer conditions, see the debris chute Minneapolis guide, which covers the same Lake Superior regional climate band.
Fall (October–November)
Fall is Milwaukee’s busiest roofing season — contractors are racing to finish tear-offs before freeze-up. Wet leaves on roofs and scaffolding create slip hazards. Make sure your chute anchor point is not relying on wet fascia boards for grip; supplement with strap anchors around the rafter tail whenever the roof surface or surrounds are wet.
Dumpster Placement on Milwaukee Streets and Driveways
Milwaukee’s residential neighborhoods present several dumpster placement challenges that directly affect chute geometry and job site safety.
Narrow Driveways in Bay View, Riverwest, and Washington Heights
Older Milwaukee neighborhoods were built before the car was king. Driveways can be as narrow as 9 feet — barely enough for a standard 10-yard container. On narrow driveway sites, consider a 10-yard slim-profile container rather than a standard 10-yard roll-off. Position the chute’s discharge to feed the long axis of the container, which gives you the maximum target area to hit.
Street-Level Permits and Placement
When the driveway isn’t an option — alley-access lots or properties where the building sits at the sidewalk line — you’ll need a street placement permit from the City of Milwaukee. See the Local Notes section below for the permit link. Street placements in Milwaukee require reflective barricades around the container and compliance with DPW setback requirements from fire hydrants and intersections.
Rear-Alley Setups
Many Milwaukee properties — especially in Riverwest, Brewer’s Hill, and Clarke Square — have rear alley access that’s actually preferable to front-street placement. The alley keeps the dumpster off the public street (no permit required in most cases) and often gives you a longer dumpster that sits directly under the building’s rear window openings. Check alley clearance for the delivery truck before booking — some Milwaukee alleys narrow to under 10 feet and won’t accommodate standard roll-off equipment.
Safety and OSHA Compliance on Milwaukee Sites
Running a debris chute is not inherently dangerous, but it does create specific hazards that Milwaukee contractors must address before work begins. Following OSHA Construction Industry safety standards is a non-negotiable starting point.
Exclusion Zone Under the Chute
Establish a clearly marked exclusion zone around the dumpster during active loading. No workers, pedestrians, or vehicles should be within 10 feet of the dumpster’s open end while material is flowing. Use traffic cones and caution tape to mark the zone; on street-level placements, use barricades. This is the most commonly skipped step on residential Milwaukee jobs — and the one most likely to result in an injury or OSHA citation.
Personal Protective Equipment
- Hard hats: Required for any worker within the exclusion zone perimeter or below any elevated work platform.
- Safety glasses or goggles: Mandatory for workers loading the chute at the top — debris rebound from the chute walls creates projectile hazards.
- Gloves: Cut-resistant gloves are recommended when handling broken material (broken lath, sharp metal, glass).
- Dust mask or respirator: Milwaukee’s old plaster and older drywall can contain lead and silica. For any pre-1978 building, treat interior demo debris as lead-positive until tested otherwise.
Heavy lifting and repetitive loading motions are a consistent injury driver in debris removal work. OSHA ergonomics guidelines for safe lifting apply directly to workers manually loading chute intake points. Use team lifts for anything over 50 pounds and position the loading height at waist level where possible.
Chute Inspection Routine
Before every shift, take 60 seconds to run through this quick inspection:
- Check the top anchor — is the bracket seated fully and the strap tight?
- Walk the full length and confirm all section overlaps are at least 6 inches.
- Look at the discharge end — is it clearing the dumpster wall cleanly?
- Confirm no sections have separated or rotated overnight (especially after a windy night).
This is the kind of pre-shift check that takes 60 seconds when nothing is wrong and saves hours — or a worker’s health — when something is. For a complete system overview, the debris chute system for contractors guide covers setup, inspection, and daily workflow in full.
Common Mistakes Milwaukee Contractors Make With Debris Chutes
Most chute problems on Milwaukee jobsites fall into a small number of repeatable patterns. Here’s what to watch for — and how to avoid each one.
Mistake 1: Under-Sizing the Chute for the Building
Contractors who rent or borrow chute sections sometimes show up with a 15-foot run for a 25-foot drop. The result: the discharge end doesn’t reach the dumpster, debris free-falls the last 10 feet, and the dumpster walks away from the building under repeated impact. Always add a 10-percent length buffer to your calculated drop distance. It’s far cheaper to have one extra section on site than to reset the dumpster three times a day.
Mistake 2: Skipping the Exclusion Zone
On busy Milwaukee residential streets, homeowners, neighbors, and pedestrians walk past active job sites constantly. Failing to establish and enforce the exclusion zone is the fastest way to generate a complaint, a stop-work order, or a OSHA inspection. Spend 10 minutes at job start setting up the zone properly — it’s visible proof to inspectors and neighbors that you’re running a professional operation.
Mistake 3: Leaving the Chute Up Overnight Unsecured
Milwaukee gets overnight wind events, especially in fall and winter. A chute left rigged but with no weight in it will swing, bang against the building, and potentially disengage from its anchor. Either drop the lower sections into the dumpster before leaving for the day, or remove them entirely and stack them in the truck.
Mistake 4: Loading Mixed Heavy and Light Debris Together
Feeding large masonry chunks and light drywall scraps into the chute simultaneously creates unpredictable flow. The heavy material accelerates and can catch light material, causing section-busting impact loads at the joints. Sort loads by weight class: run the heavy masonry first, then follow with lighter mixed debris.
Mistake 5: Not Using a Chute Bag for Smaller Debris
Fine debris — broken plaster dust, small tile fragments, gravel granules — tends to escape through chute joints or blow out the discharge end. Using a chute bag for dumpster containment at the discharge point keeps fine material inside the bin and dramatically reduces ground cleanup time at end of day.
Local Notes: Milwaukee Permits, Waste Rules, and Resources
Milwaukee has specific requirements that affect how and where you can operate debris removal equipment on public or semi-public property. Here’s what contractors need to know before the job starts.
Right-of-Way Permits for Street Dumpster Placement
If your dumpster must sit in the street or partially on the sidewalk, you need a right-of-way permit from the City of Milwaukee Department of Public Works. The DPW manages these permits and sets requirements for barricade placement, reflective marking, and fire-hydrant clearance distances. Review the current permit requirements and fee schedule directly at the City of Milwaukee Department of Public Works website before booking your container drop.
Construction Waste Disposal Requirements
Milwaukee contractors are subject to Wisconsin DNR and EPA rules on construction and demolition debris disposal. Mixed C&D debris — shingles, drywall, wood, concrete — has specific routing requirements for licensed facilities. Review the EPA construction and demolition debris guidelines for a federal-level overview, and confirm your hauler is routing to a Wisconsin-licensed C&D landfill or recycling facility.
Lead and Asbestos Considerations in Pre-1978 Milwaukee Homes
Milwaukee has an extremely high proportion of pre-1978 housing — the city’s historic preservation of its bungalow and two-flat stock means the majority of gut remodels involve materials that require special handling under Wisconsin DHSS rules. Before starting any interior demo job, confirm your hazardous materials abatement status. This affects not just chute use but how debris is bagged, contained, and transported to disposal facilities.
Frequently Asked Questions
How many chute sections do I need for a typical Milwaukee two-flat?
A standard Milwaukee two-flat with a second-floor window loading point sits approximately 16–20 feet above the dumpster lid. You’ll typically need two standard chute sections, plus a collar bracket for the window opening. If the dumpster must be placed further from the building than usual due to street permit requirements, add a third section and adjust the angle. Always measure the actual drop before ordering — don’t rely on estimates for a building you haven’t visited.
Do I need a permit to use a debris chute in Milwaukee?
Using a debris chute on private property — a driveway or rear alley — generally does not require a specific chute permit in Milwaukee. However, if the associated dumpster is in the public right-of-way (street or sidewalk), you need a right-of-way permit from the City of Milwaukee Department of Public Works. Check with your dumpster rental company — many can pull this permit on your behalf and include it in the rental fee.
Can I use a debris chute on Milwaukee’s older Cream City brick buildings without damaging the facade?
Yes, with the right attachment method. For brick facades without a wood window frame, use the strap-tension mounting method: run the collar strap through the window opening to an interior anchor point rather than relying on the masonry to bear the load. This protects the brick surround entirely. Avoid collar brackets that clamp directly onto brick — historic masonry in Milwaukee can spall under point-load pressure, especially on older buildings with softer lime mortar.
What’s the best chute setup for a Milwaukee flat-roof commercial tear-off?
For commercial flat roofs, anchor the top collar at the roof parapet using a heavy-duty bracket bolted to the parapet’s blocking or through the cap flashing into the roof structure. Set the chute to drop along the building’s exterior wall rather than free-hanging. Intermediate tie-offs at each floor level keep the run stable under the lateral forces of flowing gravel or membrane debris. On buildings taller than three stories, plan for a minimum of one intermediate anchor per story.
How do I prevent debris dust from creating problems on Milwaukee residential streets?
Dust from interior demo debris is the most common complaint trigger on Milwaukee residential jobsites. Use a chute bag at the discharge end to contain fine particles, keep the dumpster covered with a tarp between active loading sessions, and brief your crew to avoid over-loading the chute (partially filled loads create less dust splash at the bottom). For lead-risk properties, wet the debris lightly before loading — this dramatically reduces airborne particulate without creating weight problems in the chute.
Is it worth buying a chute system or renting one for Milwaukee work?
If you’re running more than four or five Milwaukee projects per year that require a chute, ownership typically pays back within a single season. Rental costs for multi-day chute rentals add up quickly, and rental equipment often arrives with worn sections that create alignment headaches. Ownership gives you the ability to show up to any job with a clean, properly sized system. Our debris chute rental vs buy guide breaks down the math in detail using real contractor job frequencies — the Milwaukee numbers aren’t far from the Philadelphia baseline used in that analysis.
What materials can I run through a debris chute on a Milwaukee remodel?
EasyChute’s modular chute sections handle virtually all standard construction and demolition debris: asphalt shingles, wood framing, plaster, drywall, ceramic tile, light concrete rubble, and mixed renovation debris. For very heavy masonry — full bricks or large concrete block — use the controlled-batch loading method described in our how to install a trash chute guide to prevent section joint stress. Never run hazardous materials (asbestos-containing material, lead paint chips in uncontained form) through an open chute — these require sealed-bag disposal per Wisconsin DNR rules.
Get a Debris Chute Delivered to Your Milwaukee Jobsite
EasyChute ships modular debris chute systems directly to contractors across Milwaukee and the surrounding metro — Wauwatosa, West Allis, Shorewood, Cudahy, South Milwaukee, and beyond. Whether you’re pulling shingles off a Bay View bungalow, gutting a Walker’s Point commercial space, or running a full structural demo in the Menomonee Valley, there’s a chute configuration that fits your job.
Our systems are designed to set up in under 30 minutes, work on both window openings and roofline anchor points, and handle the kinds of heavy, mixed-material loads Milwaukee’s older building stock generates. No proprietary tools required. No specialized training needed. Just a well-engineered system that works the way contractors actually work.
- Order online and choose the section count for your drop height
- Delivery available throughout the Milwaukee metro area
- Phone support: 855-902-4883 — talk to someone who can help you spec the right setup for your specific job
Ready to run a cleaner, faster, safer Milwaukee project? Browse the full EasyChute system at easychute.com or call us directly to get your order in before the next job starts.